Ematic EGM003 User Manual
Hide thumbs
Also See for EGM003:
- User manual (30 pages) ,
- User manual (27 pages) ,
- Quick start manual (2 pages)
Advertisement
Quick Links
Download this manual
See also:
User Manual
User manual
Precautions
This manual contains important information regarding safety measures and proper use
of the product.
To avoid accident, please be sure to read the manual carefully prior to use the product.
Keep the product away from high temperature, moisture or dust.
Do not expose the product to high temperature, especially in a window‐closed vehicle
during summer.
Avoid drop or strong collision of the product or heavy vibration of the TFT screen, as it
may cause damage or abnormal display of the TFT screen.
Please choose appropriate volume. It is not recommended to use earphones in high
volume. If ringing occurs in the ear, please lower the volume or stop using the device.
Please charge under the following circumstances:
A. The battery icon indicates no power.
B. The system automatically shuts down, and immediately shuts down again after
restart.
C. The operating button does not respond.
D. The red icon is displayed in the lower right corner of the product.
Note: This product cannot be used with any unauthorized charger; otherwise it may
burn the product, which is not covered by warranty. For any additional original charger,
please contact customer service.
The Li‐ion battery cells in the battery pack are not user serviceable.
When battery level is low, Recommendation: use the A/C wall adapter supplied with the
product.
Please operate the product properly following the user manual's guidelines.
Do not disassemble the product. Do not use alcohol, thinner or benzene to clean the
surface of the product.
Do not operate device where the use of electronic equipment is prohibited, such as on
airplanes.
To avoid any accidents, please do not use the product when driving or walking on the
street.
USB connection is for data transfer only.
*As the product may undergo modifications and improvements, product specifications
and design are subject to change without prior notice.
NOTE: Pictures in this manual are for reference only.
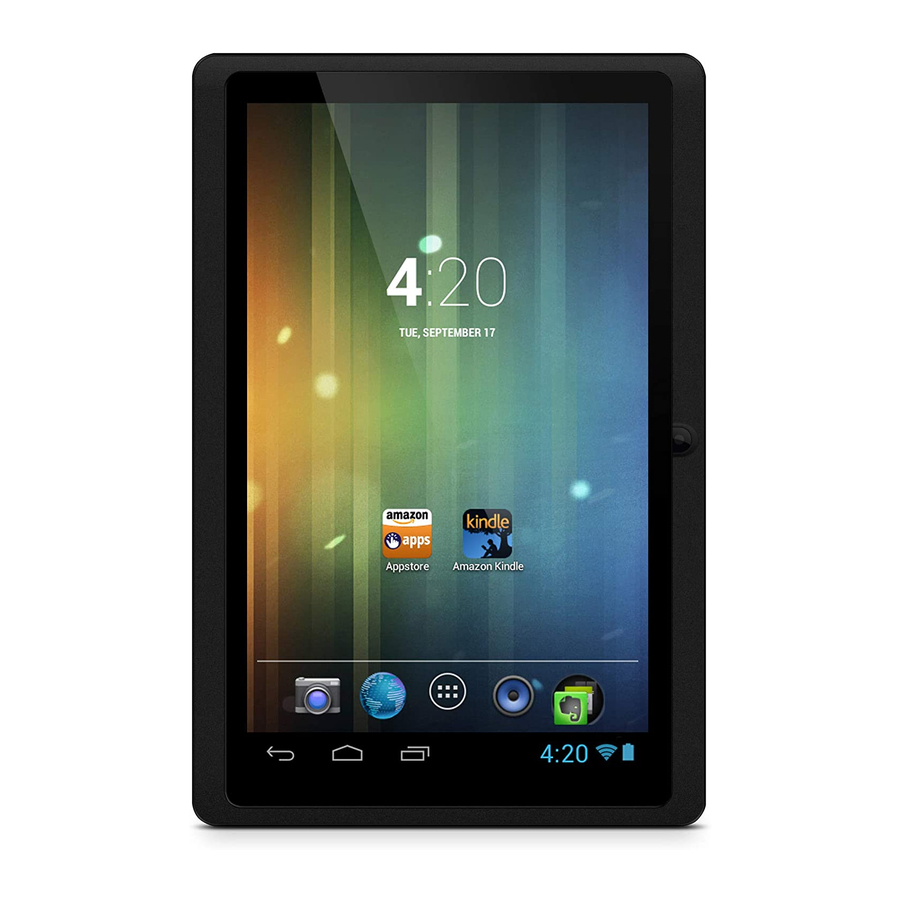
1. The Home Screen
1.1 Home Screen
After turning on the device, the locked home screen is displayed.
1
Advertisement

Related Manuals for Ematic EGM003


Summary of Contents for Ematic EGM003
- Page 1 User manual Precautions This manual contains important information regarding safety measures and proper use of the product. To avoid accident, please be sure to read the manual carefully prior to use the product. Keep the product away from high temperature, moisture or dust. Do not expose the product to high temperature, especially in a window‐closed vehicle during summer. Avoid drop or strong collision of the product or heavy vibration of the TFT screen, as it may cause damage or abnormal display of the TFT screen. Please choose appropriate volume. It is not recommended to use earphones in high volume. If ringing occurs in the ear, please lower the volume or stop using the device. Please charge under the following circumstances: A. The battery icon indicates no power. B. The system automatically shuts down, and immediately shuts down again after restart. C. The operating button does not respond. D. The red icon is displayed in the lower right corner of the product. Note: This product cannot be used with any unauthorized charger; otherwise it may burn the product, which is not covered by warranty. For any additional original charger, please contact customer service. The Li‐ion battery cells in the battery pack are not user serviceable. When battery level is low, Recommendation: use the A/C wall adapter supplied with the product. Please operate the product properly following the user manual’s guidelines. Do not disassemble the product. Do not use alcohol, thinner or benzene to clean the surface of the product. Do not operate device where the use of electronic equipment is prohibited, such as on airplanes. To avoid any accidents, please do not use the product when driving or walking on the street. USB connection is for data transfer only. *As the product may undergo modifications and improvements, product specifications and design are subject to change without prior notice. NOTE: Pictures in this manual are for reference only. 1. The Home Screen 1.1 Home Screen After turning on the device, the locked home screen is displayed. ...
- Page 2 The screen is locked by default. To unlock the screen, drag towards or drag towards to directly enter the camera application. You can manage application icons from the home screen. Add application shortcuts: Long press an application icon from the application menu and drag the icon to the home screen to add as shortcut. • Remove application shortcuts: Long press an application icon in the home screen as the top of the screen displays an “X”. Drag the application icon towards the “X” until it turns red, and then release the hold to remove the application shortcut. 1.2 Wallpapers Long press the touch screen and the Wallpaper option will appear. • Gallery: Choose a picture saved in your photo gallery or a picture taken by the device camera to use as the background of the home screen. • Live Wallpapers: Choose a moving graphic from Live Wallpapers to use as the background of the home screen. • Wallpapers: Choose a picture from the default system pictures to use as the background of the home screen. 1.3 Status Bar The status bar is located at the bottom the screen. The icons on the left side are: • Back: Tap to return to previous screen. • Home: Tap to return to home screen. ...
- Page 3 • History: Tap to view the most‐recently accessed applications. The icons on the right side display Wi‐Fi signal, Wi‐Fi connection status, battery power/battery charging status, current time, USB and SD card connection status. Tap the icons to view the date, and time or another information. 1.4 Using the Touch Screen The tablet is equipped with a 7” touch screen. The following describes the main touch screen area, and tips on how to properly use it. Whichever interface you are in, you can return to the home screen directly by touching the Home icon. You can also touch the History icon to view recently accessed applications. In different applications, you can return to the upper layer or previous interface by touching the Return icon. In different applications, you can touch the advanced icon to show relevant options available in the application. 1.5 Application Menu Tap the Application icon to view the application menu screen. In the application menu interface, simply touch an application icon to open the application. In applications with browsing capabilities, such as Explorer, Music, etc., you can drag the scroll bar up and down or flick the screen to scroll the file list. In Browser or PDF reader, touch and drag the page to scroll up/down. 2. Basic Settings Personalize applications, set system date and time, configure network connection, and ...
- Page 4 Tap the notification icons on the right side of the status bar, and then tap . Tap an item on the left panel menu to display more setting options on the right panel. 2.1 Wi-Fi and Network The Wi‐Fi menu lets you manage Wi‐Fi settings and connect to a wireless network. Tap the Wi‐Fi switch button to turn Wi‐Fi on or off. The Wi‐Fi icon displaying indicates Wi‐Fi is turned off. The Wi‐Fi icon displaying indicates Wi‐Fi is turned on. Connect to an Access Point 1. Turn on Wi‐Fi. The device will search for available networks within range and display the searched Access Point (AP) names on the right panel. 2. Tap the access point name that you wish to connect to. If the selected access point is protected by a password, the device will prompt for the password. (Note: Password entry is only required when connecting to the AP for the first time.) 3. When prompted, enter the password to connect to the AP. ...
- Page 5 4. Tap Connect. Other Wi-Fi Options Tap the Advanced icon on the upper‐right corner of the screen to display advanced options and other network information. When the Network notification option is checked, the system automatically scans and displays available networks within range. If it is unchecked, you must tap SCAN to manually scan for nearby networks and tap ADD NETWORK to manually do so. *Note: The tablet recognizes Wi‐Fi networks that it has connected to before. Once Wi‐Fi is turned on and a known connection is detected, the device automatically connects to that network. 2.2 Device 2.2.1 Sound Set the tone and sound notifications. • Volumes: Includes volume adjustments for Music, Video, Games and other medium, notifications and alarm clock. Drag the slider bar to adjust the volume. • Default notification: Set the default notification ringtone. • Touch sounds: Activate sound when you make selection on the screen. ...
- Page 6 • Screen lock sound: Activate sound when you unlock or lock the screen. 2.2.2 Display • Brightness: Adjust the brightness of the screen by dragging the slider bar left or right, then click OK. You can also select automatic adjustment. • Wallpaper: Change the background of the home screen by three (3) options. Refer back to section 1.2 Wallpapers for details. • Auto-rotate screen: When you rotate the tablet, the screen changes direction automatically. • Sleep: Adjust idle time before the screen locks. • Font size: Set the size of the system font with four options: Small, Normal, Large, and Huge. 2.3 Personal 2.3.1 Accounts and Sync When the device accesses applications, such as the calendar, it needs to log in with an ID to sync data on your account with data on your tablet. • Account Synchronization: Touch the Account Sync switch to enable or disable ...
-
Page 7: Credential Storage
account synchronization. • ADD ACCOUNT: Touch this option to add a new E‐mail account, if necessary. 2.3.2 Location Services Set your location and allow interactive options with Google. • Google’s location service: When checked, applications use data from Wi‐Fi or mobile networks to determine your approximate location. 2.3.3 Security The Security menu allows you to set device security options. • Screen lock: Select the method of unlocking the screen. • Owner info: Display the owner information on a locked screen. • Encrypt tablet: Encrypt the device with a PIN or password. • Make passwords visible: Display password characters as you type them on screen. • Device administrators: View or deactivate device administrators. • Unknown sources: Run and install application programs not from Google market. CREDENTIAL STORAGE Ascertain the legality and credibility of the program with some credentials CA. • Trusted credentials: Store trusted credentials used by the system or the user. ... -
Page 8: Keyboard & Input Methods
• Install from SD card: Import trusted credentials from the SD card. • Clear credentials: Clear all credentials recorded by the system, generally can’t be selected by default. 2.3.4 Language and Input Method This menu allows you to choose the system display language and input method. • Language: Choose the system language, with 60 options. • Spelling correction: Based on the selected language, the system assists to correct spelling errors. • Personal dictionary: Customized words defined by the user, null by default. KEYBOARD & INPUT METHODS Choose to set the system input method. • Default: Select the default input method. • Android keyboard: Tap the Settings icon to configure the Android keyboard settings. • Google speech-to-text: Automatic 2.3.5 Backup and Reset PERSONAL DATA Factory data reset: Clear all data in the tablet PC and revert all settings to factory default. 2.4 System 2.4.1 Date and Time Set the date, time, time zone and format. ... - Page 9 • Automatic date & time: Use the time on the network; requires Internet access and system reboot to take effect. • Set date: Access date setting interface and set the date. • Set time: Access time setting interfaces and set the time. • Select time zone: Access time zone setting interface and set time zone. • Use 24-hour format: Set display format of the time. • Select date format: Display the date by selecting different date format. 2.4.2 Accessibility SYSTEM • Large text: Select the size of the system display font. • Auto-rotate screen: Adjust the screen direction according to the G‐sensor. • Speak passwords: Choose to say passwords verbally instead of typing them. • Touch & hold delay: Set the response speed of the touch screen. • Install web scripts: Choose whether or not to install the script from Google for viewing the web conveniently. ...
- Page 10 2.4.3 About the Tablet • System updates: Detect system version and upgrade. • Status: Current status of tablet PC, including battery power, network, uptime, etc. • Legal information: Code development license and Google legal information. • Model number: Device model number. • Android version: Android version number. • Kernel version: Linux core version number. • Build number: The customized version number, used to distinguish the system software.
- Page 11 Conditions of Guarantee 1. For the guarantee to be carried out, all products must be delivered to IJOY perfectly packed, preferably in its own original packing, with all accessories, user manuals and drivers that the packaging would originally contain. Otherwise, IJOY will not be held responsible for damages that might occur during transportation.
- Page 12 FCC Information and Copyright This equipment has been tested and found to comply with the limits for a Class B digital device, pursuant to part 15 of the FCC Rules. These limits are designed to provide reasonable protection against harmful interference in a residential installation.
Need help?
Do you have a question about the EGM003 and is the answer not in the manual?
Questions and answers