Table of Contents
Advertisement
INSTALLATION & OPERATION MANUAL
®
Bar-B-Q Boss
Pressure Smoker
Models BC71 and BC73
Be sure ALL installers read, understand, and have access to this manual at all times.
Smokaroma® is a registered trademark.
Broaster Company
2855 Cranston Road, Beloit, WI 53511-3991
608/365-0193 broaster.com
Design Certified By:
© 2017 Broaster Company
Manual #17896 6/17
UL, CUL & NSF
Printed In U.S.A.
Advertisement
Table of Contents

Related Manuals for Smokaroma BC71

Summary of Contents for Smokaroma BC71
- Page 1 INSTALLATION & OPERATION MANUAL ® Bar-B-Q Boss Pressure Smoker Models BC71 and BC73 Be sure ALL installers read, understand, and have access to this manual at all times. Smokaroma® is a registered trademark. Broaster Company 2855 Cranston Road, Beloit, WI 53511-3991 608/365-0193 broaster.com...
- Page 3 Indicates a potentially hazardous situation which, if not avoided, could result in minor injury, property damage or both. All adjustments and repairs shall be made Rags or paper containing by an authorized Smokaroma representa- cooking oil can catch fire tive. if exposed to heat. Laundering will not remove the oil.
-
Page 5: Table Of Contents
TABLE OF CONTENTS 1. - LIMITED WARRANTY ................1 - 1 2. - OWNER’S RESPONSIBILITY ..............2 - 1 3. - INSTALLATION LOCATION ....................... 3 - 1 VENTILATION ......................3 - 1 4. - GETTING TO KNOW YOUR BBQ-BOSS PRESSURE SMOKER ... 4 - 1 5. -
Page 7: Limited Warranty
1 - LIMITED WARRANTY Parts and Labor Subject to the terms and conditions of this warranty, Broaster Company (Company) warrants that all equipment and parts manufactured or sold by the Company and purchased new from an authorized Company distributor are free from defects in material and workmanship for a period of one year from the date of installation, or two years from the date of manufacture, if installation is made by a qualified installer under supervision by an authorized distributor in accordance with applicable laws and regulations. -
Page 9: Owners Responsibility
2 - OWNERS RESPONSIBILITY It is the owner’s responsibility to: If you need replacement warning signs or manuals, contact an authorized Smo- karoma representative or Broaster Com- ® • Ensure the Bar-B-Q Boss is properly pany at 608-365-0193. maintained. The Customer Service Department at •... -
Page 11: Installation
3 - INSTALLATION LOCATION: VENTILATION: For convenience and speed, location of the Check with state and local building codes ® for ventilation requirements for this type of Bar-B-Q Boss Pressure Smoker should be product. given careful consideration. If possible, locate the unit so the flow of cooked prod- uct is in a straight line from storage, in and out of the unit and to the customer. -
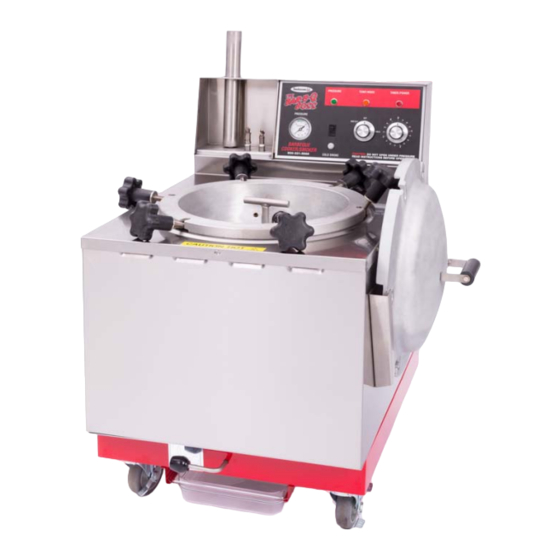
Page 13: Getting To Know Your Bbq-Boss Pressure Smoker
4 - GETTING TO KNOW YOUR ® Bar-B-Q Boss Pressure Smoker broaster.com Manual #17896 6/17... - Page 14 COVER CLAMP: These clamps hold the ® Bar-B-Q Boss cover against the cooking well so pressure EJECTOR VALVE: When closed it allows can build up in the cooking well. pressure to build in the cooking well. Open exhausts pressure from cooking well. COVER: Covers the cooking well during the cooking cycle.
-
Page 15: Electrical Connections
5 - ELECTRICAL CONNECTIONS ELECTRICAL CHARACTERISTICS SUGGESTED 1 PHASE WIRING CAPAC- ITY TABLE: These models are available for either 208 or 240 applied voltage, 60Hz, 1 phase or 3 phase electrical connection in the USA and Volts Amps Wire Breaker several voltages for export applications. - Page 16 1 phase wiring diagram. broaster.com Manual #17896 6/17...
- Page 17 3 phase wiring diagram. broaster.com Manual #17896 6/17...
-
Page 19: Control Panel
6 - CONTROL PANEL PRESSURE GAUGE: Indicates the pres- THERMOSTAT: Puts the smoker in either sure in the Cooking Well. BAR-B-Q or HOLD mode. GREEN LIGHT: Illuminates when the COLD MODE SWITCH: Puts the smoker THERMOSTAT and TIMER are set and the into Cold Smoke Mode. -
Page 21: Operation
7 - OPERATION All food should be com- LOADING MEAT RACKS: pletely thawed before cooking, if frozen. Always cook from a Push the slabs onto the top spit and then refrigerated temperature. pierce the slab with a spit on the spit adapter at a lower point of the slab. -
Page 22: Cooking Thick Cuts Of Meat
COOKER OPERATION: Load food basket. The food basket has eight shelves which are adjustable. HOT SMOKE: 1. Close drain valve. 2. Place wood shavings or chips into charring cup. 3. Place the charring cup into the small chamber inside of cooking well. The smoke can be varied by increasing or decreasing the amount of wood placed... - Page 23 6. Align cover so that the L shaped slots 12. Set time on timer to that indicated in are at the #1 and #2 position as shown recipe depending on number of above. pounds being cooked. 7. Swing up “locking” knobs #1 and #2 When cooker is still warm into “L”...
-
Page 24: Cold Smoke
16. Lift cover and open by tilting the top of COLD SMOKE: the cover toward you to allow steam trapped by cover to be released away 1. Close drain valve. from you. 2. Place wood shavings or chips into 17. Remove food. charring cup. - Page 25 7. Swing up “locking” knobs #1 and #2 16. Lift cover and open by tilting the top of into “L” shaped slots. the cover toward you to allow steam trapped by cover to be released away 8. Rotate cover clockwise until it stops. from you.
-
Page 27: Cleaning
8 - CLEANING Always use cleaners ap- 4. BEFORE opening the drain valve make proved for use in food ar- sure the drain pan is in place under the eas. cooking well. DO NOT pour water into a 5. Clean the stainless steel parts of the unit hot cooking well. - Page 30 Broaster Company 2855 Cranston Road, Beloit, WI 53511-3991 608/365-0193 broaster.com...
Need help?
Do you have a question about the BC71 and is the answer not in the manual?
Questions and answers