
Related Manuals for Ezviz S1


Summary of Contents for Ezviz S1
- Page 1 Quick Start Guide Please read the quick start guide carefully and keep it properly.
- Page 5 Table of Contents Packing List Camera Appearance Operation EZVIZ SPORTS APP S1 Features S1 Remote Control Appearance Main Menu Operation S1 Connects to Display Appendix Modes Description Appendix Parameters Description Restricted substances or elements identification...
- Page 6 Packing List Open the packet and check whether the S1 sports camera (Hereinafter referred to as S1) and all accessoriess is in good condition. USB Data Cable Power Adaptor Quick Start Guide...
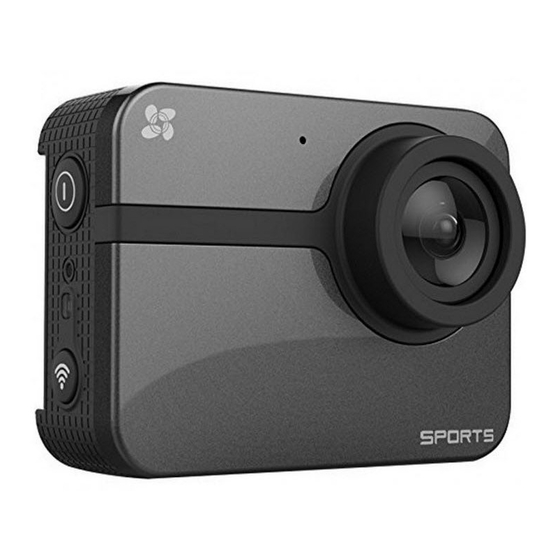
- Page 7 Appearance Description...
- Page 8 Shutter Start/Stop Shooting Blue steady: Standby; Camera Status Flicker: Camera is on. Indicator Audio Input Lens 152°Wide Angel Red light steady when charging. Power Camera Red light off when fully charged. Indicator USB Port USB data trasfer Micro SD Card Recommendation Micro SD Card Slot micro HDMI...
- Page 9 Operation Step 1 Insert micro SD card. Insert the micro SD card into the card slot. Micro SD Card Recommendation...
- Page 10 Connect the power cable. Use the USB cable to charge. When the power indicator goes off, the power is fully charged. You are recommended to fully charge the S1 when it is the first time you use it. Power on the camera.
- Page 11 Stop recording. Press record button, the camera stops recording, and the camera indicator is on You can choose to switch record, capture, burst snapshot with EZVIZ SPORTS App. If no operation with in 120 seconds, the S1 camera shuts down automatically.
- Page 12 Step 4 Connect to the display. You can connect to the S1 to the display to vide the video and picture. Connect the S1 camera and the display with a HDMI wire. Press the the power button and the record...
- Page 13 Download and install the EZVIZ App, you can get the live video, playback and control the camera. Download EZVIZ SPORTS App. Use the mobile phone to scan the QR code or search in the App Store to download the EZVIZ SPORTS App.
- Page 14 Turn on Wi-Fi of the S1 camera. Press the Wi-Fi button for 3 seconds. When the status indicator flickers in blue, the Wi-Fi is on. Connect the Wi-Fi of the camera and your phone. Turn on the Wi-Fi of your mobile phone.
- Page 15 What you can do with EZVIZ SPORTS Open EZVIZ SPORTS App. You can set the parameters as you requested. After configuration, you can use the App to record, take photo, share your video and so on. …...
- Page 17 S1 Remote Control User Manual...
- Page 18 Button parameters Press to power on; press and Power Button hold for 3 seconds to power off /OK Button When setting, press to enter. External power supply (you can use USB Port the USB cable and power adaptor of S1.)
- Page 19 OSD Description GUI Description 1280-60 38:35/59:42 S1 Current Mode :Photo :Recording :Delay capture :Burst The first number indicates the resolution of video or photo. TheC second is the capture speed and delay interval. Time already recorded and time left for recording/...
- Page 20 The battery life is 30 days. Start up the remote Press , the remote is on. EZVIZ logo, verision, battery, bluetooth and S1 status will be displayed. V1.2.2 BLUETOOTH REMOTE BLUETOOTH LOA DI NG .
- Page 21 Pair the S1 and the remote The remote and the S1 are paired by default. If tou use the remote to control another S1,or if you find the bluetooth icon flickers when starting up, you need to pair them before any operation.
- Page 22 After power on S1 for 10 seconds, the remote can find the S1 serial No.. 123456789 EXIT If the S1 is not found, it shows“S1 NOT FOUND”and then the remote shuts down automatically. SI NOT FOUND You can restart the S1 and the remote and...
- Page 23 Press to switch to your S1 and press to pair them. BLUETOOTH CONNECTED The remote enters the main menu, see the following figure. 1280-60 38:35/59:42...
- Page 24 Cancel remote and S1 pairing (Optional) You can also cancel the pairing. Enter the main menu and press for 5 seconds. BLE CLEARED NEED RESET Press to reset the remote to cancel the pairing.
- Page 25 Cancel remote and S1 pairing (Optional) Power on/off S1 Start up the remote, if the S1 is powered off, you can power it on with the remote. Enter the main menu and press POWER OFF S1 POWER ON S1 After the S1 is powered off, the remote shows “POWER ON S1”.
- Page 26 When the remote is powered off for 20 minutes the bluetooth of S1 stops broadcasting. If you power on the remote, you need to press the power button of S1 or restart the S1 manually to pair the S1 and remote.
- Page 27 S1 Connecting to Display You can connect the S1 to a display to view the photo Choose the setting you want to set, press and video stored. to enter the setting interface directly. Connect the S1 and display with HDMI wire, power on S1, and the remotes shows “HDMI”.
- Page 28 Record Mode 1280-60 38:35/59:42 In photo mode, press the button on the remote or button on S1 to start recording. And in the remote, recording time is displayed. 1280-60 00:01 In photo mode, press the button on the remote or button on S1 to stop recording.
- Page 29 Photo Mode 386 / 532 In photo mode, press the button on the remote or button on S1 to take a photo. After taking the photo, the number of photo captured and the remaining capacity for photo are changed.
- Page 30 Burst Mode Capture many photos in a certain time; E.g.5PCS/1S,10PCS/1S,10PCS/2S,30PCS/1S,30PCS/2S When you set it as 10PCS/2S, S1 captures 10 photos in 2 seconds. 10PCS/2S 386 / 532 In burst mode press the button on the remote or press the record button on S1 to start capture.
- Page 31 E.g., when set the delay time as 0.5SEC, press the record/capture button, the camera capture 1 photo after 5 seconds. 0.5SEC 386 / 532 Press the button on the remote or press the button on the S1 camera to start delay capture. Press the button again to stop capture.
- Page 32 UV Detector Mode The remote can detect the UV indicators outdoor to provide information for you to choose protection. UV Value UV Level UV Level Weak Weak No protection required. Medium Wear sunhat and sunglasses Strong Wear sunhat, sunglasses and sunblocking cream.
- Page 33 OFF S1”to power it off. Press button when the menu shows”POWER ON S1”to power it on. POWER OFF S1 Parameters Setting You can set the S1 parameters with the remote. E.g. video resolution, recording mode and so on.
- Page 34 Appendix Parameters Description Parameters Description 1920*1080 60fps 1920*1080 30fps 1280*720 120fps Video 1280*720 60fps Resolution 848*484 240fps In order: The camera indicator goes bsteady blue. And you cannot record or take photo when micro SD has no space. Looping Video and photo stored in Recording the micro SD card are overwitten Mode...
- Page 35 The longitude and latitude information can be viewed with subtitle for video and EXIF tool for photo) Enabling the G-sensor, S1 starts G-Sensor recording when senses acceleration and stops recording when motion stops for 20 seconds...
- Page 36 Parameters Description Set the remote into standby time. Remote Standby You can choose 120 seconds or cancel it. Version Info Check the information.
- Page 37 Restricted Substances and Elements Restricted substances and elements declaration Parts Medal Lens Curciut Board Plastic Display Power Controller Accesories units are within the limit stipulated by the of the SJ/T11363-2006 standard. × means the toxic and harmful substances in the assembly units exceed the limit stipulated by the SJ/T11363-2006 standard.
Need help?
Do you have a question about the S1 and is the answer not in the manual?
Questions and answers