Table of Contents
Advertisement
Quick Links
For certified companies
ROTEX
GCU compact
Installation and maintenance
instructions
Gas Combi Unit compact
0085 CO 0180
Types
GCU compact 315
GCU compact 324
GCU compact 515
GCU compact 524
GCU compact 533
GB
Edition
GCU compact 315 Biv
GCU compact 324 Biv
GCU compact 515 Biv
GCU compact 524 Biv
GCU compact 533 Biv
Advertisement
Table of Contents

Summary of Contents for Rotex GCU compact
- Page 1 Installation and maintenance instructions Gas Combi Unit compact 0085 CO 0180 Types GCU compact 315 GCU compact 315 Biv GCU compact 324 GCU compact 324 Biv GCU compact 515 GCU compact 515 Biv GCU compact 524 GCU compact 524 Biv...
-
Page 2: Table Of Contents
Changing the sensors ....35 3.1.1 GCU compact 315 / 324 .....7 6.3.1 Changing the flow temperature sensor / return 3.1.2... - Page 3 12.1 Basic data ......56 12.1.1 GCU compact 3xx ......56 12.1.2 GCU compact 5xx .
-
Page 4: Guarantee
Guarantee Guarantee 1.1 Warranty conditions The legal guarantee conditions fundamentally apply. Our war- ranty conditions beyond that can be found online on your sales representative's webpage. ROTEX GCU compact -... -
Page 5: Safety
Disregarding this warning can result in serious injury 2.4 Proper use or death. The ROTEX GCU compact may only be used for the heating of hot water heating systems. It may only be erected, connected CAUTION! and operated only according to the indications in this manual. -
Page 6: Instructions For Operating Safety
Before completing the mains connection, compare the mains The ROTEX GCU compact is factory set to the gas type indicated voltage, indicated on the type plate (230 V, 50 Hz) with the on the burner sticker and on the settings type plate and adjusted supply voltage. -
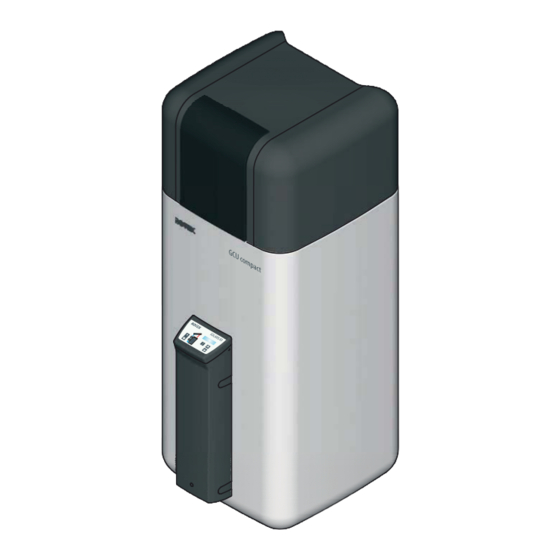
Page 7: Product Description
Structure and components GCU compact 315/324 - plan view (for legend designations, see tab. 3-1) Fig. 3-3 Structure and components GCU compact 315 / 324 - Schematic view (for legend designations, see tab. 3-1) Fig. 3-2 Structure and components GCU compact 315 / 324 - front view (for legend designations, see tab. -
Page 8: Gcu Compact 515 / 524 / 533
Product description 3.1.2 GCU compact 515 / 524 / 533 Fig. 3-4 Structure and components GCU compact 515 / 524 / 533 - plan view (for legend designations, see tab. 3-1) Fig. 3-6 Structure and components GCU compact 515 / 524 / 533 - Schematic view (for legend designations, see tab. -
Page 9: Brief Description
Tab. 3-1 Legend from fig. 3-1 to fig. 3-6 3.2 Brief description Die ROTEX Gas Combi Unit compact (GCU compact) is a fully The cold water which flows out when the hot water is removed is preassembled gas condenser unit., which is built into a water first routed to the storage tank at the very bottom of the heat ex- storage tank. - Page 10 If a ROTEX pressurised solar system or an external heating boiler is used as an external heat generator, this means that only one of the - listed in section 3.1 - GCU compact with BIV config- uration is permitted as the primary hot water storage unit.
-
Page 11: Set-Up And Installation
Technical Customer Service. operate properly and are dangerous for the health and safety of individuals. The ROTEX GCU compact must be installed only by heating engineers authorised and trained by gas or energy supply companies. 4.1 Dimensions and connection dimensions... -
Page 12: Connection Dimensions For The Heating And Hot Water Connections
When using a shorter exhaust pipe D8 L25 ( 15 50 79.0102) instead of the exhaust pipe D8 L50 contained in SET. 350, 470 200, 320 Tab. 4-1 Connection- and set-up dimensions GCU compact in mm 535, 365 , 285 500, 330 , 250 (in relation to fig. - Page 13 ROTEX recommends the installation of gravity brakes 16 50 70) or syphoning (lead the connection lines straight downward) of the potable water connections to avoid an increased loss through cooling. Fig. 4-5 Connection dimensions GCU compact 5xx (view from behind) ROTEX GCU compact -...
-
Page 14: Installation Versions
Rear ventilation opening (150 cm²) Fig. 4-7 Installation variants for the GCU compact The ROTEX GCU compact are designed basically for operation Using the ROTEX GCU compact in room-air inde- independent of the ambient air. They are fitted with a con- pendent operation with a concentric flue gas/air supply centric flue gas /air supply pipe DN 60/100. -
Page 15: Operation Independent Of Ambient Air
– Minimum height of the flue gas pipe: 2 m. Set-up version 3 The ROTEX GCU compact is not placed directly below the roof. The dual tube for the combustible air supply and flue gas pipe runs through the roof truss. -
Page 16: Operation Partially Independent Of Ambient Air
4.4.1 Selecting the installation site jacket pipe. The place of installation for the ROTEX GCU compact must meet For the flue gas routing to the outdoors, the shaft sizing and the the following minimum requirements. -
Page 17: Setting Up The Unit
(item G) and mount onto the available connections on the front and back of the hot water storage tank. Fig. 4-10 Minimum distances for the erection of the GCU compact (for dimensions, see tab. 4-1) Install the connection lines to allow for the removal of the sound insulation hood (fig. -
Page 18: Remove The Sound Insulation Hood
The tab. 4-2 shows the maximum permissible height of the flue Basically, for the flue gas system, you can use each flue gas pipe gas line to ensure that the ROTEX GCU compact can be op- according to EN 14471 with EU label, which meets the following erated in the rated power range. -
Page 19: Connecting A Flue Gas Line
Set-up and installation Fig. 4-14 Plan view GCU compact Flue gas connection to the side with SET K (see section 4.5.3) - (for dimensions, see tab. 4-1) Natural gas E/H (G20) Flue gas mass flow In some cases, the resonance in the flue system can... -
Page 20: Flue Gas System Kits
Set-up and installation 4.5.3 Flue gas system kits Fig. 4-15 Flue system kits If needed Flue gas connection left See tab. 4-1 Flue gas connection right Flue gas connection rear ROTEX GCU compact -... -
Page 21: Water Connection
10 m or additional accessory components must be ordered. 4.6 Water connection The connections to the ROTEX GCU compact are on the top of the unit or on the front side ( solar return flow). Heating circuit and storage charge have a common inflow and return flow. -
Page 22: Connecting Hydraulic Lines
Connector for KFE cock + diaphragm expansion vessel Fig. 4-17 Installation of safety group SBG GCU compact to type 3xx – Water shortage protection: The overheating protection of the ROTEX GCU compact switches off the gas condensing boiler in case of heat deficiency and locks it. -
Page 23: Connect The Condensate Drain
All electronic control and safety devices of the ROTEX GCU compact are connected and tested and ready for use. Modifica- tions on the electrical installation are dangerous and prohibited. - Page 24 Secure cables leading outdoors to the storage container (fig. 4-27). Fig. 4-27 Fasten cabling on the storage container. Establish the mains connection between ROTEX GCU compact and automatic fuse on the junction box of the domestic power supply (see chapter 12 "Technical data", fig.
-
Page 25: Integrated Heating Circulation Pump And 3-Way-Valve
(flow and return flow temperature sensors, internal mixer valve sensors) are used to control the burner's output and to detect The ROTEX GCU compact comes as standard with an integrated faults. The temperature sensors are already factory-connected heating circulation pump and, according to the type: and can be plugged directly to the respective sensor, if they need –... -
Page 26: Connect The Gas Line, Check The Burner Setting For Gas Type
The standard corrugated gas connection hose can cause a pressure drop of up to 5 mbar. This will not hinder operation of the ROTEX GCU compact. Connect the factory installed corrugated gas connection hose (A) (pipe thread DIN EN 2999 Rp ½") without tension to the gas supply line. -
Page 27: Checking The Gas Pre-Installation
(fig. 3-2 / fig. 3-5, item 33). Setting screw gas type Immersion coil Measuring connection IN inlet gas pressure Gas input Gas solenoid valve Voltage supply to gas solenoid valve Voltage supply to immersion coil Fig. 4-32 Check the gas inlet pressure ROTEX GCU compact -... -
Page 28: Optional Connections
Remove the filling hose with backflush prevention (1/2") to the connection "Solar inflow " (fig. 4-34, item 20). Fill the storage tank of the GCU compact until water begins 4.11 Filling the system to escape from the overflow connection (fig. 4-34, Do not fill the ROTEX GCU compact until all installation activities item 23). - Page 29 Set-up and installation Gc 5xx Gc 3xx Solar inflow Safety overflow GCU compact Fig. 4-34 Filling buffer storage tank - without connected DrainBack solar system ROTEX GCU compact -...
-
Page 30: Filling The Heating System And The Storage Tank Charging Circuit
After filling for the first time and before switching (see work step 2 and the enclosed operating instruc- the GCU compact at the mains switch, check that tions "ROTEX Control RoCon BF"). all electrical parts and joints are dry. -
Page 31: Start-Up
5.1 Initial start-up 5. Second automatic calibration and performance of flue gas measurement: After the ROTEX GCU compact has been erected and fully con- From the RoCon BF control, select the programme nected, it can be put into service by skilled staff. -
Page 32: After Start-Up
Document the measured values in the "Installation certifi- housing cation" and in the operating manual. Tab. 5-3 Start-up control values for GCU compact 533 for various gas 7. End programme [Emission Measurement]. types 8. Set manual mode from the RoCon BF control (see operating instructions "RoCon BF Control"). -
Page 33: Checklists For Start-Up
Start-up Checklists for start-up Checklist before start-up 1st. Is the ROTEX GCU compact correctly set up according to an admissible set up variant and without visible damages? Combustion air supply secured? Adequate ventilation and extraction in the heating room with limited room-air independent (separate flue... -
Page 34: Control Unit
6.1 Operating elements on the boiler control panel The ROTEX GCU compact is fitted with the ROTEX RoCon BF Control. The fitted digital control system serves to actuate a direct heating circuit and a storage tank charging circuit. It can be extended in many ways with accessory components. -
Page 35: Replacing The Operating Section Rocon B1
(switch of fuse, main cause life-threatening burns and injuries. switch) and secure against unintentional restart. Before beginning work on the ROTEX GCU compact disconnect it from the power supply Removing the operating section (switch off the fuse, main switch) and secure against unintentional restart. -
Page 36: Changing The Flow Temperature Sensor / Return Temperature Sensor And Pressure Sensor
"ISM" is mounted underneath the heat insulation of the hydraulic line components. The fig. 6-4 shows which components need to be removed to reach the internal mixer sensor. Fig. 6-6 Remove the valve drive and heat insulation - 3.+ 4. ROTEX GCU compact -... -
Page 37: Changing The Storage Tank Temperature Sensor
3. Bend the pressing springs on the new sensor and push the new sensor into the sensor immersion sleeve. 4. Unscrew the internal mixer sensor with open-ended spanner The insertion depth is marked on the ROTEX storage tank by SW 15. a coloured marking, depending on the storage tank type. -
Page 38: Gas Burner
Burner adapter 4x fixing screws (ignition electrodes + ionisation electrode) Tab. 7-1 Legend for fig. 7-1 Fig. 7-1 Gas burner of the GCU compact - exploded view drawing Ionisation electrode Condensate pipe (for the legend, see tab. 7-1) Burner adapter... -
Page 39: Safety Function
Burner setting should be carried out only by An interlocking fault can only be reset manually from authorised and recognised heating engineers. the controller of the GCU compact (see chapter 10.4). Type Blower type Burner... -
Page 40: Setting Values
12-5. (G20) Natural gas LL/L 15.7 0.6 0,2 The RoCon BF control cab be used to set up the GCU compact (G25) to the function [Emission Measurement] under [Full Load] and Propane* (G31) 10.7 [Base Load]. -
Page 41: Starting Problems - Calibrate The Firing Unit, Starting Output Burner Blower And Setting The Gas Volume
More detailed explanations and possible setting values for these parameters can be -content and the O -content. Compare the measured found in the operating instructions "ROTEX RoCon BF Control". values with the specified setting values (see section 7.3.1). a) If the O concentrations lie within the permissible 7.3.4 Starting problems - calibrate the firing unit,... - Page 42 -5 to +10 is displayed. burner start. 6. Connect the flue gas analysis unit to the GCU compact. 1. Place the rotary switch in the "Configuration" position.
-
Page 43: Setting Ignition And Ionisation Electrodes
Burner dismantling Block gas supply. Disconnect ROTEX GCU compact from the power supply (fuse, main switch switched off) and secure against uninten- tional restart. Remove the sound insulation hood (see chapter 4.4.3). - Page 44 Start the burner. Check for function, leakage at the burner flange and the settings (see section 7.3.3). Safety clamp Mains plug, blower Plug, blower controller 4x fixing screws (burner flange / boiler body) Burner flange seal Burner surface Fig. 7-5 Removing the burner ROTEX GCU compact -...
-
Page 45: Hydraulic Connection
Outside temperature sensor Storage tank temperature probe CAUTION! Mixer circuit flow temperature sensor The ROTEX units can also be optionally fitted with gravity breaks ( 16 50 70) made of plastic. They are suitable for maximum operating temperatures of 95°C. If a heat exchanger is operated at temperatures greater than 95°C, another gravity brake must be... - Page 46 Hydraulic connection Fig. 8-1 GCU compact 3xx with DrainBack solar (for legend, see tab. 8-1) Fig. 8-2 GCU compact 5xx with DrainBack solar (for legend, see tab. 8-1) ROTEX GCU compact -...
-
Page 47: Service And Maintenance
Have the inspection and maintenance carried out by Damage repair to live or gas carrying components authorised and trained heating engineers once a year of the ROTEX GCU compact must only be and, if possible, before the heating period. This will conducted by heating engineers that are avoid malfunctions during the heating period. -
Page 48: Checking And Cleaning The Burner
Let the burner cool down for a reasonably long time before maintenance and service work. Wear protective gloves. Remove the burner (see chapter 7.4 "Dismantling the burner") Rinsing the flue gas path with clean water (hose in the open combustion chamber). ROTEX GCU compact -... -
Page 49: Faults And Malfunctions
10.1 Troubleshooting Troubleshooting Detecting and remedying the cause of the malfunction. The electronics of the ROTEX GCU compact Non-interlocking malfunctions (see section 10.3) are – signals a fault by red backlighting in the display and indicated as long as there is a malfunction. Once the cause –... - Page 50 Pump standstill Check mains and PWM control signal connection, replace pump if necessary. 1) See documentation "ROTEX RoCon BF Controller" Tab. 10-1 Possible faults on the GCU compact ROTEX GCU compact -...
-
Page 51: Fault Codes
Fault found in the flame amplifier evaluation during the idle state check (electronic fault, short E226 circuit ionisation electrode or cable). E227 Internal fault to firing unit. Tab. 10-2 Error codes of interlocking malfunctions (can be detected by the firing unit) ROTEX GCU compact -... - Page 52 Impermissible GPV offset value (safety gas control block defective). No stable state in partial load reached during adaption within the tolerance period (wind effect, speed fluctuations, blower). Tab. 10-3 Error codes temporary faults (can be detected by firing unit) ROTEX GCU compact -...
-
Page 53: Rectifying Burner Faults And Stb Faults
Requirements: The cause of the malfunction is rectified, the burner is electrically connected. WARNING! 1. Switching ROTEX GCU compact on. Risk of burns due to very hot boiler body with STB fault. 2. Push the Exit button (fig. 6-1, item 15) for at least 5 secs. -
Page 54: Emergency Operation
"Manual Operation" on the control (see en- closed operating instructions "ROTEX RoCon BF control"). When the 3-way valves are intact, the ROTEX GCU compact will switch to heating operation. The necessary flow temperature can be adjusted with the rotary switch. -
Page 55: Taking Out Of Service
Switch off the main switch and secure against restarting. Close the gas isolation valve. Connect the hose and hose connection from the accessories set to the rear of the solar panel . When the ROTEX solar system is connected, use the KFE cock on the solar return flow. -
Page 56: Technical Data
= 45°C. The specific water flow according to EN 625 is the potable water flow with a mean temperature increase of 30 K, which the ROTEX GCU compact is able to deliver in two consecutive tappings of 10 min duration each with a charging temperature of 65°C. A delay of 20 minutes between the two draw-off procedures is usually assumed. -
Page 57: Gcu Compact 5Xx
= 45°C. The specific water flow according to EN 625 is the potable water flow with a mean temperature increase of 30 K, which the ROTEX GCU compact is able to deliver in two consecutive tappings of 10 min duration each with a charging temperature of 65°C. A delay of 20 minutes between the two draw-off procedures is usually assumed. -
Page 58: Integrated Gas Burner
Flue gas / air infeed connection diameter (DN 80/125 with SET GCU1 ( 15 50 79.17)) Liquid gas setting Position numbers see fig. 12-1 Tab. 12-3 Technical data, gas burner GCU compact 12.1.4 Integrated heating circulation pump, 3-way valve Parameter Unit Heating circulation pump... -
Page 59: Gas Type, Connection Pressures
ES, FR, GR, PT, SI 20/25 2N3P 2L3P 2H3P 20/25 2E+3P 2Er3P DK, FI, LV, NL, NO, SE, TR 20/25 20/25 Tab. 12-6 Countries of destination, unit categories and associated gas connection pressures (7)* * Position numbers see fig. 12-1 ROTEX GCU compact -... -
Page 60: Tightening Torque
2000 2500 m / L/h Δ Remaining pumping height Modulation range Flow heating network Fig. 12-2 Residual feed height GCU compact (heater side) Sensor resistance Temperature Fig. 12-4 Resistance characteristics of the temperature sensor Temperature sensor Type Specification * Measured... -
Page 61: Electrical Connection Diagram
GCU compact 3xx: Not assigned 2-pin circuit board with PWM signal cable GCU compact 5xx: Connection 3-way Mains supply 230 V, 50 Hz for external heating circulation pump change valve (3UVB1) Fig. 12-5 Wiring diagram ROTEX GCU compact ROTEX GCU compact -... -
Page 62: Notes
Notes 13 Notes ROTEX GCU compact -... -
Page 63: List Of Keywords
Cleaning ....48 GCU compact 3xx ... . . 56 Hydraulic connection combustion controller . -
Page 64: For The Chimney Sweep
4-12, page 19) 15.2 Emissions measurement Special Level The check measurement can be made by a simply selectable automatic function (see also "Operating Instructions - ROTEX-RoCon BF Con- Emission Measurement troller"). Manual Operation Depress the exit button for at least 5 secs.
Need help?
Do you have a question about the GCU compact and is the answer not in the manual?
Questions and answers