Table of Contents
Advertisement
Advertisement
Table of Contents

Related Manuals for Humanware explore 5


Summary of Contents for Humanware explore 5
- Page 3 QUICK START GUIDE 1. Connect the USB recharge cable to the Power Supply. 2. Hold explorē 5 so that the screen side is facing you. Make sure the tactile USB symbol on the recharge cable’s USB connector is on the opposite side of the screen.
- Page 4 device and plug the power supply into an outlet. IMPORTANT: Use caution while inserting the cable into the Recharge Port. 3. Let your device recharge until your battery is full. The device will become warmer during the charge – this is normal. 4.
- Page 5 5. Press the Power button to start using the device.
-
Page 6: Table Of Contents
CONTENTS Chapter 1 – Product Overview ....... 1 Introduction ..........1 Box Contents ..........4 Physical Description ........5 Chapter 2 – Using your explorē 5 ....8 Powering off explorē 5 ......11 Magnifier Mode ......... 11 Zooming in and out ....... 12 Changing Contrast ........ - Page 7 Line and blinds ........15 Autofocus ..........16 Freezing an image ........ 18 Zooming in and out of frozen images ..19 Gallery Mode ..........20 Capturing saving images Gallery ........... 20 Accessing viewing images Gallery ........... 21 Deleting images from Gallery ....22...
- Page 8 Using an external screen ...... 24 Chapter 3 – Exporting images to computer .. 25 Chapter 4 – Configuring your explorē 5 ..27 Accessing, navigating in and changing Settings ............. 27 Viewing software/hardware numbers ..33 Restoring factory defaults ......34 Chapter 5 –...
- Page 9 explorē 5 does not power on ....42 Screen is black ........44 explorē 5 shuts down after inactivity ..45 Colors are difficult to detect ....46 There is a lot of glare ......46 Other problems ........47 Chapter 8 –...
- Page 10 Appendix B – Technical Specifications ..56 Appendix C – Customer Support ....58 Appendix D – FCC Information ....59 Appendix E – Warranty ........ 64...
-
Page 11: Chapter 1 - Product Overview
Thank you for purchasing the HumanWare explorē 5, the easy to use, smallest and most portable electronic handheld magnifier with a large easy to read 5” screen. Being magnifier users ourselves, we at HumanWare know that in addition to the best... - Page 12 available image quality, a good magnifier needs to be simple, portable, comfortable to use, and should always be ready when you need it, where you need it. Your explorē 5 was designed with just that in mind, for we take great pride in offering you a quality product that will meet both your needs and expectations.
- Page 13 HumanWare Customer Service by consulting the contact information in the back of this user guide. Congratulations for your purchase. You’ll be reading those fine prints in a matter of seconds. Copyright 2015 by Technologies HumanWare Inc., all rights reserved. No part of this...
-
Page 14: Box Contents
BOX CONTENTS explorē 5 Electronic Magnifier Base box Carrying case Power adapter USB cable Lanyard User Guide Warranty Sheet Microfiber cleaning cloth... -
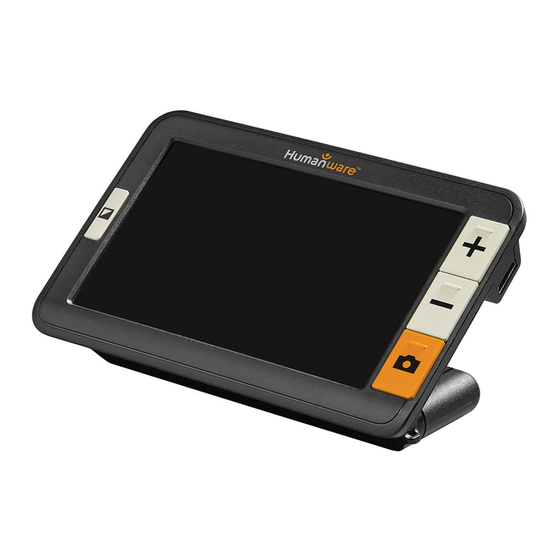
Page 15: Physical Description
PHYSICAL DESCRIPTION Front Face 1. Contrast button 2. Zoom+ button 3. Zoom- button 4. Freeze button 5. Attachment ring... - Page 16 Back Side 1. Power button 2. Camera 3. LEDs 4. Handle...
- Page 17 Left Edge 1. USB connector Right Edge 1. HDMI Connector...
-
Page 18: Chapter 2 - Using Your Explorē 5
CHAPTER 2 – USING YOUR EXPLORĒ 5 To start your magnifier, simply press the Power button located on the top edge of the device, on the right side. The device can then be held by the sides, just like you would hold a tablet. - Page 19 Alternatively, you can open your device by simply opening the handle sideway, just like you would hold a magnifier.
- Page 20 The device could also be used hand-free by opening the handle vertically and placing it over what you wish to read. After a few seconds, the explorē 5 screen will open and display the image from the camera. This is the magnifier mode.
-
Page 21: Powering Off Explorē 5
POWERING OFF EXPLORĒ 5 To turn off your device, simply press the Power button. Alternatively, if your magnifier’s handle is open, you can close your device by simply turning the handle back into its closed position. MAGNIFIER MODE Magnifier mode is explorē 5’s main mode of operation. -
Page 22: Zooming In And Out
ZOOMING IN AND OUT To zoom in, simply press or press and hold the Zoom+ button until the image is of the appropriate size. Similarly, you can zoom out by single pressing or pressing and holding the Zoom- button until you are satisfied with the image size. -
Page 23: Changing Contrast
CHANGING CONTRAST explorē 5 allows you to customize contrast to better suit your needs and preferences. Simply press the Contrast button to change contrast until you find one you are comfortable with. The available contrast modes are listed below: Full color, Black on white, White on black, Black on yellow, Yellow on black... - Page 24 Other contrast modes are also available: Black on orange, Orange on black, Black on cyan, Cyan on black, Black on purple, Purple on black, Black on green, Green on black, Blue on yellow, Yellow on blue, White on blue, Blue on white. It is possible to select the favorite contrast mode in the menu.
-
Page 25: Line And Blinds
LINE AND BLINDS With the explorē 5, you can add a horizontal line or blinds over your image for easier reading. To add or remove a line, press and hold the Contrast and Zoom+ buttons simultaneously. To add or remove blinds, press and hold the Contrast and Zoom- buttons simultaneously. -
Page 26: Autofocus
AUTOFOCUS explorē 5 features an autofocus that can be set to locked or unlocked from the menu. When autofocus is set to unlocked (by default), explorē 5 will dynamically adjust its focus to the object currently being viewed. When autofocus is set to locked, and you are using your magnifier on a tabletop, explorē... - Page 27 When autofocus is set to locked, and you are holding your magnifier like a tablet or with the handle, explorē 5 will maintain its focus approximately 6 cm in front of the magnifier. Note: To reset the focus when autofocus is set to locked, simply press the Freeze button once to freeze the image, then press the Freeze button again to return to the magnifier...
-
Page 28: Freezing An Image
FREEZING AN IMAGE explorē 5 enables you to freeze an image while in magnifier mode for easier reading, an especially useful feature when reading labels or writings on products on stores’ top shelves. To freeze an image, simply press the Freeze button while aligning your magnifier towards what you wish to read. -
Page 29: Zooming In And Out Of Frozen Images
To return to magnifier mode, simply press the Freeze button once again. ZOOMING IN AND OUT OF FROZEN IMAGES To zoom in on still images, simply press or press and hold the Zoom+ button until the image is of the appropriate size. Similarly, you can zoom out by single pressing or pressing and holding the Zoom- button until you are satisfied with the image size. -
Page 30: Gallery Mode
GALLERY MODE CAPTURING AND SAVING IMAGES TO GALLERY To save a live or static image to your Gallery, simply press and hold the Freeze button for a half-second while in Magnifier mode. You should see a Save message displayed briefly on your screen meaning your image is now saved inside explorē... -
Page 31: Accessing And Viewing Images In Gallery
ACCESSING AND VIEWING IMAGES IN GALLERY You can access explorē 5’s Gallery through the menu. Alternatively, you can access the Gallery by simply pressing and holding the Freeze and Contrast buttons simultaneously while in Magnifier mode. You can navigate the Gallery by pressing the Zoom+ and Zoom- buttons. -
Page 32: Deleting Images From Gallery
To exit the Gallery, simply press the Contrast button. DELETING IMAGES FROM GALLERY To delete an image from the Gallery, access the Gallery by pressing and holding the Freeze and Contrast buttons simultaneously while in Magnifier mode. Navigate to the image you wish to delete (by pressing the Zoom+ and Zoom- buttons), then... - Page 33 press and hold the Freeze button to delete the image. To confirm the deletion of an image, select Delete by pressing the Zoom+ button. You can cancel by either selecting cancel with the Zoom- button. If you wish to delete all your images at once, you can do so by entering the menu and selecting Delete Gallery content.
-
Page 34: Using An External Screen
USING AN EXTERNAL SCREEN For a larger image, you may want explorē 5’s content to be displayed on an external screen (like a TV). To do so, simply connect your explorē 5 to an external screen using an HDMI cable (not included). Please refer to Appendix B for a list of supported HDMI formats. -
Page 35: Chapter 3 - Exporting Images To Computer
CHAPTER 3 – EXPORTING IMAGES TO COMPUTER To export Gallery images saved on explorē 5 to your computer, connect your magnifier to your computer with the USB cable provided. You should see a “PC connected” message appear on your device. You can now copy and paste the images from your Gallery to your computer using your computer’s file browser. - Page 36 When connected to a personal computer, the device will act exactly like a USB thumb drive or an external drive. Gallery images are located in the Images folder on your explorē 5. When you are copying or deleting images from the device, never disconnect the USB cable as some images could be lost in the process.
-
Page 37: Chapter 4 - Configuring Your Explorē 5
CHAPTER 4 – CONFIGURING YOUR EXPLORĒ 5 ACCESSING, NAVIGATING IN AND CHANGING SETTINGS Press and hold the Contrast button to enter the menu. You can navigate the menu by pressing the Zoom+ button to scroll up and the Zoom- button to scroll down. - Page 38 To select an item, press the Freeze button. To go back to the previous menu, press Contrast, or press and hold Contrast to return to the Magnifier mode. The menu contains the following items: Gallery (Access Gallery images) Autofocus: Unlocked*, Locked ...
- Page 39 Auto-off (Choose how long the device stays on): 1 minute, 2 minutes, 5 minutes*, 10 minutes Preferred Zoom (Change the default zoom level when you open your device): Previous (the zoom level you were at when you closed your device), 2x* to 22x ...
- Page 40 Previous* (last used contrast), Color, enabled contrasts Menu (change menu colors): Black on white, White on black, Black on yellow, Yellow on black, Black on orange, Orange on black, Black on cyan, Cyan on black, Black on purple, Purple on black, Black on green, Green on black, Blue on yellow, Yellow on blue, White on blue, Blue on white...
- Page 41 Enabled contrasts (select enabled color pairs for magnifier mode): Black on white, White on black, Black on yellow, Yellow on black, Black on orange, Orange on black, Black on cyan, Cyan on black, Black on purple, Purple on black, Black on green, Green on black, Blue on yellow, Yellow on blue, White on blue, Blue on white ...
-
Page 42: Factory Defaults
Language: English (US)*, English (UK), French, Spanish, German, Dutch, Danish, Polish, Portuguese (Portugal), Portuguese (Brazil), Norwegian (Bokmål), Italian, Swedish, Finnish, Russian, Czech, Japanese, Korean, Icelandic, Estonian, Turkish, Lithuanian, Hungarian, Latvian Display: 50Hz , 60Hz* Delete Gallery Factory Defaults... -
Page 43: Viewing Software/Hardware Numbers
About (View information about your device): Software, Hardware, Serial VIEWING SOFTWARE/HARDWARE NUMBERS To see explorē 5’s software and hardware version, access the menu by pressing and holding the Contrast button. -
Page 44: Restoring Factory Defaults
Scroll down to About by pressing Zoom- then press the Freeze button to display explorē 5’s current software and hardware versions. RESTORING FACTORY DEFAULTS To restore your magnifier to factory defaults, access the menu by pressing and holding the Contrast button. Scroll down to Factory Defaults by pressing Zoom- then press the Freeze button. -
Page 45: Chapter 5 - Updating Your Explorē 5
CHAPTER 5 – UPDATING YOUR EXPLORĒ 5 Go to: http://www.humanware.com/support/explore5 and download the latest version of the explorē 5 software. Connect your device to your computer using the provided USB cable. Using your computer’s file explorer, paste your downloaded file directly into your explorē 5 root. -
Page 46: Chapter 6 - Recharging Your Explorē 5
USB cable from your computer. Start your explorē 5. Your device should automatically update itself. CHAPTER 6 – RECHARGING YOUR EXPLORĒ 5 IMPORTANT: The battery becomes warm during recharging. This is normal. Do not recharge the battery near a heat source. - Page 47 To recharge the battery using a household power outlet: Connect the USB Recharge Cable to explorē 5’s Power Supply. Then, carefully connect the USB Recharge Cable to the magnifier and plug the Power Supply to an outlet. Let your device charge until your battery is full.
- Page 48 To recharge the battery with a computer: Connect the USB Recharge Cable to your magnifier’s Power Supply. During the recharge process, the image below will show momentarily when the battery starts charging or when the device is turned on.
- Page 49 The lightning bolt icon means your device is being charged. The number to the right represents the percentage of battery charge remaining. Due to lower voltage, charging from the computer USB may be slower. In some cases, the magnifier may not charge at all depending on the amount of power supplied by the computer.
- Page 50 connected to the power adapter to recharge the magnifier from a household power outlet. Although it may lengthen the charging time, the device can be used when it is recharging. Please note that if the battery is fully discharged or hasn’t been used for a very long period, there will be a delay of up to a few minutes before the device shows any activity.
- Page 51 Battery safety precautions: Do not disassemble or modify the battery. Use only the specified HumanWare charger. There is a risk of overheating, fire or explosion if the battery is put in a fire,...
-
Page 52: Chapter 7 - Troubleshooting
heated, subjected to impact, put in contact with water, or if its terminals are shorted. CHAPTER 7 – TROUBLESHOOTING EXPLORĒ 5 DOES NOT POWER ON Press and hold the Power button. If the unit still does not turn on, your device’s battery may need recharging. - Page 53 Connect the provided USB cable with the power supply into a power outlet or just the USB cable into a running computer. If the battery was completely discharged, it may take a few minutes before the device shows any signs of activity.
-
Page 54: Screen Is Black
SCREEN IS BLACK If the unit is laying on a table or any flat surface, the image may be black. Lift your magnifier to see whether this is the reason why your screen is black. If this does not solve the problem, try restarting your device. -
Page 55: Explorē 5 Shuts Down After Inactivity
EXPLORĒ SHUTS DOWN AFTER INACTIVITY This is a normal behaviour intended to preserve the battery. By default, explorē 5 will shut down after 5 minutes of inactivity. It is possible to configure the default auto-shutdown timer to 1 minute, 2 minutes, 5 minutes or 10 minutes. -
Page 56: Colors Are Difficult To Detect
COLORS ARE DIFFICULT TO DETECT First make sure there is sufficient ambient light around you. Choose a different color combination by pressing Contrast button while magnifier mode. THERE IS A LOT OF GLARE Tilt the object you are looking at in a different direction to reduce glare. -
Page 57: Other Problems
OTHER PROBLEMS Restore to factory defaults in the menu. Access the menu by pressing and holding the Contrast button. Scroll down to Factory Defaults by pressing Zoom- then press Freeze to restore to factory defaults. Select Yes and press Freeze again to confirm. -
Page 58: Chapter 8 - Cleaning Your Explorē 5
CHAPTER 8 – CLEANING YOUR EXPLORĒ 5 CLEANING THE LCD SCREEN Make sure your device is off and unplugged. Make sure you only use microfiber cloths like the one included with your explorē 5. Carefully and gently wipe the microfiber cloth across the LCD screen. - Page 59 If you choose to clean your LCD screen with a liquid cleaner, make sure this cleaner is appropriate for LCD screens. Distilled water, isopropyl alcohol and a vinegar-water solutions (no more than 10% vinegar) are safe cleaning liquids for your LCD screen. Use only the minimal amount of liquid to prevent spills inside the device.
- Page 60 the previous steps for spots that are harder to remove. Never use household cleaners to clean your explorē 5. Never spray any liquid directly on your LCD screen. Never use cleaning products that contain ethyl alcohol, ethyl acid, ammonia, acetone or methyl chloride.
-
Page 61: Cleaning The Explorē 5 Exterior
Never use paper towel to clean your LCD screen. CLEANING EXPLORĒ EXTERIOR Make sure your device is off and unplugged. If necessary, use a slightly humid cloth to clean your device’s exterior. - Page 62 Make sure no liquids remain on your device. Repeat the previous steps for spots that are harder to remove. Never use abrasive material, sprays, alcohol or solvents to clean your explorē 5 exterior.
-
Page 63: Appendix A - Safety Instructions
APPENDIX A – SAFETY INSTRUCTIONS You must not stare at the LED light source located on the back side of the magnifier. Keep away from water or high humidity. Do not submerge. Power off your explorē 5 before cleaning it. Use only cables provided with your explorē... - Page 64 Battery: The explorē 5 has an internal rechargeable Li- Ion battery. The battery must be replaced by a qualified Humanware technician. Do not use or leave the unit near heat source and fire. Do not store in high temperatures.
- Page 65 Do not strike or throw the unit. Do not pierce or strike the unit with sharp objects or a hammer. If the battery leaks and liquid gets into the eyes, do not rub eyes. Instead, rinse the eyes with clean running water and seek immediate medical attention to prevent injury.
-
Page 66: Appendix B - Technical Specifications
APPENDIX B – TECHNICAL SPECIFICATIONS Size: 89 x 139.4 x 21.3mm Display: 5’’ WVGA (800 x 480) LCD Weight: 228g Power Input: Micro USB connector, 5V. Max current 1.5A Battery life: 3 hours Charge Time: 3.5 hours (when device is off), 4.75 hours (when device is on) - Page 67 HDMI Compatibility: Supported HDMI formats: 1280x720p 60Hz, 50Hz 1920x1080p 60Hz, 50 Hz, 24Hz 1920x1080i 60Hz, 50Hz No support of DVI emulation. Operating conditions: Temperature: 10 ˚C to 40 ˚C / 50 ˚F to 104 ˚F Humidity: 20% to 80% Transport and storage conditions: Temperature: -20 ˚C to 60 ˚C / -4 ˚F to 140 ˚F...
-
Page 68: Appendix C - Customer Support
Humidity: 10% to 95% APPENDIX C – CUSTOMER SUPPORT For customer support, please contact the HumanWare office nearest you. Global: support@humanware.com North America: 1 (800) 722-3393 us.support@humanware.com Europe: (0044) 1933 415 800 eu.support@humanware.com... -
Page 69: Appendix D - Fcc Information
Australia / Asia: (02) 9686 2600 au.sales@humanware.com APPENDIX D – FCC INFORMATION FCC Statement: This device complies with part 15 of the FCC Rules. Operation is subject to the following two conditions: (1) This device may not cause harmful interference, and (2) this device must... - Page 70 accept any interference received, including interference that cause undesired operation. FCC Warning: Changes modifications expressly approved party responsible compliance could void the user's authority to operate the equipment. Note: This equipment has been tested and found to comply with the limits for a Class B...
- Page 71 digital device, pursuant to part 15 of the FCC Rules. These limits are designed to provide reasonable protection against harmful interference in a residential installation. This equipment generates, uses and can radiate radio frequency energy and, if not installed and used in accordance with the instructions, may cause harmful...
- Page 72 cause harmful interference to radio or television reception, which can be determined by turning the equipment off and on, the user is encouraged to try to correct the interference by one or more of the following measures: —Reorient or relocate the receiving antenna. —Increase separation between...
- Page 73 —Connect the equipment into an outlet on a circuit different from that to which the receiver is connected. —Consult the dealer or an experienced radio/TV technician for help. Note: This unit was tested with shielded cables on the peripheral devices. Shielded cables must be used with the unit to ensure compliance.
-
Page 74: Appendix E - Warranty
APPENDIX E – WARRANTY HumanWare warrants explorē 5, effective from the date of purchase, to be free of any defects in material and workmanship for a period of 1 year unless otherwise required by law in the country or region of purchase. - Page 75 In no event shall HumanWare or its distributors be liable for indirect or consequential damages. No replacement or repair covered by the warranty will be carried out unless the system is accompanied by a copy of the original bill of purchase.
- Page 80 ACCD-0137 REV 06...
Need help?
Do you have a question about the explore 5 and is the answer not in the manual?
Questions and answers