Table of Contents
Advertisement
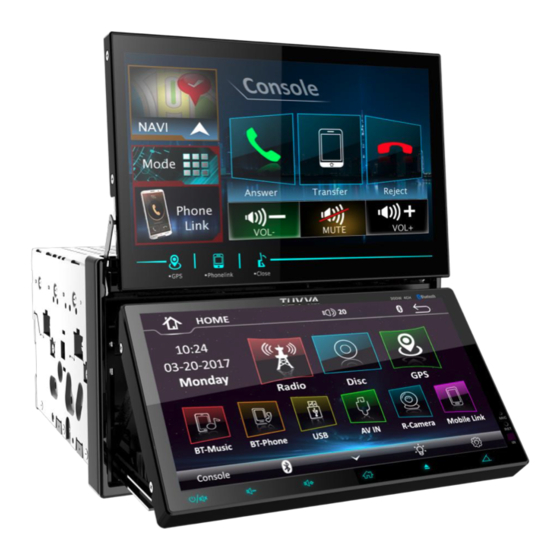
TUVVA
KSD7701
"
"
2 DIN 6.95
&7
Double Monitor
DVD/CD/MP3/MP4 Player
AM/FM Radio
Support Navigation
Support Bluetooth
Support USB Phone Link
Manual.
.Owner's
Take the time to read through this owner's manual.
Familiarity with installation and operation procedures will help you obtain the best
Performance from your new DVD-receiver.
Advertisement
Table of Contents

Related Manuals for Tuvva KSD7701

Summary of Contents for Tuvva KSD7701
- Page 1 TUVVA KSD7701 ” ” 2 DIN 6.95 &7 Double Monitor DVD/CD/MP3/MP4 Player AM/FM Radio Support Navigation Support Bluetooth Support USB Phone Link Manual. .Owner’s Take the time to read through this owner’s manual. Familiarity with installation and operation procedures will help you obtain the best...
-
Page 2: Warning
WARNING! To promote safety, certain functions are disabled unless the parking brake is on. The Unit is designed to detect parked status and must be connected to the power supply side of the parking brake switch. Improper connection or use of his connection may violate applicable law and may result in serious injury or damage. -
Page 3: Table Of Contents
CONTENTS WARNING! ......................... 2 OPERATION PRECAUTIONS ....................2 CONTENTS .......................... 3 ACCESSORIES ........................4 INSTALLATION / UN-INSTALLATION ................... 5 WIRING CONNECTIONS ...................... 6 PANEL ..........................8 REMOTE CONTROL ......................10 REMOVE BATTERY ......................11 MAIN MENU........................11 ◆RADIO PLAYER ......................12 ◆DVD PLAYER ...................... -
Page 4: Accessories
ACCESSORIES Package contains the following accessories for installation and operation of the unit. (1) Washer, Spring 1 each Washer, M5 Nut (2) Mounting Strap (3) Bolt (4) Screw (5) Mounting Collar (6) Release Key (7) Screw (8) Rubber Cushion GPS cable User Manual Remote Control Trim Ring... -
Page 5: Installation / Un-Installation
INSTALLATION / UN-INSTALLATION Note Before starting installation of the unit, make sure the wiring is connected properly. Use only the parts provided with the unit to ensure proper installation. The use of unauthorized parts may cause malfunction. Install the unit where it does not get in the driver’s way and will not injure the passenger in case there is a sudden stop, like an emergency stop. -
Page 6: Wiring Connections
WIRING CONNECTIONS Make sure you have good chassis ground. A good ground connection will eliminate most electrical noise problems. A good chassis ground requires a tight connection to the vehicle’s metal chassis. The area around the ground connection should be clean, bare metal without rust, paint, plastic, dust, or dirt for a good electrical connection. - Page 7 Parking wire Note: The parking wire is connected with brake signal; for safety, the programs can be seen on the monitor after braking the car. Connecting the reversing line to taillight on the car After connecting, when you start up the reverse gear, the unit will receive the picture from car rear view camera.
-
Page 8: Panel
PANEL GPS Button Touch this Button, go to GPS mode 2. Phone Link Button Touch this Button, go to Phone Link mode 3. Top Panel Close/ Adjustment Button Condition: Top panel opened Touch this button: Close top panel Touch and hold this button for 3 seconds: Adjust angle of top panel (Angle1 → Angle2 → Angle3 →... - Page 9 5. Power Button/Mute Touch this button to turn on or mute the volume output, touch it again to resume volume Touch and hold this button for 3 seconds to turn off the head unit 6. Bottom Panel Bottom Panel 6.95” display 7.
-
Page 10: Remote Control
REMOTE CONTROL... -
Page 11: Remove Battery
REMOVE BATTERY Note: The distance may vary according to the brightness of ambient light. If the remote is not used for an extended period of time, remove the battery to prevent possible damage from battery leakage and corrosion. ... -
Page 12: Radio Player
NOTE: The unit can be operated under the following conditions Bottom Panel Phone Top Panel Mode Radio Disc GPS USB AV IN R-Camera Music Phone Link close ✔ ✔ ✔ ✔ ✔ ✔ ✔ ✔ ✔ condition Bottom Panel Phone Mode Radio Disc GPS USB AV IN R-Camera Music... -
Page 13: Dvd Player
Touch this button to select program type Touch this button to select station backward manually Touch this button to select station forward manually Touch this button to adjust the EQ, it can choose USER → JAZZ → CLASSIC → POP ROCK → BEAT → FLAT Touch this button to search backward stations Touch this button to search forward stations 1-6 preset selection... -
Page 14: Usb Interface Operation
Touch it to select previous or next track Touch it to start fast rewind or fast forward. Press one of the keys again to change the spooling speed (FFx2 → FFx4 → FFx8 → FFx20). Press the PLAY key to regain normal playback Pause playback. - Page 15 When play the picture, the UI will display as below: Touch it to go to previous page or next page of control bar Touch it to enter general setting Touch it to adjust the EQ, it can choose USER → JAZZ → CLASSIC → POP → ROCK →...
- Page 16 Touch it switch Random on or off Touch it to adjust the EQ, it can choose USER → JAZZ → CLASSIC → POP → ROCK → BEAT → FLAT When play the video, the UI will be display as below: Touch it to select Subtitle Touch it to go to previous page or next page of control bar Pause playback.
-
Page 17: Setting Control
◆SETTING CONTROL Your device has default system settings. You can customize the settings to suit your personal needs. Once you change settings, your new settings will remain until you change it again. To start SETTING, touch key to view the hidden toolbar and then tap SETUP icon to enter setting menu. -
Page 18: Radio Setting
Radio Setting Region: Select the radio region Display Setting Top Panel: Adjust the color / brightness / contrast / tint display of top panel Bottom Panel: Adjust the color / brightness / contrast / tint display of top panel DVD Ratio Setting Press it to choose DVD Ratio (4:3 PS / 4:3 LB / 16:9) Bluetooth Setting Bluetooth: Turn on or off the Bluetooth... -
Page 19: Gps Scetion
GPS SCETION To start GPS mode, please insert SD card in GPS slot on the front panel. Choose Navigation path and touch the Enter icon to enter the GPS (Navi path choose only for first using). You can choose road and run GPS. Navigation setup Enter to GPS PHONE LINK SCETION... -
Page 20: Buletooth Scetion
When the unit have connect with phone, the BT icon will turn on and the Mobile phone name (if available) will be display on the panel. According to mobile pairing device manual,after searching new device(TUVVA), select it, input password "0000" and confirm ok, device paring is finished. - Page 21 1. Dial BUTTON Tap on Dial button to enter call mode. In Call mode, the unit can be used as your phone. Making and receiving calls are possible with BLUETOOTH. Simply tap phone number and tap button to make a call, and tap button to hang up.
-
Page 22: Av In Mode
AV IN MODE To start AV-IN Mode, tap on AV IN button from main menu screen. Connect the external audio/video signal source to this unit. Select AV-IN mode in the main menu and. TFT display as below: R-Camera To start Back View Camera mode, tap on R-Camera button from main menu screen. This unit is equipped with back view camera output. -
Page 23: Other Functions
OTHER FUNCTIONS Independent Volume Adjust You can choose the “GPS & Phone VOL” or “MEDIA VOL” to adjust the volume from top panel or bottom panel independently. Condition 1: Top panel is opened: Top panel: GPS / Phone Link mode Bottom panel: Radio / Disc / BT-Music / BT Music / USB / AV IN mode Touch “Vol-”... -
Page 24: Notes On Disc
NOTES ON DISC Only use groundless loudspeakers. Use only loudspeakers of minimal 40Watt, using fewer watts may result in damaging your loud speakers at higher volumes. Use 4~8 Ω (Ohm impedance) loudspeakers only; using higher or lesser impedance may damage the unit. -
Page 25: Troubleshooting
TROUBLESHOOTING Symptom Cause Remedy Power does not turn Replace with fuse of the same amperage. Fuse is blown If the fuse blows again, consult your store of purchase (No sound is produced.) In correct wiring Consult your local retailer. 1. Turn off the unit. 2. - Page 26 TROUBLESHOOTING SYMPTOM CAUSE SOLUTION IF THE POWER SUPPLY IS PROPERLY THE CAR IGNITION IS CONNECTED TO THE CAR NOT ON. ACCESSORY SWITCH THE IGNITION KEY NO POWER TO “ACC”. THE FUSE IS BLOWN. REPLACE THE FUSE. DISC CANNOT BE PRESENCE OF DISC REMOVE THE DISC IN THE PLAYER LOADED.
-
Page 27: Technical Specifications
TECHNICAL SPECIFICATIONS General Power supply: 11~16V DC Current consumption: max. 10 A Maximum power output: 4 x 50W channels (max) DVD/VCD/MP3/MP4/VIDEO/PICTURE Compatible formats: CDCD-R/CDDA/-RW/DVD±R/±RW PLAYBACK Dimensions (W x D x H) / weight: 178*170*100 mm/4 kg Working temperature range: -20℃ - +60℃ ESP function: 10 sec. - Page 28 Need help? Contact us! TUVVA representatives are ready to help you with any question about your new product. We can guide you through connections, first time setup, or any of the features. We want you to start enjoying your new product right away!
Need help?
Do you have a question about the KSD7701 and is the answer not in the manual?
Questions and answers