Table of Contents
Advertisement
Quick Links
TRUE VIEW
VIDEO MONITOR
Birth & Up
08028
User Guide
Out function –
outer level (not pressing the select Key), press the up arrow or Zoom in key. Video will zoom in to x2.
up arrow or Zoom in button again will zoom to x4.
the down arrow or Zoom Out Button will Zoom out from x4 to x2 to normal.
ton is pressed without zoom already done, it will give feedback of ZOOM x1 Only.
r also display the correct setting at all times. (Not shown in these images.)
12/31
35.76
CD VIEW
1.5
At Safety 1st, we're not only about safety, we're
also about your satisfaction. If you have any
questions, please call our Consumer Relations department and let us help.
We want to hear from you. 1-800-544-1108 or email us at consumer@safety1st.com.
WARNING:
Please read the following instructions and
warnings carefully. Keep these instructions for
future reference. Tools needed: Flat Head Screwdriver (not included)
0
12:20
72 F
PM
Video Display
2x
Black 20% Opacity
Myriad Bold 8 pt
Black 35% Opacity
48.05
LCD VIEW
Scale: 200%
COLOR
™
2x
PMS 280C
Video Display
Prepress: please
make image
greyscale
Will the zoom show up at bottom
?
8.4 mm
Video Display
12/31
12:20
72
PM
Video
4x
12/31
12:20
72
PM
Video
2x
12/31
12:20
72
PM
Video
1x
Scale
Advertisement
Table of Contents

Related Manuals for Safety 1st 08028


Summary of Contents for Safety 1st 08028
- Page 1 CD VIEW 12/31 12:20 8.4 mm Video At Safety 1st, we're not only about safety, we're Black 20% Opacity also about your satisfaction. If you have any Myriad Bold 8 pt PMS 280C questions, please call our Consumer Relations department and let us help.
- Page 2 DANGER! To prevent electric shock, NEVER use the Transmitter or Receiver near water, such as a bathtub, sink, laundry tub, in a wet basement, etc. WARNING! To prevent strangulation with power cord, never place transmitter within reach of child. Important! •...
-
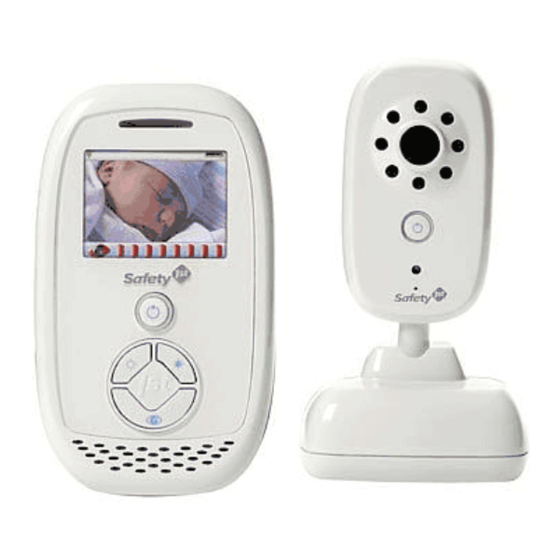
Page 3: Baby Unit
Parent Unit Baby Unit 2 AC Adapters AAA Rechargeable Battery Pack (already installed in Parent Unit) Parent Unit K Camera Lens L Base A Video Screen M Power On/Off Button B Sound Light Bar – Shows your N Microphone baby’s sounds O A/C Adapter Jack C Video Screen On/Off Button P Nighttime Viewing Lights... - Page 4 Plug in here. Plug in here. Prepress: please make image greyscale and clip 1 Connect AC adapter to the side 2 Connect AC adapter to the back of the Parent Unit. of the Baby Unit. 3 Plug Parent Unit and Plug Baby Unit into wall to charge or to operate AC power.
- Page 5 Power Up Press Power button for one second, LED ring will light up and stay lit as product is on. Video will boot up in following sequence: Safety First Screen for 3 seconds PMS 877C 48.05 LCD VIEW PMS 130C 35.76 LCD VIEW Scale: 100%...
-
Page 6: Volume Adjust
SOUND LIGHT BAR Video Display The sound light bar will illuminate red from left to right as baby gets louder. Sound Light Bar Middle Volume djust – djust is shown on a window that pops up on the bottom. 8.4 mm bar. -
Page 7: Control Panel
CONTROL PANEL Less Bright/Scroll Left More Bright/Scroll Right Video Display st button press. Video Screen On/Off Button brightness. BRIGHTNESS deo will darken one level. get to MAX brightness. 1-8. Brightest Video Display e Adjust – e adjust is shown on a window that pops up on the bottom. es away 3 seconds after last button press. -
Page 8: Night Vision
Battery Flashing Green With power off: When plugging in Parent Unit, Safety 1st screen will come on for 2 seconds, then a large fl ashing green battery will fi ll the center of the screen indicating charging. Also, the blue ring around the Power On/Off button will fl... - Page 9 Figure 1 CHANGING BATTERIES [Figure 1 – Unscrewing battery covers] Unscrew battery covers (Figure 1) to remove and insert 4 AAA alkaline batteries in the camera (optional). Rechargeable battery pack is included in the Parent’s unit. Secure each battery cover with the screw. Contact Consumer Relations at 1-800-544-1108 to order a new battery pack.
-
Page 10: Troubleshooting
- Video is ON all the time Quick View button to turn than expected off video when not looking at the monitor to extend battery life. Contact Consumer Relations at 1-800-544-1108 to order a new battery pack. Use reference number 08028.
Need help?
Do you have a question about the 08028 and is the answer not in the manual?
Questions and answers