
Related Manuals for DR POWERWAGON 5.0


Summary of Contents for DR POWERWAGON 5.0
- Page 1 ® ™ POWERWAGON Safety & Operating Instructions Please read instructions before operating the DR POWERWAGON 5.0...
- Page 2 And congratulations on your purchase of a new DR POWERWAGON 5.0! We have done our utmost to ensure that your DR POWERWAGON 5.0 will be one of the most trouble-free and satisfying pieces of equipment you have ever owned. Please let us know of any questions or problems you may have.
-
Page 3: Table Of Contents
Chapter 1: Introducing the DR POWERWAGON 5.0..........1 Conventions used in this manual....................1 Chapter 2: Safety Considerations................2 Preparing to Use the DR POWERWAGON 5.0 ................2 Safety Information Labels....................... 2 Protecting Yourself ......................... 4 Operating the Machine Safely ......................4 Safety with Gasoline-Powered Machines .................. -
Page 4: Chapter 1: Introducing The Dr Powerwagon 5.0
Failure to follow this instruction could result in injury to you or damage to your DR POWERWAGON 5.0. Tip: This is a helpful hint to guide you in getting the most out of your DR POWERWAGON 5.0. Tools Needed: This indicates you will need a special tool to perform a maintenance function on your DR POWERWAGON 5.0. -
Page 5: Chapter 2: Safety Considerations
Taking the time to read and observe all safety instructions will ensure many years of productive use from your DR POWERWAGON 5.0 and help you avoid injury. Please take a few moments to read the following guidelines for safely operating your new machine. - Page 6 #153441 #153431 #180531 DR POWERWAGON 5.0 Safety & Operating Instructions...
-
Page 7: Protecting Yourself
Protecting Yourself Wear shoes with non-slip treads when using your DR POWERWAGON 5.0. If you have safety shoes, we recommend wearing them. Do not use the machine while barefoot or wearing open sandals. Avoid wearing loose clothing or jewelry, which might be caught on the machine’s moving parts. -
Page 8: Safety With Gasoline-Powered Machines
Operate the machine in the lowest gear that is satisfactory to do the job. Give complete and undivided attention to the job at hand. Before you use your new machine, be sure you know how to engage the parking brake and stop the DR POWERWAGON 5.0 at a moment's notice. -
Page 9: A Note To All Users
Under California law, and the laws of some other states, you are not permitted to operate an internal combustion engine using hydrocarbon fuels without an engine spark arrester. Any DR POWERWAGON 5.0 shipped to California and Washington State are provided with spark arresters. Failure of the owner / operator to maintain this equipment in compliance with state regulations is a misdemeanor under California law and may be in violation of other state and/or federal regulations. -
Page 10: Chapter 3: Setting Up Your Dr Powerwagon 5.0
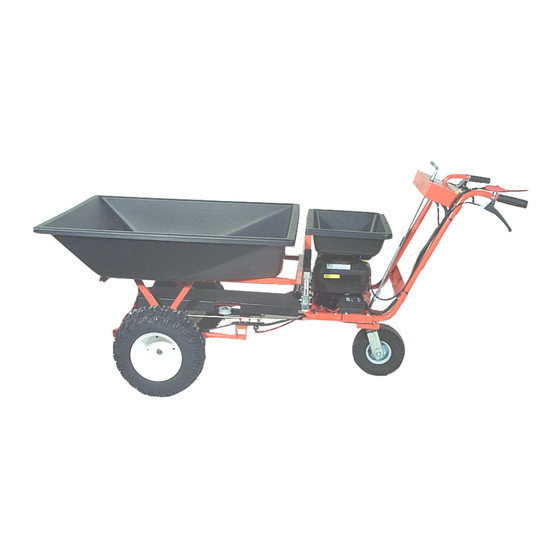
This chapter outlines a few simple steps you will need to follow to set up your new machine before you use it. It may be helpful to familiarize yourself with the controls and features on your DR POWERWAGON 5.0 by reviewing the picture on this page before beginning the steps outlined in this chapter. -
Page 11: Unpacking The Dr Powerwagon 5.0
3. Pry off the fasteners and cut any ties holding the machine to the pallet. 4. Roll the DR POWERWAGON 5.0 off the pallet. Do not discard your pallet and packaging material until you are fully satisfied with your machine. -
Page 12: Adding Oil And Gasoline
(Figure 2) 3. Fill the gas tank to within ¼ inch of the top with fresh, unleaded gas. See your engine manufacturer’s owner’s manual for more information. Figure 2 DR POWERWAGON 5.0 Safety & Operating Instructions... -
Page 13: Connect The Battery Wires
Connect the Battery Wires Connect the red wires to each other (Figure 3). The black wires are connected at the factory. Connect the red wires Figure 3 DR POWERWAGON 5.0 Safety & Operating Instructions... -
Page 14: Chapter 4: Operating Your Dr Powerwagon 5.0
Chapter 4: Operating Your DR POWERWAGON 5.0 This chapter covers the procedures for starting and stopping your new DR POWERWAGON 5.0 and discusses basic operation features. Operator Presence Lever Before Starting the Engine 1. Check the oil level every time you use the machine. -
Page 15: Manual Recoil Starting
WARNING! Always release the clutch lever on the left handle bar when shifting to avoid damaging the gears. The DR POWERWAGON 5.0 has a four-speed forward transmission and single-speed reverse. Use the lower gears for slower speeds, heavy loads, or more power and the higher gears for transport over smooth terrain. -
Page 16: Stopping
POWERWAGON 5.0 will be as stable as possible. Don't pile material too high. Divide your load and make several lighter trips. Do not pile heavy loads, such as rocks or gravel, to a height that will make the DR POWERWAGON 5.0 top-heavy and susceptible to tipping over. -
Page 17: Slopes & Uneven Terrain
Figure 8 depressions. On a slope, a heavy load will tend to shift. When using your DR POWERWAGON 5.0, keep in mind that loads tend to shift to the downhill side of the dump bed. Secure your load in the bed to limit the shifting of the load on slopes. The higher and heavier the load, the greater the possibility of tipping over. -
Page 18: Dumping
Dumping Note: For safety reasons, the DR POWERWAGON 5.0 bed is designed NOT to dump automatically once the dump lever is released. You must pull the dump lever back then lift the back of the bed to cause it to tip forward. -
Page 19: Chapter 5: Maintaining The Dr Powerwagon 5.0
Chapter 5: Maintaining the DR POWERWAGON 5.0 Regular maintenance is the way to ensure the best performance and long life of your machine. Please refer to this manual and the engine manufacturer's owner's manual for maintenance procedures. Service intervals listed in the checklist below supercede those listed in the engine manufacturer's owner's manual. -
Page 20: Battery Care
Engine must be operated for at least 45 minutes to maintain proper battery charge. If the battery loses its charge, you'll need to use a trickle charger (like the DR Battery Charger) to recharge it. The charger should have an output of 12 volts at no more than 2 amps. -
Page 21: Lubrication
Lubrication Your DR POWERWAGON 5.0 was lubricated at the Factory. The transmission is lubricated for life with 16 ounces of 90-weight gear oil and sealed at the factory. The operator needs only to provide engine lubrication, wheel and cable lubrication. -
Page 22: Changing The Engine Oil
Note: If the oil is not to be reused, be sure to use environmentally safe disposal procedures in the disposing of the used oil. Oil Drain Plug Belt Guide Figure 14 DR POWERWAGON 5.0 Safety & Operating Instructions... -
Page 23: Removing And Replacing The Belt
WARNING! Before performing any maintenance procedure, stop the engine, set the parking brake and disconnect the spark plug wire. Important! Use only DR belts on your machine. They have been thoroughly tested and proven for many hours of use. Tools Needed: 7/16"... - Page 24 (Figure 16) with the 9/16" socket. Note: When the clutch lever is released (disengaged), the belt guides will just touch the belt (Figure 19) to prevent the DR POWERWAGON 5.0 from “creeping”. Guides perpendicular to...
-
Page 25: Removing And Replacing The Front Wheels
Slide the key back in place and reinstall the washer and wheel lock ring. Note: When replacing the wheel lock ring, make sure the center of the wheel lock ring is opposite the key. Wheel Lock Ring Figure 20 DR POWERWAGON 5.0 Safety & Operating Instructions... -
Page 26: Adjusting The Parking Brake
Adjusting the Parking Brake Note: If your DR POWERWAGON 5.0 rolls on slopes when the parking brake is set, or if you can't get the parking brake to set, it needs to be adjusted. (Figure 21) WARNING! Before performing any maintenance procedure, stop the engine, set the parking brake and disconnect the spark plug wire. -
Page 27: Parking Brake Cable Adjustment
WARNING! Before performing any maintenance procedure, stop the engine and disconnect the spark plug wire. Note: If your DR POWERWAGON 5.0 rolls on slopes when the parking brake is set, and you have tried adjusting the parking brake, the parking brake pads may need to be replaced. - Page 28 Figure 25 turn with 1/2" wrench. See “Adjusting the Parking Brake” on page 23. Note: Check the parking brake periodically and adjust accordingly. DR POWERWAGON 5.0 Safety & Operating Instructions...
-
Page 29: Replacing The Throttle Cable
3. Remove the two screws holding the throttle assembly to the control panel with the 1/4" socket or screwdriver. (Figure 28) 4. Tilt and slide the throttle assembly down through the slot in the control panel. (Figure 28) Throttle Assy Throttle Slot Screws Figure 27 Figure 28 DR POWERWAGON 5.0 Safety & Operating Instructions... - Page 30 Important! If the cable is clamped with too much tension between these points the engine will not return to idle properly. 10. Start the engine and check the operation of the machine. The DR POWERWAGON 5.0 should idle smoothly, but should not move while in idle, and should not jump after being put into gear.
-
Page 31: Adjusting The Shift Lever
7. Place the tie rod back on the transaxle arm, insert the bolt, and re-tighten the nut. This should now enable you to use the full range of gears. Transaxle Shift Tie Arm Forward Rod End Figure 31 DR POWERWAGON 5.0 Safety & Operating Instructions... -
Page 32: Adjusting The Wheel Clutch
2. WARNING! If clutch is over tightened, machine may lurch forward when shifting into gear. Use caution when shifting into gear. Clutch Adjustment Bracket Nut, underside Nut, outside Figure 32 DR POWERWAGON 5.0 Safety & Operating Instructions... -
Page 33: End Of Season & Storage
POWERWAGON 5.0 is in storage. We suggest charging the battery once a month while the DR is stored and again before you are ready to start the new season. This will help the battery maintain its charge all season. See page 17. -
Page 34: Chapter 6: Troubleshooting And Warranty
⇒ Check the Operator Presence switch connection beneath the panel at the key switch. ⇒ Check the Operator Presence switch connection at the engine. ⇒ If your engine still won’t start, call 1(800) DR-OWNER (376-9637) for assistance. DR POWERWAGON 5.0 Safety & Operating Instructions... - Page 35 45 minutes at a time, the battery may need to be periodically charged. See the Battery Care section on page 17. ⇒ If your battery is charged and your DR still won’t start, call 1(800) DR-OWNER (376-9637) for assistance. ⇒ Check the throttle travel and adjustment.
- Page 36 Refer to your Engine Manufacturer’s Owner’s Manual for detailed information. ⇒ Clean the cooling fins if they’re dirty. ⇒ If the engine still smokes, call 1(800) DR-OWNER (376-9637) for assistance. ⇒ A pulley groove may be nicked. Check the belt for The belt frays or wear and hard spots.
- Page 37 Notes: DR POWERWAGON 5.0 Safety & Operating Instructions...
- Page 38 Notes: DR POWERWAGON 5.0 Safety & Operating Instructions...
- Page 39 Country Home Products, Inc. however, limits the implied warranties of merchantability and fitness in duration to a period of one (1) year in consumer use, ninety (90) days for any other use. The warranty will be void if non-DR approved accessories are used or your DR POWERWAGON 5.0 is modified in any way.
- Page 40 Daily Checklist for the DR POWERWAGON 5.0 To help maintain your DR for optimum performance, we recommend you follow this checklist each time you use your machine. [ ] OIL: With the machine on a level surface, remove the oil fill cap and check the oil level.
Need help?
Do you have a question about the POWERWAGON 5.0 and is the answer not in the manual?
Questions and answers