
Related Manuals for Gain Electronic SAGA1-K Series

Summary of Contents for Gain Electronic SAGA1-K Series
- Page 1 Installation & Operation Manual SAGA1-K Series Industrial Radio Remote Control Gain Electronic Co. Ltd.
-
Page 2: Table Of Contents
Table Of Contents Safety Considerations ------------------------------------------------------------2 Part. 1 Operator’s Manual Chapter 1 Warranty -----------------------------------------------------3 Chapter 2 Precautions of Operation --------------------------------- 4 Chapter 3 Standard Accessories ---------------------------------------6 Chapter 4 Operation -----------------------------------------------------7 Chapter 5 Inspection and Fault Detection ---------------------------10 Chapter 6 FAQ ----------------------------------------------------------11 Part. -
Page 3: Safety Considerations
Safety Considerations This product and related documentation must be reviewed for familiarization with safety markings and instructions before operation. Safety Symbols The following symbols may be found on the remote control or throughout the remote control’s documentation. Refer to Manual When product is marked with this symbol refer to instruction manual for additional information. -
Page 4: Part. 1 Operator's Manual
Part 1. Operator’s Manual Chapter 1 Warranty 1-1 Warranty Gain Electronic Co., Ltd. guarantees that this product meets its published specifications at the time of shipment from the factory. Under proper installation it should work as expected. 1-2 Warranty Period This equipment is warranted against defects in material and manufacturing for a period of one year from the date of shipment. -
Page 5: Chapter 2 Precautions Of Operation
Chapter 2 Precautions of Operation 2-1 Attention Please carefully read the manual before installing and operating this device. Due to the complex nature of this equipment it is necessary to read the entire manual before installation. Never dismantle the equipment by any unauthorized personnel, or equipment may be damaged. - Page 6 2-2 Precautions ¡ Operating in an industrial facility is relatively dangerous; therefore, operator must have taken the adequate trainings in using SAGA1-K system. ¡ Those who operate the machine should be healthy and have good judgment in regard to safety. ¡...
-
Page 7: Chapter 3 Standard Accessories
Chapter 3 SAGA1-K Standard Accessories When you acquire a standard and full set of SAGA1-K system, it includes the following items. (1)Transmitter, one unit. (2)Receiver, one unit. -
Page 8: Chapter 4 Operation
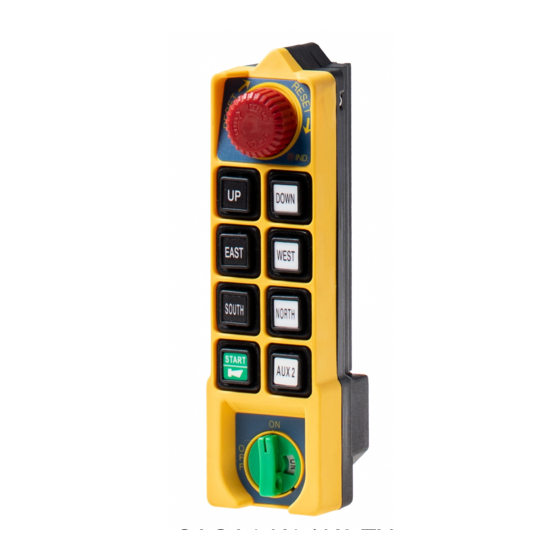
Chapter 4 Operation 4-1 SAGA1-K Transmitter’s parts EMS Button LED Indicator Battery Cover Motion Buttons Start / Horn Button Rotary Key... - Page 9 4-2 SAGA1-K Receiver’s parts Power On Indicator Horn Wiring Diagram Antenna Output cable...
- Page 10 4–3 General Operation 1. Turn on the main power switch of the equipment (Crane). 2. Install four AA size batteries in the transmitter make sure the "+" and "-" direction are correct. 3. Rotate "EMS" mushroom clockwise 45 and pull out. ¢...
-
Page 11: Chapter 5 Inspection And Fault Detection
Chapter 5. Inspection and Fault Detection 5–1 Inspection Daily inspection is important and will ensure the safety of operation. Inspection should include "emergency stop" and other safety devices and functions. If there is any doubt, operation must be stopped immediately and problems must be solved before resume of operation. -
Page 12: Chapter 6 Faq
Chapter 6 FAQ The followings are some common questions that our customers have frequently asked with answers provided. Q1: Why does the relay not actuate when I operate a function on the transmitter? A1: If the relay does not actuate, this can be due to one of the following causes: 1. -
Page 13: Part. 2 Technician's Manual
Part 2. Technician’s Manual Chapter 1 General Characteristic 1–1 General Specifications - Operation Frequency--------------------- : 433.05~434.79MHz - Hamming Distance ----------------------- : £ - I.D. Code----------------------------------- : 2 sets (set by factory, never repeated) - Temperature Range----------------------- : -40 ~ +85 ¤... -
Page 14: Chapter 2 System Configuration
Chapter 2. System Configuration 2–1 Transmitter Unit Control Data Antenna Data Encoder Transmitter Pushbuttons Circuit RF Circuit Figure A. Transmitter block diagram The transmitter unit consists of an Encoder Circuit and a Transmitter RF Circuit. When the user presses a pushbutton on the transmitter, the Encoder Circuit senses the pushbutton’s data immediately. - Page 15 to the Receiver/ Decoder module. The main functions of the Receiver/Decoder module are to process the RF signal from the transmitter through the signal processing circuits, consisting of the band-pass filter, RF amplifier, mixer, IF amplifier, demodulator, error detection, error correction circuits, and decoder in order to generate a control command sent to the Relay module to drive the corresponding relay.
-
Page 16: Chapter 3 Installation
2-3-2 Hamming Code It is shown as below, the Code Word length is equal to 8, the Data Bit is equal to 4, the Hamming Distance is equal to 4, it means that HAMMING CODE (8,4,4) can correct single-bit errors and also detect double-bit errors. 1 0 1 0 1 0 0 0 BINARY... - Page 17 c. Select a place where there is no spark, e.g. keep away from motors, relays, magnetic switch and power cables. d. Keep away from high-voltage wiring and device. e. The Receiver’s box must be at least 3 cm away from the other obstacles. 3.
Need help?
Do you have a question about the SAGA1-K Series and is the answer not in the manual?
Questions and answers