
Summary of Contents for iRV iRV6500BT
- Page 1 INSTRUCTION MANUAL Car DVD/CD Receiver AV IN/AUX IN 10 19 20...
-
Page 2: Before You Begin
BEFORE YOU BEGIN PRECAUTIONS: CAUTION: USE OF CONTROLS OR ADJUSTMENT OR PERFORMANCE OF PROCEDURES OTHER THAN THOSE SPECIFIED HEREIN MAY RESULT IN HAZARDOUS RADIATION EXPOSURE. THE USE OF OPTICAL INSTRUMENTS WITH THIS PRODUCT WILL INCREASE EYE HAZARD. A class 1 laser is safe under all conditions of normal use. CLASS 1 This means the maximum permissible exposure (MPE) cannot be exceeded. -
Page 3: Installation
5. Power On/Off 12. S top 6. Select Band (FM/AM) 13. T rack / Search / Seek Tuning 7. Volume Control • Tablet/Smart Phone open bluetooth connection. Open the App on Tablet/Smart Phone. • Tablet/Smart Phone through App. controls Car Audio in bluetooth connection. Modified Pin Code/Device: • Press “ ” in the screen of Tablet/Smart phone to change the Bluetooth PIN code. Input 4 desired digits, press “OK” icon then restart the unit (iRV6500BT), the revised PIN code will be saved into the unit automatically. • Press “ ” in the screen of Tablet/Smart phone to change the Bluetooth device name. When a desired device name (max. 16 alphabet) is inputted, press “OK” icon then restart the unit, your desired device name (1-6) will be saved into the unit automatically. Use New Pin Code/Device: • Press “ ” button to turn ON unit. • Activate the Bluetooth function on Tablet/Smart phone to search for Bluetooth devices. Once a Bluetooth search is completed, the revised device name will be displayed. Click the revised device name and input the revised PIN code to connect Bluetooth. -
Page 4: Wire Connection
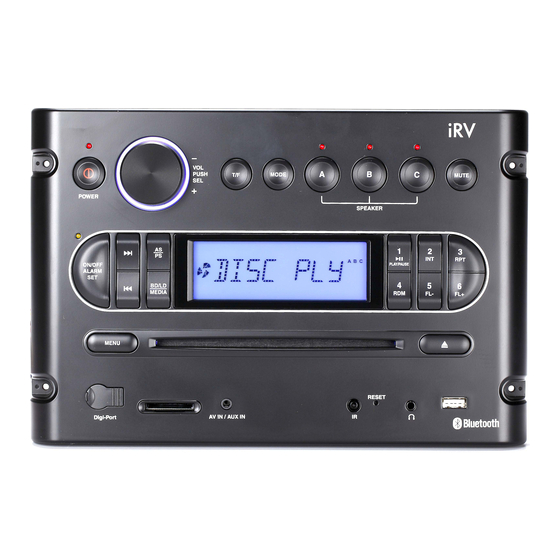
WIRE CONNECTION Audio Line Out: White (L) Red (R) Audio Line In: White (L) Red (R) I & II Video Outputs: Yellow Connect to external A/V system to display VIDEO OUT FUSE 15A ANTENNA LINE IN LINE OUT ISO CONVERTER GREY/BLACK(-) BROWN/BLACK(-) FRONT RIGHT REAR LEFT GREY(+) SPEAKER ‘A’... - Page 5 Locations of Parts (Main unit) 10 19 20 AV IN/AUX IN 16 21 22 1. POWER ON/OFF ( 2. SELECT FUNCTION BUTTON (SEL) 3. VOLUME CONTROL 4. PRESET STATIONS (1,2,3,4,5,6) 5. BAND (BD) / LOUDNESS (LD) / MEDIA CHANGE BUTTON (MEDIA) 6. MODE BUTTON (MODE) 7. AUTO STORE/PRESET SCAN (AS/PS) 8. DVD/CD TRACK / SEARCH BUTTON ( 9. SEEK TUNING 10. MUTE (MUTE) 11. TIME/FREQUENCY DISPLAY (T/F) 12. MAIN MENU (MENU) 13. ALARM SET (ON/OFF ALARM SET) 14. SPEAKER (A, B, C) 15. LCD DISPLAY 16. CD EJECT BUTTON (...
- Page 6 Locations of Parts (Remote Control) 1. POWER ON/OFF 2. MODE 3. PLAY/PAUSE 4. TITLE / PLAYBACK CONTROL 5. SELECT 6. SEEK+/SEEK- / CD TRACK/SEARCH 7. VOL +/VOL- 8. GOTO Loud STEP 9. AUDIO 10. ENTER 11. NAVIGATION 12. AUTO SEEK / PRESET SCAN / REPEAT 13. RANDOM / BAND 14. LOUDNESS 15. INTRO VOL+/- 16. SUBTITLE 17. SETUP 18. EQUALIZER / ANGLE 19. SLOW MOTION...
-
Page 7: General Operations
GENERAL OPERATIONS Turning the unit ON/OFF ( Press “ ” button to turn ON/OFF unit. Selecting a source (MODE) Press MODE repeatedly to switch between TUNER, DISC, USB, SD, DIGI-PORT, BT PLAY, AUX IN and AV IN mode. Main Menu (MENU) Press MENU button to show the MAIN MENU. Turning and press SEL to select function mode. Loading a Disc Make sure power is turned ON before loading disc. Insert a disc into the disc loading slot Ejecting a Disc Make sure power is turned ON before ejecting disc. Press button to eject disc. Adjusting Volume/Bass/Treble/Balance/Fader • Head Unit: Turning the VOL knob Right or Left. Increase or decrease the volume by turning . Press the SEL (2) button briefly until the BASS, TREBLE, BALANCE and FADER function. • Remote Control: Press VOL+ or VOL- to increase or decrease volume. Further settings via the multi controller Press and hold SEL button to adjust LOCAL/STEREO/BEEP/ADJUST TIME/AUDIO DSP/U.S.A: 2 sec. -
Page 8: Listening To Radio
Earphones Connect the stereo earphones to the Phone jack Note: Extended listening of music at high volume may damage your hearing. It is highly recommended to use at comfortable volume levels. RESET Reset button is placed on the housing. To reset, use a sharp point object and press and hold the RESET button for 2 seconds. The reset button is to be activated for the following reason: • Initial installation of the unit when all wiring is completed. • All the function buttons does not operate. • Error symbol on the display. LISTENING TO RADIO Band (BD) Press BD button repeatedly will toggle cyclically between each band. FM1--FM2--FM3--AM1--AM2. Automatic or Manual tuning ( When pressed short, these keys are operated as AUTOMATIC tuning mode. - Page 9 Remote control: Files search for stop mode: 1. Press Stop button to stop any playback. 2. Press and hold 2 sec ( ) button repeatedly to select “MUSIC” file listed. 3. Press ( ) button to listed music folder. 4. Press ( ) button to select desired folder then press Enter to confirm. 5. Press ( ) button to select desired file then press Enter button to start playback music. 6. Press SEEK+ for next file. 7. Press SEEK- for previous file. 8. Press button for pause, press again for resume playback. 9. Press INT button repeatedly for intro play, you can select INTRO DIR/ALL/OFF to introducing play each file 10sec. 10. Press RPT button repeatedly to select Rep-1/Rep DIR/Rep ALL repeatedly playback until press Stop button. 11. Press RDM button repeatedly to select RANDOM DIR/ALL/OFF to random playback DIR or ALL. Movie Playback: Head unit Files search for stop mode: 1. Press AS/PS button to stop any playback.
-
Page 10: Playing Dvd/Video Cd
Note: - Due to the great variety of devices with USB and SD card interfaces that sometimes have manufacturer-specific functions, we cannot guarantee that all media will be recognized and that all operational functions will be available with this device. - You cannot operate USB hard drives on the device. - Page 11 Changing the subtitle language during playback (Multi-subtitle) With DVDs featuring multi-subtitle recordings, you can switch between subtitle languages during playback. 1. Press Sub-T on the remote control during playback. Press repeatedly until the supported desired subtitle appears. Note: • With some DVDs, switching between subtitles may only be possible using a menu display. • You can also switch between subtitles using SET-UP MENU or tap the screen then press Subtitle. Changing the viewing angle during playback (Multi-angle) –...
-
Page 12: Setting The Dvd Player
SETTING THE DVD PLAYER You can flexibly customize the unit to suit your preference. You can set the language and other video and audio settings so when playback starts it will always use your preferred settings. Important: 1. Play any video file before you can access the setup. 2. Press Setup on the remote control. 3. Used to select DVD to return/enter setup category. Settings Category Options TV System NTSC, PAL TV Type 4:3PS, 4:3LB, 16:9 System Setup Password Setup password Rating Setup rating level Default Restore to factory settings OSD Language Audio Language Language Setup Select preferred options appear on screen Subtitle Language Menu Language Setting Rating Password 1 Press Setup on the remote control. 2 Using Navigation keys select System Setup >...
Need help?
Do you have a question about the iRV6500BT and is the answer not in the manual?
Questions and answers