Advertisement
Advertisement
Table of Contents

Related Manuals for iRV iRV6500BT

Summary of Contents for iRV iRV6500BT
-
Page 1: Instruction Manual
INSTRUCTION MANUAL Car DVD/CD Receiver AV IN/AUX IN... -
Page 2: Before You Begin
BEFORE YOU BEGIN PRECAUTIONS: CAUTION: USE OF CONTROLS OR ADJUSTMENT OR PERFORMANCE OF PROCEDURES OTHER THAN THOSE SPECIFIED HEREIN MAY RESULT IN HAZARDOUS RADIATION EXPOSURE. THE USE OF OPTICAL INSTRUMENTS WITH THIS PRODUCT WILL INCREASE EYE HAZARD. CLASS 1 A class 1 laser is safe under all conditions of normal use. LASER PRODUCT This means the maximum permissible exposure (MPE) cannot be exceeded. -
Page 3: Installation
INSTALLATION Selecting the Mounting Location Preparing the Opening MAIN UNIT 178mm 118.8mm RECOMMENDED CUTOUT 133mm MOUNTING SCREWS M3x30 WITH ø3 SPRING WASHER AND ø3 FLAT WASHER 4xPLACES 19mm 247.9mm 5.8mm 236.2mm 265mm 247.9mm NOTE: Before cutting the mounting hole, make sure the area behind the mounting location is clear of wires, fuel and vacuum or brake lines. -
Page 4: Wire Connection
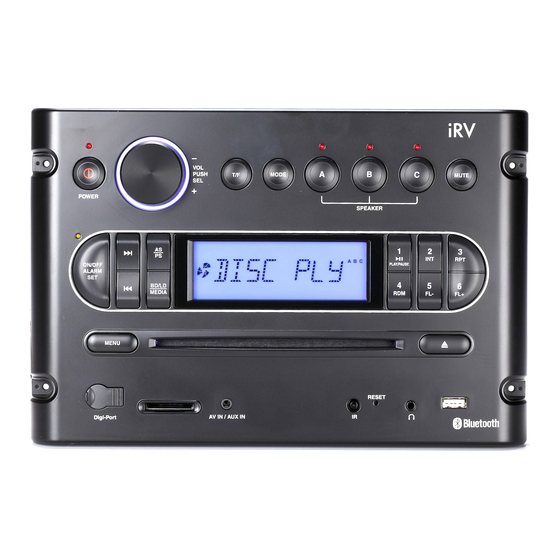
WIRE CONNECTION Audio Line Out: White (L) Red (R) Audio Line In: White (L) Red (R) I & II Video Outputs: Yellow VIDEO OUT FUSE 15A ANTENNA LINE IN LINE OUT ISO CONVERTER GREY/BLACK(-) BROWN/BLACK(-) FRONT RIGHT REAR LEFT GREY(+) SPEAKER ‘A’... - Page 5 Locations of Parts (Main unit) 10 19 20 AV IN/AUX IN 16 21 22 EN-5...
- Page 6 Locations of Parts (Remote Control) Loud STEP VOL+/- Band Use and care of the remote control Installing the battery CAUTIONS Using the remote control IMPORTANT...
-
Page 7: General Operations
GENERAL OPERATIONS Turning the unit ON/OFF ( Selecting a source (MODE) MODE Main Menu (MENU) MENU Loading a Disc Ejecting a Disc Adjusting Volume/Bass/Treble/Balance/Fader VOL+ or VOL- Further settings via the multi controller 2 sec. STEREO BEEP U.S.A LOCAL/DX STEREO/MONO BEEP MODE AUDIO DSP CONTROLS Select U.S.A/Europe Area Band... -
Page 8: Listening To Radio
Alarm Setting ALARM SET To set the alarm: ALARM SET ALARM SET Alarm status: Speaker Output SPEAKER A, SPEAKER B, SPEAKER C Earphones Note: Extended listening of music at high volume may damage your hearing. It is highly recommended to use at comfortable volume levels. - Page 9 CD/MP3 Music listening: Head unit: AS/PS “MUSIC” 5 FL-/6 FL+ 1 PAU 2 INT INTRO DIR/ALL/OFF 3 RPT Rep-1/Rep DIR/Rep ALL A/PS 4 RDM RANDOM DIR/ALL/OFF Remote control: Stop “MUSIC” Enter Enter SEEK+ SEEK- INTRO DIR/ALL/OFF Rep-1/Rep DIR/Rep ALL Stop RANDOM DIR/ALL/OFF Movie Playback: Head unit...
-
Page 10: Playing Dvd/Video Cd
PLAYING USB / SD/MMC MEMORY CARD FILES / DIGI-PORT & AV IN/AUX IN AV IN/AUX IN USB/SD/MMC Memory Card Note: - Due to the great variety of devices with USB and SD/MMC card interfaces that sometimes have manufacturer-specific functions, we cannot guarantee that all media will be recognized and that all operational functions will be available with this device. - Page 11 Note: Changing the subtitle language during playback (Multi-subtitle) Sub-T Note: Changing the viewing angle during playback (Multi-angle) – (DVD only) Angle Angle Title (DVD only) Title Return to Root Menu (DVD only) Menu Note: Some DVD may not contain root menu. Slow motion playback Slow Note:...
-
Page 12: Setting The Dvd Player
SETTING THE DVD PLAYER Important: Setup Settings Category Options Setting Rating Password Setup System Setup > Password Enter ‘0000’ Enter Enter Note: The default password is ‘0000’. In case you forgot your password, you can use the master password ‘0000’ TECHNICAL SPECIFICATIONS CD/MP3/WMA PLAYER SECTION TUNER FM...
Need help?
Do you have a question about the iRV6500BT and is the answer not in the manual?
Questions and answers
Radio will not shut off or reset
The iRV6500BT radio may not shut off or reset if the power connections are incorrect. Ensure the power supply is properly connected to 12V DC (10.8–15.6V allowable) and all wiring follows the diagram. Also, check if the unit is mounted and connected correctly, as improper installation can prevent proper operation.
This answer is automatically generated