
Related Manuals for Orflo MOXI GO

Summary of Contents for Orflo MOXI GO
- Page 1 Moxi GO™ USER GUIDE For Research Use Only. Not For Use In Diagnostic or Therapeutic Procedures.
- Page 2 Orflo may authorize in writing. Limitations: The Moxi GO is intended for research use only. It is not intended for use in medical diagnostic or therapeutic procedures, and it has not been approved or cleared by the Unites States Food and Drug Administration for such uses.
-
Page 3: Table Of Contents
System Overview ....................... 4 Moxi GO Accessories ........................ 5 Getting Started ..........................6 Using the Moxi GO™ ........................7 Home Screen ..........................7 Settings ............................. 8 A number of settings are made available to the user by selecting the Settings icon..... 8 Date and Time ........................ - Page 4 Moxi GO™ Apps ........................37 Troubleshooting .......................... 38 Error Messaging ......................... 40 Maintenance and Storage ......................41 Specifications for the Moxi GO™ and MFS Cassettes ............... 43 Ordering Information ........................44 Technical Service ........................45 Warranty ............................. 45 Applicable Patents ........................46...
-
Page 5: Introduction
IMPORTANT NOTE: The Moxi GO™ is intended for research use only. It is not intended for use in medical diagnostic or therapeutic procedures, and it has not been approved or cleared by the Unites States Food and Drug Administration for such uses. -
Page 6: Conventions Used In The User Guide
Indicates additional related information that may be helpful to the user. Safety Precautions The Moxi GO™ has integrated safety features that are designed for the protection of the user. THE INSTRUMENT SHOULD BE USED ONLY BY PROPERLY QUALIFIED AND TRAINED LABORATORY PERSONNEL, AND SHOULD BE USED ONLY AS DIRECTED IN THIS GUIDE. -
Page 7: Biological Safety
• Do not attempt to defeat the interlock and run a test with the door open. Do not operate the Moxi GO™ if there is any damage to the instrument’s enclosure. • Do not attempt to disassemble or service the Moxi GO™ to service or adjust the •... -
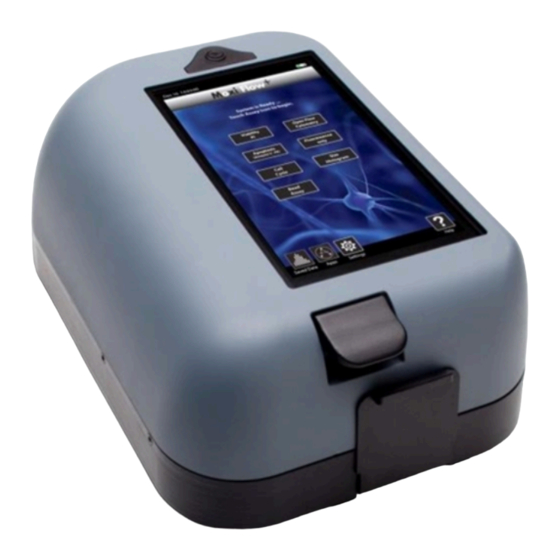
Page 8: Moxi Go Tm System Overview
The Moxi GO™ Kit includes the Moxi GO™ flow cytometer, USB Cable, USB Power Adapter, one pack of 25 MF-S+ Cassettes, a Quick Start Reference Guide, and Registration Card. The following figure shows the main visible components of the Moxi GO™ and the table provides a description of each component. -
Page 9: Moxi Go Tm Accessories
Moxi GO Accessories The Moxi GO™ uses a USB Cable and Power Adapter for power source. The Moxi GO™ Kit will come with the power adapter required for your local region. For more information on the approved regional power adapters, please see Section 14, Ordering Information. Additional adapter types may be available for other regions, please contact technical support at ORFLO for more information. -
Page 10: Getting Started
Getting Started The Moxi GO™ is shipped in a condition ready for initial use, however it is recommended to update the flow cytometer with the most current software version available upon receipt. NOTE: Save all packaging as these materials are recommended for use should you need to send instrument for service. -
Page 11: Using The Moxi Go
Press the Power Button to turn on the instrument. The Home Screen will become available. Home Screen NOTE: The home page appearance may change as additional applications are launched and new icons are added to the Moxi GO software program. Moxi GO™ User Guide Page 7... -
Page 12: Settings
Month, Day, Year and Time fields. When completed, select Done. Passcode Lock The Moxi GO™ can be configured to require a password login to use the instrument and access stored data. To set the lock code, select the Settings icon and then use the left and right arrows on the screen to highlight the “Passcode Lock”... -
Page 13: Fluorescence Gain
To set the Auto Noise-find, select the Settings icon and then use the left and right arrows on the screen to highlight the Auto Noise-find field. Use up or down arrows to change and select the field value to Off or On, and then select Done. Moxi GO™ User Guide Page 9... -
Page 14: Acquiring And Analyzing A Sample
Acquiring and Analyzing a Sample General Sample Preparation Guidelines and Considerations There are five key considerations for preparing a sample for analysis with the Moxi GO™: 1. Solution Conductivity – Cells must be suspended in 0.9% salt solution (e.g. PBS or equivalent) to ensure proper conductivity for unit operation and to ensure accurate particle sizing. -
Page 15: General Instructions For Running A Test (All Applications)
(b) you are using a new cassette, or unused side of a cassette. 4. The Moxi GO™ will automatically perform a calibration sequence, as outlined in the images below, to align the laser to the cassette flow cell. This occurs for all tests except “Size Histogram”. -
Page 16: Running The Open Flow Cytometry Application
The Open Flow Cytometry application is an open-format test that allows the user to design their own assays using antibodies and dyes. Assays must use fluorophores compatible with the system configuration: MXG001: 532 nm laser excitation and 561nm/LP filter. • Moxi GO™ User Guide Page 12... - Page 17 “Fluorescence Gain” setting (set from the Settings icon on the Home Screen). 4. A pop-up menu will appear with the available options (image below/right). Touch the desired value to change the setting. Moxi GO™ User Guide Page 13...
-
Page 18: Running A "Cell Cycle" Test
G0/G1, S, and G2/M phases. It is important to note that the cell cycle assay on Moxi GO™ has been configured to run specifically with the Orflo Technologies, LLC Cell Cycle Protocol, thereby insuring that the sample fluorescence intensity is appropriately matched to the fluorescent gain settings of the assay/instrument. - Page 19 The user is then prompted to select a “Control” test (image above/middle). Note: As interpretation of samples with arrested cell proliferation can be challenging, the Moxi GO™ system is designed to allow initial gating of a “Control”, or reference, sample that can be used to establish the expected locations of the G0/G1, S, and G2/M phases.
- Page 20 G2/M gating are predetermined by the control file reference. All relevant information for those regions is presented in table below the histogram, including: the calculated cell counts, percentages, MFI’s, and MFI ratio’s (to the G0/G1 region MFI). Moxi GO™ User Guide Page 16...
- Page 21 Moxi GO™ User Guide Page 17...
-
Page 22: Analyzing A Sample
Analyzing a Sample Test Screen Outputs The Moxi GO™ Software has two main test output formats: 1.) Fluorescence vs. Size dot plot OR 2.) Size or fluorescence channel histograms. Fully labeled images are provided below for each type of output. More detailed workflow instructions for each function are outlined in the “Managing the Data”... -
Page 23: Histograms
Histograms Moxi GO™ User Guide Page 19... -
Page 24: Managing The Data
(e.g optimize unnecessary adjusting intensity (red export the size (noise/debris) the size markers). screenshot, resolution. points from (blue) save, save analysis/saving. gates. gates) Moxi GO™ User Guide Page 20... -
Page 25: Re-Scaling The Size Range (X-Axis)
Gate Adjustment Toggle icon in the upper right of the dot plot (see images below). Each gating mode will be discussed in further detail in the corresponding sections below. Moxi GO™ User Guide Page 21... - Page 26 Data points outside of the blue (size) gate are not included in analysis results. The total count in the size-gated region is displayed above the plot, between the blue gating markers. Moxi GO™ User Guide Page 22...
- Page 27 “Upper Population” statistics (images below, black box to the right underneath the scatter plot). Those data points below the line are included in the “Lower Population” statistics (images below, black box to the left underneath the scatter plot). Moxi GO™ User Guide Page 23...
- Page 28 Gates can be recalled at any point (immediately after an acquisition or when analyzing a saved test) by selecting the same STO/RCL icon. Saved gates are displayed in green (see image Moxi GO™ User Guide Page 24...
- Page 29 (fluorescent) axis. The size histogram is displayed as a red histogram with a base on the bottom (size) axis. The histograms can be rescaled by swiping your finger in the appropriate direction: Up-down for the size histogram and left-right for the fluorescent histogram. Moxi GO™ User Guide Page 25...
- Page 30 Changing Display Axis for Analysis (PMT vs Size, Histogram Only Views) Moxi GO™ User Guide Page 26...
- Page 31 The user can select any combination of y-axis and x-axis values to generate the corresponding data display. The size axis can only be selected as the x- axis. Some examples are shown in the above figure (but not all possible permutations) including: Moxi GO™ User Guide Page 27...
- Page 32 Concentration, Size, and Percentage Information The Moxi GO™ provides particle concentration and precise sizing information for each gated region, total counts information, fluorescent percentages, and median fluorescent intensities (all where applicable based on the channels selected). Three example analysis view screens are shown below, left to right: Fluorescence vs. size dot plot, Single Channel Histogram Display, and Fluorescence vs.
-
Page 33: Managing Data Files And Storage
Note : For cell cycle assays, control Sample files are automatically saved with a ‘C” suffix at the end of the file name. If choosing to rename the file at a later time, one must keep Moxi GO™ User Guide Page 29... -
Page 34: Saving And Deleting Data/Tests
Screenshots can be transferred to a computer following the instructions in the “Exporting Data” section this User Guide. Caution Subsequent screenshot exports for the same test will overwrite any existing screenshot associated with that test. Moxi GO™ User Guide Page 30... -
Page 35: Editing Saved Tests
Saved tests can be accessed by selecting the Saved Data icon from the Home screen. A list of all files stored on the Moxi GO™ is presented, ordered by test date/time. File types are color coded (image below) as follows: Test (FCS) files are displayed as green rows. -
Page 36: Compare/Overlay Saved Tests
Note: The disk usage percentage is indicated in the upper right corner of this screen. Compare/Overlay Saved Tests Moxi GO™ software provides the functionality to directly compare two tests by overlaying the data from each test in a dot plot or histogram view. - Page 37 The tests need to be of the same assay type (e.g. Open Flow Cytometry, Viability, etc) • Only two tests can be compared at a time. • Open Flow tests need to have identical Fluorescent Gain Settings. • Moxi GO™ User Guide Page 33...
-
Page 38: Exporting Data - Connecting Via Usb (Usb On-The-Go)
3. Power on the instrument. It will appear as a disk (or flash) drive in your computer’s file system (Windows Explorer for PC’s or Finder for Mac), named “Moxi GO”. 4. Open the Moxi GO drive folder and copy the files to your computer (drag and drop or copy and paste). -
Page 39: System Information
For additional help, see the Troubleshooting table. Instrument Firmware and Software Upgrades This User Guide describes OS version 2.0 of the Moxi GO™ Software. For information on the most up-to-date software/firmware, files, and instructions, please visit the ORFLO website at www.orflo.com. -
Page 40: Updating The Firmware
From the Apps screen (off of the Home screen) press the Loader app icon 5. The Moxi GO™ will show up as an external drive on the computer (on Mac use the Finder, on PCs use the Windows Explorer to see it). -
Page 41: Moxi Go™ Apps
Moxi GO™ Apps Moxi GO™ Applications can be entered by selecting the Apps icon on the Home screen. Included applications in version 1.29 are: Clock • Programmable timer (with sound notification) • Loader – Puts unit in Firmware/OS loader mode •... -
Page 42: Troubleshooting
Reset instrument by pressing and holding the Instrument/Touchscreen stops power button for at least 5 seconds. Internal firmware issue responding If problem persists, contact ORFLO Technical Support. Try running the cell sample at a higher Cell/bead concentration too low concentration. - Page 43 Try breaking apart cells using pipette trituration blocking flow and/or protease treatment. System shuts off during Recheck that the system is properly plugged into System has insufficient alignment/test the instrument and into the AC wall adapter. Moxi GO™ User Guide Page 39...
-
Page 44: Error Messaging
Try to reset the instrument by pressing and Gray Screen – “Software malfunction. holding the power button for at least 5 seconds. If Exception” problem persists, contact ORFLO Technical System settings error Support. Try to reset the instrument by pressing and Resource Error: Missing holding the power button for at least 5 seconds. -
Page 45: Maintenance And Storage
Instrument repairs must be carried out by authorized personnel only. Charging the Battery The Moxi GO™ contains a 3.7 V lithium ion battery that can be charged for approximately 500 cycles. The battery can be charged continuously without damage, using a PC/Mac computer or the power adapter. - Page 46 Cleaning/Sanitizing The external surfaces of the Moxi GO™ body and touch screen display can be sanitized by wiping with a soft, nonabrasive cloth with 70% isopropyl alcohol or 70% ethanol. Other acceptable cleaning solutions for cleaning the body of the instrument (not for use on the touch...
-
Page 47: Specifications For The Moxi Go™ And Mfs Cassettes
Specifications for the Moxi GO™ and MFS Cassettes System Performance Detection Parameters 3 (1-color fluorescence, cell count, cell size) Excitation Laser Wavelength 532 nm (MXG001) or 488nm (MXG002) Number of PMTs Optical Detection Range 561 nm LP (e.g PE) and 525/45nm (488nnm system... -
Page 48: Ordering Information
IPX0 Ordering Information This section lists catalog numbers for the Moxi GO™ and related products. Currently the Moxi GO™ is only available for purchase in the Unites States. You can purchase ORFLO products on-line at www.orflo.com. See the Technical Assistance section for information about contacting ORFLO directly. -
Page 49: Technical Service
ORFLO or an approved sales distributor.* You may purchase, for an additional fee, an extended warranty for the Moxi GO™ for an additional one (1) or two (2) years from the anniversary of the date of purchase. The extended warranty extends the duration of your warranty coverage from the date of original purchase from ORFLO or an approved sales distributor, but does not alter, change, or otherwise add to the coverage described here. -
Page 50: Applicable Patents
An ORFLO technician will promptly examine your product to determine if the issue is covered under the ORFLO warranty. If it is, we will decide to either repair it or replace it at no cost to you, including shipping. Repair or replacement will be done as expediently as possible to ensure minimum disruption to your laboratory.
Need help?
Do you have a question about the MOXI GO and is the answer not in the manual?
Questions and answers