
Related Manuals for Orflo Moxi Flow

Summary of Contents for Orflo Moxi Flow
- Page 1 MOXI Flow UIDE For Research Use Only. Moxi Flow is not for use in diagnostic procedures.
- Page 2 This manual is believed to be complete and accurate at the time of publication. In no event shall Orflo Technologies or any of its affiliated corporations be liable for incidental or consequential damages in connection with or arising from the use of this manual.
-
Page 3: Table Of Contents
System Overview ..................... 4 Moxi Flow Accessories ......................5 Getting Started ..........................6 General Guidelines ........................6 Materials Required ........................7 Using the Moxi Flow ........................7 Home (Start) Screen ......................... 7 Settings ............................. 8 Passcode Lock ........................8 Fluorescence Gain ........................ 9 Analyzing a Sample ........................ - Page 4 Firmware via USB ................24 Moxi Flow Apps ........................25 Troubleshooting .......................... 26 Maintenance and Storage ......................29 Ordering Information ........................30 Specifications for the Moxi Flow ....................31 Technical Service ........................32 Warranty ............................. 33 Applicable Patents ........................35...
-
Page 5: Introduction
(FCS) files offline. Similarly, the user guide does not include information on preparing samples prior to running them in the Moxi Flow . For more information on this topic, please visit www.orflo.com. Conventions Used in the User Guide WARNING Alerts you to a situation that may cause injury to the user. -
Page 6: Safety Precautions
Do not attempt to disassemble or service the Moxi Flow . The instrument has no • user serviceable parts. All service must be performed by ORFLO Technologies. WARNING To avoid the danger of fire or explosion, do not use the Moxi Flow with flammable or explosive liquids. Laser Safety... -
Page 7: Biological Safety
• Wear appropriate personal protective equipment (PPE) including clothing, eyewear, and gloves. • Do not pipette by mouth. • Dispose of biological waste in accordance with all applicable local, state, and federal regulations. ™ Moxi Flow User Guide Page 3... -
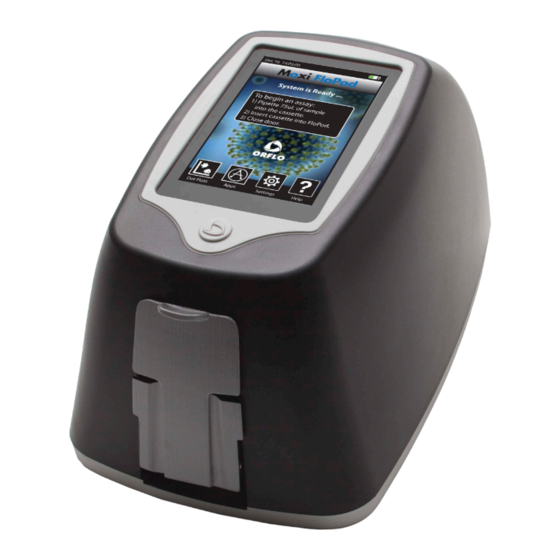
Page 8: Moxi Flow Tm System Overview
Moxi Flow System Overview The Moxi Flow Kit includes the Moxi Flow instrument, USB Cable, Power Adapter (US, UK, and EU versions only), User Guide and one pack of 25 Cassettes. USB Cable Port Touch Screen Display Power/Reset Button Lower Door... -
Page 9: Moxi Flow Tm Accessories
Connects instrument to USB cable. Cassette Disposable used for loading samples. Each cassette contains two fill ports thereby allowing for two tests to be run per cassette. Moxi Flow Accessories Power Adapter (US style) Power Adapter (EU style) USB Cable Power Adapter (UK Style) ™... -
Page 10: Getting Started
Cells need to be prepared as single-cell suspensions. Clusters/aggregates should be broken apart with mechanical trituration and/or protease dissociation (e.g., Accutase - MXA020) As the Moxi Flow™ uses a 532nm laser with a 590/40nm detection filter, dye/fluorophore ™ Moxi Flow... -
Page 11: Materials Required
(e.g. R-PE, PI, Suncoast Yellow). For assays other than the “Open Flow Cytometry,” Orflo approved kits/reagents are strongly recommended. Materials Required Cell or bead sample (diluted and dissociated, if necessary); 75 µL minimum. • MF-S or MF-M cassette •... -
Page 12: Settings
Passcode Lock The Moxi Flow™ can be setup to require a password login to use the unit and access the units data. To set the Password lock, use the left and right arrows on the Settings screen to highlight the “Passcode Lock”... -
Page 13: Fluorescence Gain
Analyzing a Sample Sample Preparation Considerations There are four key considerations for preparing a sample for analysis with the Moxi Flow: 1. Solution Conductivity – Cells must be suspended in 0.9% salt solution (e.g. PBS or equivalent) for proper particle sizing and test function. Deviations of ~50% can be tolerated without sacrificing count performance. - Page 14 Settings icon off of the Home Screen. 4. Open the Upper and Lower Doors. Slide a test cassette into the tray and close both Doors. The Moxi Flow will automatically perform a calibration step (all tests except “Size Histogram”) as outlined below. The automated sequence aligns the laser to the cassette flow cell (“System Calibration”), and prompts the user to open the OUTER door...
- Page 15 If the time limit for any of the steps is exceeded, the test will automatically cancel and the user will be returned to the Home screen 6. The Moxi Flow will begin the test. While the system waits for sample/fluid detection an “Analyzing…”...
-
Page 16: Test Screen Output
Test Screen Output The Moxi Flow™ test output screen components are fully labeled in the images below for both the scatter/dot plot output and the size histogram output. More detailed workflow instructions for each function are outlined in the “Managing the Data” section below. -
Page 17: Histogram Output
Histogram Output ™ Moxi Flow User Guide Page 13... -
Page 18: Managing The Data
(blue on fluorescent operations (e.g. properly size markers). intensity (red export screenshot, identifies the resolution. markers). save, save gates) noise. Adjust if necessary. ™ Moxi Flow User Guide Page 14... -
Page 19: Re-Scaling The X Axis (Size Range)
Removing the noise region The Moxi Flow automatically identifies the noise region and removes it. To manually adjust the noise gate, press the red gate button at the top right of the screen and toggle until the yellow noise gate appears (see left image below). -
Page 20: Gating The Data
(see the image on the right below). Using that red gate toggle button, the user can switch back and forth between size and fluorescent gating modes. Toggle between size and Fluorescent Gates Information pertinent to the population above the fluorescent (red) gate and between the size ™ Moxi Flow User Guide Page 16... - Page 21 Store and Recall of Gate Settings By default, the Moxi Flow™ gates are “sticky” meaning that each new test defaults to the gate settings (size and fluorescence) of the prior test. The Moxi Flow™ also allows the user to store up to five gate locations in memory for recall.
- Page 22 (fluorescent) axis. The size histogram is displayed as a red histogram with a base on the bottom (size) axis. The histograms can be rescaled by swiping your finger in the appropriate direction: Up-down for the size histogram and left-right for the fluorescent histogram. ™ Moxi Flow User Guide Page 18...
- Page 23 Modes Count, Size, and Percentage Information The Moxi Flow™ provides particle concentration and precise sizing information for each gated region, total counts information, and fluorescent percentages for each test. Three example test output screens are shown below (left to right: Viability Count, Open Flow Cytometry, Size Histogram).
-
Page 24: Test Naming And Renaming Tests
Capital letters can be achieved by hitting the “ABC” button. Symbols and special characters can be accessed by hitting the “ABC” button first, followed by the “?123” button. Select Save to assign the newly entered name to the test. ™ Moxi Flow User Guide Page 20... -
Page 25: Saving And Deleting Data/Tests
Moxi Flow. Exporting Data Screenshots Exact data screenshots can be generated from the Moxi Flow™ by selecting File | Print | Export Screenshot (see above first image) from the test screen. Selecting this option will save a bitmap file named after the test with a .bmp extension (e.g. Via-001.bmp). Note: Subsequent screenshot exports for the same test will overwrite any existing screenshot associated with that test. - Page 26 2. Plug the wide end (standard USB connector) of the USB Cable into your computer’s USB port. 3. Plug the small end (mini-USB connector) of the cable into the back of the Moxi Flow 4. Make sure the Moxi Flow is powered on and wait for it to appear as a disk (or flash) drive in your computer’s file system (Windows Explorer for PC’s or Finder for Mac).
- Page 27 Previous icon to return to the previous screen. The last screen of the help menu provides information on the version of the Moxi Flow™ OS being run on the unit, the build date, as well as the Bluetooth ID number (see image to the right).
-
Page 28: Instrument Firmware And Software Upgrades
USB port via the provided USB cable. 1. Download and extract the Moxi Flow™ Firmware update files (provided as a .zip file). Three files should be present on extraction/unzipping: MANIFEST.TXT, KERNEL.COF, and MOXIPROG.HEX. Note the location of the files for later use. -
Page 29: Moxi Flow Tm Apps
AC adapter. The unit has been updated and is now ready for use. Moxi Flow Apps Moxi Flow applications can be entered from touching the Apps icon on the Home screen. Included applications in version 2.04 are: Clock •... -
Page 30: Troubleshooting
Break clumps by pipetting up and down with a Cell clumping standard pipette. Protease treatment can also be used to dissociate clusters. ORFLO recommends Accutase or equivalent. Please refer to the “Managing the Data” | “Gating the Data” section for instructions on gating. The... - Page 31 Break clumps by pipetting up and down with a Cell clumping standard pipette. Protease treatment can also be used to dissociate clusters. ORFLO recommends Accutase or equivalent. Size measurements are reported as the mean size for a gated range. If a cell population is not...
-
Page 32: Error Messages
No Suitable Fit Size Histogram counts. Please take a photo and send to System firmware has detected a Tech_support@orflo.com. Reset the instrument Red Screen – “Software malfunction. by pressing and holding the power button for at Exception” least 5 seconds. -
Page 33: Maintenance And Storage
USB port on a computer or an Orflo power adapter. If using the power adapter, plug it into an AC outlet with an appropriate power rating. Charging time will vary but a complete charge is typically achieved in 4-8 hours. -
Page 34: Ordering Information
Ordering Information This section lists catalog numbers for the Moxi Flow and related products. You can purchase Orflo products through a regional distributor or on-line at www.orflo.com. See the Technical Assistance section for information about contacting Orflo. Product Description Cat. No. -
Page 35: Specifications For The Moxi Flow
Specifications for the Moxi Flow System Performance Detection Channels: 2 (1 color, 1 size) Laser Wavelength: 532 nm Number of PMT’s: Optical Detection Range: 590/40 nm (e.g. R-PE) Particle Size Detection: Impedimetric (Coulter Principle) Display: 480 x 320 color touchscreen... -
Page 36: Technical Service
2000 m (maximum) Applicable Pollution Degree: Pollution Degree 2 Degree of Ingress Protection: IPX0 Technical Service For technical service, contact ORFLO Technologies at 855-TRY-MOXI (855-879-6694) or email us at Tech_support@orflo.com for technical questions or info@orflo.com for general questions. ™ Moxi Flow... -
Page 37: Warranty
How Long is Your Warranty Your ORFLO products are covered for a period of one (1) year from the original date of purchase from ORFLO or an approved sales distributor.* You may purchase, for an additional fee, an extended warranty for your ORFLO cell analysis product for two (2) or four (4) years from the date of purchase. - Page 38 ORFLO warranty. If it is, we will decide to either repair it or replace it at no cost to you, including shipping. Repair or replacement will be done as expediently as possible to ensure minimum disruption to your laboratory.
-
Page 39: Applicable Patents
Applicable Patents The following core patents apply to the Moxi Flow and cassettes. This is not intended to be an all-encompassing list of related patents. U.S. Patent # 7,515,268 • U.S. Patent # 7,520,164 • U.S. Patent # 8,082,603 •...
Need help?
Do you have a question about the Moxi Flow and is the answer not in the manual?
Questions and answers