Table of Contents
Advertisement
Available languages
Available languages
Advertisement
Chapters
Table of Contents

Related Manuals for DBDrums DB-6 X


Summary of Contents for DBDrums DB-6 X
- Page 1 DB-6 x DIGITAL DRUM ESPAÑOL-INGLES MANUAL DEL USUARIO USER MANUAL...
- Page 2 PRECAUCION Precaución Cualquier cambio o modificación en la construcción de este dispositivo que no esté aprobada expresamente por la parte responsable del cumplimiento podrían anular la garantía del usuario para operar el equipo. ADVERTENCIA Al usar productos eléctricos, las precauciones básicas de seguridad deben seguirse, incluyendo las siguientes: NOTA: Este equipo ha sido probado y cumple con los límites para un dispositivo digital de Clase B, según la Parte 15 de las Normas de la FCC.
- Page 3 EL CUIDADO DE SU TAMBOR NO INTENTE ABRIR LA UNIDAD O HACER CUALQUIER CAMBIO EN LOS CIRCUITOS O PARTES DE LA UNIDAD. SERVICIO Y MODIFICACIÓN Este producto debe ser reparado por personal de servicio calificado cuando, el cable de alimentación o el enchufe del adaptador se ha dañado, o se ha salpicado con líquido en la unidad o se ha expuesto a la lluvia, el instrumento no parece funcionar...
-
Page 4: Table Of Contents
CONTENIDOS TABLA INSTALACION ..........................5 MÓDULO DE SONIDO........................9 PANEL DE CONTROL......................9 PANEL INFERIOR........................10 EJECUTAR EL PAD........................11 ENCIENDA LA ALIMENTACION..................... 11 REPRODUCCIÓN DE PADS ....................11 VOLUMEN MAESTRO......................11 DRUM KIT ............................ 12 SELECCION DE KIT......................12 EDICION DE KIT........................ -
Page 5: Instalacion
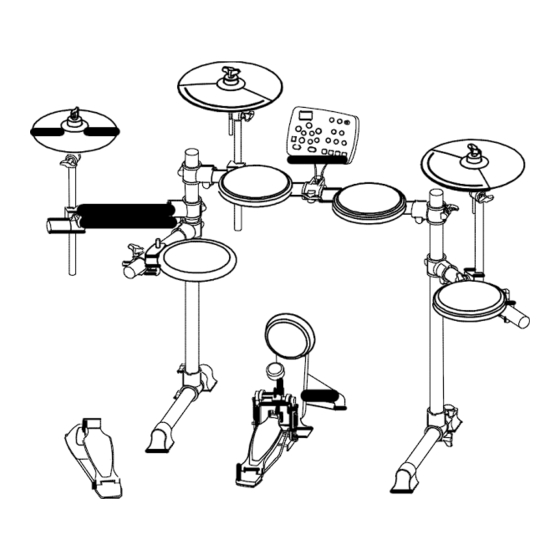
INSTALACION CRASH HI-HAT MODULO DE SONIDO db 6x RIDE TOM 1 TOM 2 SNARE KICK TOM 3 RACK - CORRAL CONTROL DE HI-HAT PEDAL BOMBO * PEDAL DE BOMBO ACCESORIO OPCIONAL *la foto es ilustrativa y no coincide con el producto El dibujo muestra una batería completa después de la instalación. - Page 6 INSTALACION RACK- CORRAL L-Rod Wing nuts Barra ppal. Pad clamp Rack clamp Brazo Barra Vertical Mini Boom de Crash y Ride Mini Boom Hi-Hat Patas Otras partes del rack-corral...
- Page 7 INSTALACION INSTALACION DEL RACK 5 Introduzca las varillas del 4 Gire los L-Rods a las posiciones platillo y ajuste su posición. adecuadas, y luego ajuste las tuercas mariposa. Mover y rotar las abrazaderas del pad a la ubicación adecuada. 6 Mover y rotar las abrazaderas del pad a la ubicación adecuada, luego ajuste las tuercas mariposa.
- Page 8 INSTALACION COMPONENTES DE INSTALACION Instalación de Hi-Hat Instalación de Crash y Ride 1. Rem ove the win g nut, 1. Remove the wing nut, washer 1- Retire la tuerca de mariposa, la arandela 1- Retire la tuerca mariposa, washer and felt pad and felt pad y almohadilla de fieltro arandela y felpa del pad.
-
Page 9: Módulo De Sonido
MODULO DE SONIDO PANEL DE CONTROL CLICK TEMPO MASTER VOLUME PATTERN CRASH RIDE HIHAT TOM 2 TOM 1 VOICE VOLUME DRUM OFF TOM 3 HI-HAT PEDAL SNARE KICK PLAY RECORD SAVE STOP (1) Display: El display es un tipo LED de 7 segmentos 3-digital que muestra información como el número de Kit, número de voz, etc. -
Page 10: Panel Inferior
MODULO DE SONIDO PANEL INFERIOR D C 9 V L I N E I N HEADPHONE LINE OUT U S B T R I G G E R P O W E R O F F O N Power interruptor: Activar Desactivar módulo... -
Page 11: Encienda La Alimentacion
ACCIONAR EL PAD Encienda la alimentación Accionar Snare Drum Golpea la posición central del pad para hacer (1) Baje el dispositivo de audio externo el sonido principal, golpear el aro del pad para conectado con la batería. hacer un sonido de aro. (2) Pulse el botón POWER mientras no golpea Head el pad o presione el pedal de control del Hi-Hat. -
Page 12: Drum Kit
DRUM bateria tiene presets percusión predefinidos para su elección. cada kit es una combinación de diferentes voces de instrumentos asignados a cada pad que tiene un estilo para cada caso. Cualquier kit puede ser editado y guardado. Acceda al modo de kit Después de que la alimentación está... -
Page 13: Salir Del Modo De Edición
DRUM El siguiente procedimiento es para la asignación de Sonido. La forma de cambiar el volumen es la misma. Mientras que el botón VOICE y el botón del pad seleccionado parpadeen, aparecerá su número de voz actual en la pantalla. Utilice los botones + y - para cambiar el número de la voz del rango 1 -184. -
Page 14: Pattern
PATTERN Hay 50 patterns incorporados. ACCIONAR EL PATTERN Pulse el botón de PATTERN para activar el modo de Press the PATTERN button to engage the pattern mode and Ingrese el modo de patrón its indicator will light up. The pattern number with “P” in front patrón y su led se iluminará. -
Page 15: Metronomo
METRONOMO Oprima el botón CLICK para activar el metrónomo, el indicador se encenderá de acuerdo con el tempo actual. Nota: Durante la reproducción del pattern, el metrónomo no podrá sonar, pero el botón CLICK Activar el metrónomo parpadeará si el metrónomo está activado. Pulse el botón de nuevo para detenerlo. -
Page 16: Grabacion
GRABAR Esta batería permite grabar un patterne y guardarlo como pattern 51. La grabación puede ser acompañado con el patrón. Antes de grabar, debe preparar los ajustes necesarios, incluyendo la selección de kit de batería, metrónomo y ajuste de tempo, la selección de patrón etc Espera de grabación Presione el botón RECORD para activar el modo de PLAY... -
Page 17: Detener Y Guardar
GRABAR Presione el botón RECORD o pulse el botón STOP para finalizar la grabación. El botón parpadea y RECORD está listo para la siguiente grabación. La nueva grabación sobre-escribe el contenido de la grabación anterior en la unidad de medida. De esta manera, puede editar su grabación. -
Page 18: Usb & Midi
USB & MIDI MIDI significa Musical Instrument Digital Interface. Esta es una interfaz estándar de comunicación que permite a los instrumentos musicales electrónicos y ordenadores para comunicarse entre sí de manera que instrucciones y otros datos pueden pasar entre ellos. Este intercambio de información hace posible la creación de un sistema de instrumentos y dispositivos MIDI que ofrece mayor versatilidad y control que está... - Page 19 LISTA DE VOZ Descripción Descripción Descripción HighAgogo SNARE HighQ LowAgogo Snare 1 Slap Cabasa Snare 2 ScraPush Maracas Snare 3 ScraPull ShortWhist Snare 4 Stick LongWhist Snare 5 SquarClick ShortGuiro Snare 6 MetroClick LongGuiro Snare 7 MetroBell Claves Snare 8 KickDrum2 Hi W-Block Snare 9...
- Page 20 LISTA DE VOZ Descripción Descripción Descripcion Open Hi-Hat 12 Low Tom5 CLOSED HI-HAT Closed Hi-Hat 1 Open Hi-Hat 13 Low Tom6 Closed Hi-Hat 2 Low Tom7 HI TOM Closed Hi-Hat 3 Hi Tom 1 Low Tom8 Closed Hi-Hat 4 Hi Tom 2 CRASH Closed Hi-Hat 5 Hi Tom 3...
-
Page 21: Especificaciones
ESPECIFICACIONES 3 X 8” Tom (without rim), 8” Snare (with rim feature), 12” Crash cymbal (with Configuracion choke feature), 12” Ride cymbal, 8” Hi-Hat, 6” Kick, Hi-Hat pedal Voice Drum Kit 20 preset kits Pattern 50, Full and Mute drum mode Pad Button play drum sound with led blink Pad Edit... - Page 22 CAUTION ESPECIFICACIONES CAUTION Any changes or modifications in construction of this device which are not expressly approved by the party responsible for compliance could void the user’s authority to operate the equipment. WARNING When using electrical products, basic safety precautions should always be followed, including the following: NOTE: This equipment has been tested and found to comply with the limits for a Class B digital device, pursuant to Part 15 of the FCC Rules.
- Page 23 TAKING CARE OF YOUR DRUM ESPECIFICACIONES DO NOT ATTEMPT TO OPEN THE UNIT OR MAKE ANY CHANGE IN THE CIRCUITS OR PARTS OF THE UNIT. - direct sunlight (near a window), SERVICE AND MODIFICATION - high temperatures (near a heat source, outside, or This product should be serviced by qualified service in a car during the daytime), personnel when,...
- Page 24 CONTENTS TABLE INSTALLATION ..........................5 SOUND MODULE .......................... 9 CONTROL PANEL ........................9 BOTTOM PANEL ........................10 PLAY PAD ............................ 11 TURN ON THE POWER ....................... 11 PLAYING PADS ........................11 MASTER VOLUME ........................ 11 DRUM KIT ........................... 12 KIT SELECT .......................... 12 KIT EDIT ..........................
-
Page 25: Installation
INSTALLATION CRASH A-12 Cymbal-edg HI-HAT SOUND MODULE A-8 Hi-Hat HD-006 RIDE A-12 Cymbal TOM 1 A-8 Tom TOM 2 A-8 Tom SNARE KICK B-8 Tom B-6 Kick TOM 3 A-8 Tom RACK SYSTEM HI-HAT CONTROLLER B-HH Ctrl KICK PEDAL P-6C Kick pedal * KICK PEDAL IS OPTIONAL ACCESORY The drawing shows a complete drum kit after installation. - Page 26 INSTALLATION RACK SYSTEM L-Rod Wing nuts Cross beam Pad clamp Rack clamp Folded rack in package Crash and Ride rod Hi-Hat rod Foot Other parts of the rack system...
- Page 27 INSTALLATION RACK INSTALLATION 5 Insert the cymbal rods 4 Rotate the L-Rods and adjust their position to proper positions, then tighten the wing nuts 3 Move and rotate the pad clamps to proper locations 6 Move and rotate the cymbal clamp to proper location, then tighten the wing nuts 1 Open the arms, adjust the position of arms...
- Page 28 INSTALLATION COMPONENTS INSTALLATION Hi-Hat Installation Crash and Ride Installation 1. Rem ove the win g nut, 1. Remove the wing nut, washer washer and felt pad and felt pad 2. Put the Hi-Hat into the rod 2. Put the cymbal pad into the along with parts removed in rod along with parts removed in step 1.
-
Page 29: Sound Module
SOUND MODULE CONTROL PANEL CLICK TEMPO MASTER VOLUME PATTERN CRASH RIDE HIHAT TOM 2 TOM 1 VOICE VOLUME DRUM OFF TOM 3 HI-HAT PEDAL SNARE KICK PLAY RECORD SAVE STOP (1) Display: The display is a 3-digital 7-Segment LED type showing Information such as Kit number, Voice number etc. -
Page 30: Bottom Panel
SOUND MODULE BOTTOM PANEL D C 9 V L I N E I N HEADPHONE LINE OUT U S B T R I G G E R P O W E R O F F O N (1) Power Switch: Turn On/Off the sound module Note: After you turn the power off, do not turn it on immediately. -
Page 31: Play Pad
PLAY PAD TURN ON THE POWER Playing Snare Drum Strike the central position (head) of the pad to make head sound, strike the rim of the pad to make a rim (1) Turn down the external audio device connected sound. with the drum. -
Page 32: Drum Kit
DRUM KIT This drum has 20 preset drum kits for your choice. The kit is a combination of different instrument voices assigned to each pad which has unitary style for performance. Any kit could be edited and saved. After the power is turned on, the kit mode is engaged automatically the KIT button is lit and the kit number is shown on the display. -
Page 33: Exit From The Edit Mode
DRUM KIT The following procedure is for voice assignment. The way of changing its volume is the same. While the VOICE button and the selected pad button blink, its current voice number will appear on the display. Use the +, - button to change the voice number ranging 1 - 184. Press both + and - button simultaneously, its original voice will be restored. -
Page 34: Pattern
PATTERN There are 50 built-in patterns for your enjoyment and exercise. PLAY THE PATTERN Press the PATTERN button to engage the pattern mode and Enter the pattern mode its indicator will light up. The pattern number with “P” in front will appear and blink on the display. -
Page 35: Metronome
METRONOME Press the CLICK button to activate the metronome, its indi- cator will light up and flash according to current tempo. Note: During the pattern playing, the metronome cannot sound but the CLICK button will flash if the metronome is engaged. Activate the metronome Press the button again to stop it. -
Page 36: Record
RECORD This drum provides facilities to record one piece of your per- formance and save it as pattern 51. The recording could be accompanied with pattern. Before recording, you should pre- pare necessary settings including selecting drum kit, metro- nome and tempo setting, pattern selecting etc. RECORD STANDBY PLAY RECORD... -
Page 37: Stop And Save
RECORD Press the RECORD button again or press the STOP button to terminate the recording. The RECORD button blinks and is ready for the next recording. The new recording over-writes the contents of the previous recording in unit of measure. In this way, you can edit your recording. - Page 38 MIDI stands for Musical Instrument Digital Interface. This is a world wide standard communication interface that enables electronic musical instruments and computers to communicate with each other so that instruc- tions and other data can pass between them. This exchange of information makes it possible to create a system of MIDI instruments and devices that offers far greater versatility and control than that is available with isolated instruments.
Need help?
Do you have a question about the DB-6 X and is the answer not in the manual?
Questions and answers