Table of Contents
Advertisement
Advertisement
Table of Contents

Related Manuals for Jawon FT-500R

Summary of Contents for Jawon FT-500R
-
Page 2: Table Of Contents
1. INTRODUCTION 2 WORD DEFINITIONS 3. CLASSIFICATION AND COMPLIANCE 4. SAFETY PRECAUTIONS 5. SAFETY SYMBOLS 1. FRONT PART 2. PRINTER 3. REAR PART 4. ACCESSORIES 5. OPTIONS 1. CONNECTING POWER CABLE(AC INPUT) 2. ASSEMBLING OF ARM REST 3. LOADING THE PRINT PAPER 4. -
Page 3: Introduction
We highly appreciate you choose this JAWON product. You are kindly requested to be familiar with these directions before using this product and always keep it together with the product. In case you are not clear about any directions or problems arising while using the product, please contact our service center. -
Page 4: Classification And Compliance
The following precautions must be observed for additional safety ; 1) The unit must be operated only by, or under supervision of, a qualified person by JAWON or his distributor. - Page 5 If you have or suspect that you have a madical problem, consult your physician promptly. Defective unit or accessories, must be packed in the replacement cartons, are shipped off from you to JAWON MEDICAL CO.,LTD. Shipping and insurance costs for return of defective unit must be prepaid by you.
-
Page 6: Safety Symbols
5. SAFETY SYMBOLS The International Electrotechnical Commission(IEC) has established a set of symbols for medical electrical equipment which classifies a connection or warnning of any potential hazard. The classifications and symbols are shown below. Save these instructions for your safety. Isolated patient connection (IEC 60601-1 Type BF) This symbol identifies a safety note. -
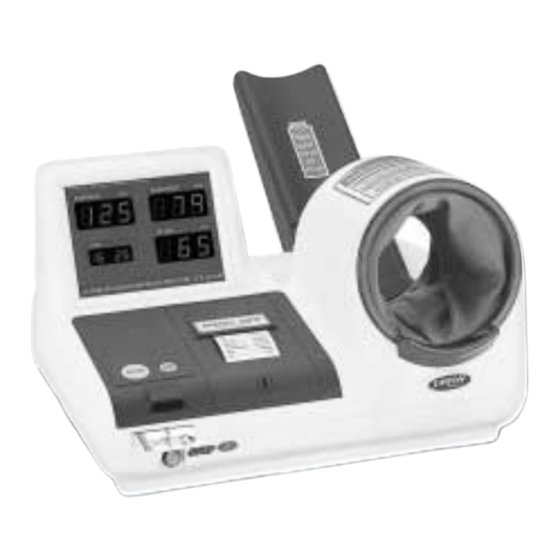
Page 7: Front Part
1. FRONT PART START BUTTON Press START button after ready to measure, the cuff will be wrapped automatically and begins to pressurize. STOP BUTTON Press STOP button if you want to stop it during measurement. Pressurizing will stop and the air will exhaust from the cuff. SYSTOLIC DISPLAY It indicates systolic blood pressure values. - Page 8 FRONT PART ARM REST SYSTOLIC DISPLAY DIASTOLIC DISPLAY PULSE DISPLAY CUFF TIMER STOP BUTTON START BUTTON HUMAN SENSOR CARD-READER EMERGENCY STOP BUTTON PRINTER COVER PAPER OUTPUT Note Printer, card reader and human sensor are optional. ID buttons are only attached to FT-750AF (R/L) model.
-
Page 9: Printer
2. PRINTER PRINT button - Use it when you print out the data. - If you set ON at the rear (PRINT ON/OFF switch), the data is printed automatically even you do not press PRINT button. - Normally, when you press this button, all measured data after you trun the power on will be printed.(if you turn it off, all memorized data would be deleted.) - When you set the date and time, use as a key which increases the number. -
Page 10: Rear Part
3. REAR PART POWER It is to turn the power on and off AC INPUT It is to connect with the power cord FUSE Two fuses(250V/1.6A) are installed to prevent overload. This is only for inspection. Never open it. EARTH(POTENTIAL EQUALIZATION TERMINAL) Please make sure for safety COMMUNICATION PORTS(RS-232C) Two ports are fixed, first for connecting between the main body and a computer or other... - Page 11 REAR PART INFORMATION BOARD FIXER VOLUME (ANNOUNCE) ON/OFF PRINT ON/OFF POWER PORT AC INPUT CARD ON/OFF (RS-232C) FUSE SENSOR ON/OFF SOUND EARTH (POTENTIAL ON/OFF EQUALIZATION TERMINAL)
-
Page 12: Accessories
4. ACCESSORIES Earth /Power /Fuse Manual/Poster Guide Arm rest 5. OPTIONS Cart/ Chair Card-reader/ Card writing device/Cards Printer paper/Printer Human sensor... -
Page 13: Connecting Power Cable(Ac Input)
1. CONNECTING POWER CABLE(AC INPUT) Just connect the power cable to the AC INPUT slot on the rear and turn the POWER ON/OFF switch(O/I) on the lower part of the rear(See the picture). 2. ASSEMBLING OF ARM REST The arm rest is divided into two parts, the first one is built-in the unit as it is packed in factory. -
Page 14: Loading The Print Paper
3. LOADING THE PRINT PAPER Check and see if power is turned on. Turn the nut(with a driver on the groove in the middle) on the lower printer cover clockwise to 90 degrees and open the cover. Load the print paper as shown in the picture. Insert the paper edge deep under the black roll, then it comes out above the CUTTER. -
Page 15: Setting Time And Date
5. SETTING TIME AND DATE Turn ON the unit Open the printer cover. Sequence is HOUR MINUTE MONTH YEAR HOUR Press SET button, then indicator says its counts that have been measured since keeping button ON. Press SET button one more. First 2 figures will blink. To set the current hour, press PRINT button to make the number goes up or press FEED button to make the number goes down. -
Page 16: Caution For Measurement
1. CAUTIONS FOR MEASUREMENT Take off heavy sweater or shirts. Before measurement, take it easy and have a rest for a while. Do not chat or move while you are being measured. Do not measure in bad positions such as standing, half seat or sitting with your legs crossed. -
Page 17: Measurement
“Can not use ID card.” In this case, purchase new one and try again. Put your right or left arm into the cuff deeply. For FT-500R, measure with right arm, for FT-500L, measure with left arm. FT-500L... - Page 18 Note Check the blood pressure with the right arm with FT-500R and the left arm with FT-500L. Place your arm on the arm supporter with the palm facing up through the cuff deeply. Adjust the height of the chair so that the arm is levelled off with the heart.
- Page 19 Blood pressure and pulse rate are displayed on LED and then the results are printed out. Also the results are informed by the voice message as Your BLOOD PRESSURE is, SYSTOLIC 000, DIASTOLIC 000, PULSE 000. Pull your arm out. Note When the PRINT ON/OFF switch on the rear is set as OFF , the result will not be printed even if the measurement is completed.
-
Page 20: Data On Measurement By Printer
3. DATA ON MEASUREMENT BY PRINTER Results on printer paper Normal Range ID-NO 0001 SYSTOLIC : below 139 Hg DATE 02/15/2002 DIASTOLIC : below 89 Hg TIME 16:50 MEANPRESS : 74~106 Hg SYSTOLIC 122mmHg PULSE : 60~100beats/minute DIASTOLIC 077mmHg PRP(Pressure Rate Product) : 7000~12000 MEANPRESS 089mmHg Related with myocardial oxygen consumption... - Page 21 To ensure safe operation and long term performance stability, it is essential that you follow this maintenance instruction all the time. The performance test should be done every 2 years to ensure that the device operates properly and safely at all times. It can be performed either by the manufacturer or by an authorized dealer according to the regulations governing manufacturing of medical products.
- Page 22 This unit is for 230V. If you want 110V, please Remind the permitted current(50VA). contact to a service center. Do not disassemble the main body. To prevent electric shock, please make sure the earth. When grounded, do not mount it close to the gas When you take out the plug, grasp the plug pipe, water pipe, lightening rod and connection exactly.
- Page 23 Wipe the unit with a damp cloth. Do not use benzine, Do not put heavy things on the unit. alcohol or liquid similar to solvents and wet cloth. Check the unit conditions occasionally. Do not use the unit under the condition of shock or vibration.
-
Page 24: After Service
2. PACKING AND TRANSPORT JAWON follows his packing ways to protect any impact during transporting etc. So please do not transport or move the unit without JAWON s packing condition as your wishes. The normal storage environment ; - 5... - Page 25 Approx. 11kg Measuring parts FT-500L : with left arm FT-500R : with right arm Note 1. It is convenient and useful, if you purchase a cart and a chair for FT series. Those are designed only for FT series so that can be placed anywhere.
- Page 26 WARRANTY Item Automatic Blood Pressure Monitor Warranty period Model FT-500(R/L) 1 year (main unit only) Serial NO. Date of purchase Month Year Name: TEL: Customer Address: Name: TEL: Dealer Address: Date Defection Confirmation Note When you receive this warranty, make sure that the name of the dealer and the month, day and year of purchase are all completed.
- Page 28 www.jawon.co.kr...
Need help?
Do you have a question about the FT-500R and is the answer not in the manual?
Questions and answers