Table of Contents
Advertisement
Advertisement
Table of Contents

Related Manuals for Viavito lunarun

Summary of Contents for Viavito lunarun
- Page 1 Treadmill Owner’s Manual. LunaRun Treadmill www.viavito.com...
-
Page 2: Table Of Contents
Getting Started manual as it will help you to get the most out of your new piece of equipment. How to use Your Viavito Treadmill For more information, or if you require any assistance please email us at Console Feedback Functions support@viavito.com... -
Page 3: Important Safety Information
Stand in a normal walking/ running position close enough to the 06 There must be 2 metres of clear space console at the front to ensure that you behind the running deck where you can easily reach the controls at all times. www.viavito.com... - Page 4 Reduce the speed by the treadmill. Remove drops of sweat pressing the ‘-’ speed button. Increase from the treadmill immediately after the speed by pressing the ‘+’ speed finishing training. button. www.viavito.com...
- Page 5 31 For your safety, only ever use the treadmill in accordance with these instructions. 32 Viavito assumes no responsibility for personal injury or property damage sustained by or through the use of this product.
-
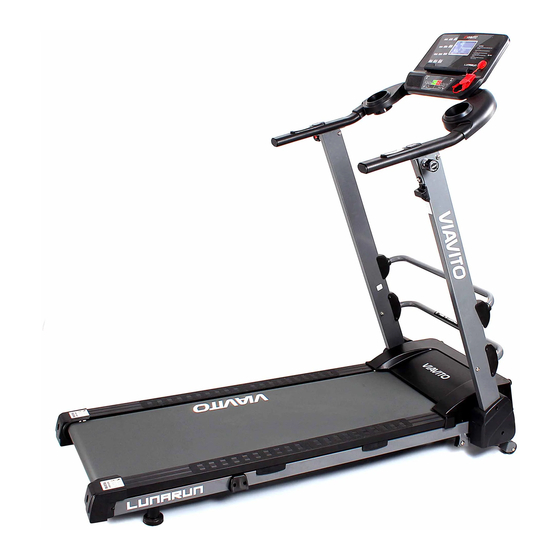
Page 6: Product Overview
Product Overview Console Safety key Handrail Fixing bracket Upright Supporting frame Motor cover Folding frame Side rail Side cover Running belt End cap Cushion Main frame Plastic holding bracket www.viavito.com... -
Page 7: Assembly Instructions
Main frame 1 set B24 Silicon oil 1 PCS C2 Safety key 1 pc Left knob (small plastic part) 1PC Allen wrench Right knob M16 B49 Water bottle 2PCs (large steel part) 1PC 5MM, 1 PC www.viavito.com... - Page 8 Step Two. 01 Make sure the fixing bracket A20 lines up with the right upright A3R. Pull out the plug B72, and lift up the left/right uprights A3L/A3R. www.viavito.com...
- Page 9 Only fully position. Screw the left/right knobs tighten all the bolts once all parts are D85/86 (M16) one turn into the left/ assembled and in the correct position. right uprights A3L/A3R, just enough www.viavito.com...
- Page 10 Step Four. 01 Lift up the console/handrail bracket A4 and tighten the right knob D86 and the left knob D85 so that they hold the console/handrail bracket A4 in position. www.viavito.com...
- Page 11 Step Five. 01 Turn the console to the front and gently push down till you hear it “click” into position. Then place on the safety key C13 and the water bottle holders B49. www.viavito.com...
-
Page 12: Folding And Unfolding Instructions
Folding Instructions The LunaRun can be folded to save floor space between uses. Simply follow these 4 steps to fold your treadmill. Step One. 01 Fold back the console and loosen knob the whole handrail bracket A4, and D86. Pull out knob D85 so that it is not re-tighten the two knobs D85/D86. - Page 13 Step Two. 01 Pull up bar A21, and push both uprights A3L/A3R downward until folded flat. www.viavito.com...
- Page 14 Step Three. 01 Make sure the plug B72 is tightened, to lock the treadmill, before attempt- ing to lift it into the vertical position. www.viavito.com...
- Page 15 Step Four. 01 Lift the treadmill up into a vertical po- sition and place on a flat surface after completing the previous steps. Then turn the fixing bracket A20 90 degrees inward to hold the base/frame tight. www.viavito.com...
-
Page 16: Getting Started
Remove the safety key when the treadmill is not in use. To avoid injury, stand on the side rails before starting the treadmill. Keep children away from the treadmill during operation. Before folding this treadmill, ensure that the incline is set to zero. www.viavito.com... - Page 17 Below are the ranges for each parameter when setting up a user profile: Parameters Window default Range Note User profile U1-U2 10-99 Years old Gender 1 = male, 2 = female Weight 20-160 in kilograms Height 100-240 in centimetres www.viavito.com...
- Page 18 When setting up the program, the user program profile with 20 segments and can hold the ENTER button for 2s to confirm it by pressing ENTER. Then access each of the other parameter press START/STOP to start exercising. - TIME/DISTANCE/CALORIES/PULSE. www.viavito.com...
-
Page 19: How To Use Your Viavito Treadmill
How To Use Your Viavito Treadmill Simply follow these steps to start using 2. PROG your treadmill: When the treadmill is in stand-by mode, STEP 1: Ensure the power is on. press the PROG button to select a program (P1 to P12, FAT, U1 to U3). The lowest STEP 2: Step onto the treadmill and stand speed for manual mode is 0.8 km/h, and... -
Page 20: Console Feedback Functions
On the console there is an audio input Displays pulse data. If no pulse signal is for connecting your mp3 player, allowing being received, it will display “P”. you to listen to the music through the speakers. Control the volume via your device. www.viavito.com... -
Page 21: Workout Programs
Press the SPEED window will display F5 and you can begin +/- buttons to adjust the time value the test. for the workout. After that, press the “START” button to start the workout. The www.viavito.com... - Page 22 The ideal reading should be between 20-25. 19 or lower Under Weight 20 – 25 Normal Weight 26 – 29 Over Weight 30 or higher Obese (The data provided is just for reference and cannot be used for medical purposes) www.viavito.com...
-
Page 23: Begginer's Guide To Exercise
If you reach the recommended beats per minute below and feel you’re • Improve flexibility over-exerting yourself stop, rest and when you feel recovered return to exercise • Lower blood pressure at a lower intensity. • Relieve insomnia www.viavito.com... -
Page 24: Workout Tips
• If you are sore or tired, give yourself you the THR for your age. Always be aware a few extra days to recover. of how you feel when you exercise. If you feel dizzy or light-headed, stop immediately and rest. www.viavito.com... -
Page 25: Stretching Guide
• Stretch at least three times a week to reduces the risk of injury. Stretching maintain flexibility. develops flexibility and reduces muscles soreness. Stretches should be held for 15 to 30 seconds. www.viavito.com... - Page 26 A proper cool-down slowly lowers your heart rate, allows blood to return to the heart and helps prevent muscle soreness caused by the build-up of lactic acid in the muscles. www.viavito.com...
-
Page 27: Treadmill Maintenance Instructions
Every 30 days the motor and under the belt. At least once a year remove the motor cover and We suggest buying lubricating oil from a vacuum under it. local distributor or by contacting us. www.viavito.com... -
Page 28: Technical Parameters
Calories display range: 000 - 999 Time display range: 00:00 - 99:59 (min : sec) Heart rate range: 50 - 200 (time / min) Running area: 420 x 1250mm Product size: 1620 x 700 x 1455mm Folded size: 1620 x 700 x 250mm www.viavito.com... -
Page 29: Belt Adjustment
1/4 turn clockwise, and insert the safety key and power cord. Then start the treadmill and test to con- firm if the belt no longer slips. Repeat the above steps until the belt is moderately tight and does not slip. www.viavito.com... -
Page 30: Customer Support
• Precise description of the issue or defect. Sabichi House IMPORTANT!! - Please retain your 5 Wadsworth Road sales receipt, viavito Customer Care Perivale, Middlesex may request proof of purchase to validate eligibility for warranty service. UB6 7JD Warranty cover starts from the date shown on the proof of purchase. -
Page 31: Manufacturers Warranty
Repairs not provided by viavito ltd conditions, for a period of 12 months from the date of the original purchase. e) Accidents, lightning, water, fire,... -
Page 32: Appendices
Program Exercise Chart There are 12 pre-set programs and each has 16 sections, displayed below. Segments Speed (kph) Incline Segments Speed (kph) Incline Segments Speed (kph) Incline Segments Speed (kph) Incline Segments Speed (kph) Incline Segments Speed (kph) Incline Segments Speed (kph) Incline Segments... -
Page 33: Exploded Diagram
Exploded Diagram www.viavito.com... -
Page 34: Parts List
Right side cover B60R Right water bottle cover Motor upper cover Plastic holding bracket Motor lower cover Fixing plug 1 Side rail Fixing plug 2 B16L Left end cap Plastic cover A B16R Right end cap Plastic cover B Silicon oil www.viavito.com... - Page 35 Round hex head bolt D52 Cross self-tapping bolt M8X40 ST4.2X16 Round hex head bolt D60 Cross head bolt M6X20 M8X50 Nylon nut 10 D66 Washer Nylon nut M6 D71 Hex head bolt M8X15 Nylon nut M8 D75 Cross self-tapping bolt ST4.2X8 www.viavito.com...
- Page 36 Hex round head Cross head bolt M6X12 bolt M6X60 Hex round head Cross head bolt M6X45 bolt M8X20 Hex round head Spring bolt M8X80 Cross head bolt Spring M6X25 Cross head bolt D100 Cross head bolt M5X16 M4X20, washer www.viavito.com...
Need help?
Do you have a question about the lunarun and is the answer not in the manual?
Questions and answers
Treadmill console display shows blank blue screen with no other information. Have tried disconnecting power but no success