Table of Contents
Advertisement
Advertisement
Table of Contents

Subscribe to Our Youtube Channel
Related Manuals for Axis AGN50


Summary of Contents for Axis AGN50
- Page 1 USER MANUAL AGN SERIES File: 2014-11-18 AGN-105 AG0M95 GB...
-
Page 2: Table Of Contents
USER MANUAL ____________________________________________________________________________________________________________________ Contents: 1. General description ..................................3 2. Completeness ....................................3 3. Technical data ....................................4 4. General balance view ................................... 5 5. Keys and indicators ..................................7 6. Safety rules ....................................8 7. Preparing working environment ..............................9 8. -
Page 3: General Description
USER MANUAL ____________________________________________________________________________________________________________________ 1. General description AGN series balances are destined for high accuracy weighing in laboratory practice. AGN series balances are equipped with internal calibration system for accuracy control during balance operation. All balances are metrologically tested. According to an order balances can be calibrated or legally verified. -
Page 4: Technical Data
USER MANUAL ____________________________________________________________________________________________________________________ 3. Technical data Type AGN50 AGN100 AGN200 AGN220 Capacity (Max) 100g 200g 220g Min load (Min) 10mg 10mg 10mg 10mg Reading unit (d) 0,1mg 0,1mg 0,1mg 0,1mg Verification unit (e) Tare range -50g -100g -200g -220g Accuracy class Working temperature +18 ÷... -
Page 5: General Balance View
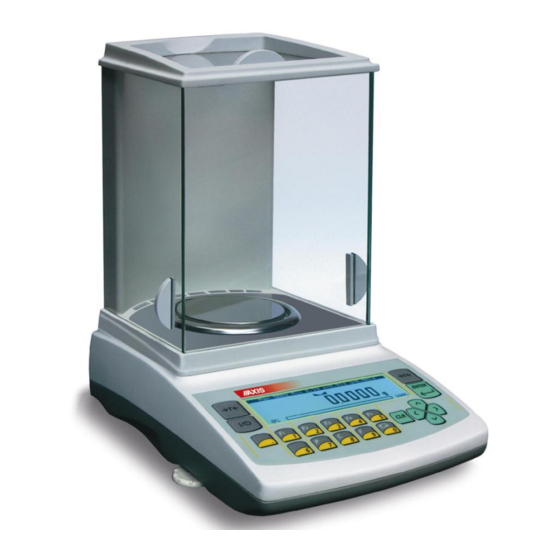
USER MANUAL ____________________________________________________________________________________________________________________ 4. General balance view 1 – pan 2 – pan support 3 – pan ring 4 – floor of weighing chamber 5 – keys 6 – rotating legs 7 – water level 8 – graphical display 9 – weighing chamber... - Page 6 USER MANUAL ____________________________________________________________________________________________________________________ Connectors view: Feeder Printer ~230V/50Hz or computer Keyboard Feeder Adjustment RS232C switch RxD (receiver) TxD (transmitter) masa Data Case...
-
Page 7: Keys And Indicators
USER MANUAL ____________________________________________________________________________________________________________________ 5. Keys and indicators Max 100g Min 0,01g e=0,001g d=0,0001 - taring (enter mass subtracted from weighed mass - zeroing (option), ENTER - confirmation / choosing an option, - decimal point, 1/F1 ... 5/F5 - numeric key / functional key, ... -
Page 8: Safety Rules
USER MANUAL ____________________________________________________________________________________________________________________ 6. Safety rules It is necessary to follow safety rules of work with the balance shown below. Obeying those rules is the condition to avoid electrical shock or damage of the balance or connected peripheral devices. Repairs and necessary regulations can be done by authorised personnel only. -
Page 9: Preparing Working Environment
USER MANUAL ____________________________________________________________________________________________________________________ 7. Preparing working environment +30°C +18°C Location for the balance should be chosen with care in order to limit influence of the factors that can interrupt working balance. This location has to maintain proper temperature for working balance and necessary space for its operating. The balance should stay on stable table made of material that does not influence magnetically on the balance. -
Page 10: Preparing Balance To Work
USER MANUAL ____________________________________________________________________________________________________________________ 8. Preparing balance to work 1. Take the balance, the feeder and mechanical elements of the pan out. It is recommended to keep the original scale package in order to transport the balance safely in future. 2. Place the balance on a stable ground affected mechanical... -
Page 11: General Operation Principles
USER MANUAL ____________________________________________________________________________________________________________________ 9. General operation principles 1. After every change of balance position, level the balance and perform internal calibration. 2. Weighed sample should be placed in the centre of the pan 3. In direct sale use (d=e), make sure that zero indicator is displayed before ... -
Page 12: Start-Up
USER MANUAL ____________________________________________________________________________________________________________________ 10. Start-up Plug feeder into 230V power supply socket and feeder connector into 12V socket at back of the balance. INITIALIZATION model program version After switching-on, the balance Processor test performs automatic self-tests. All Reading EEPROM tests should successfully completed what is signalled with... - Page 13 USER MANUAL ____________________________________________________________________________________________________________________ In order to perform internal, calibration proceed with the following: Empty the pan. CALIBRATION Press key twice (double pressing Internal calibration the key helps to avoid accidental - to confirm) starting calibration procedure). During calibration internal weight is put three times on and obtained CALIBRATION results are compared.
-
Page 14: Checking The Balance
INSTRUKCJA OBSŁUGI _________________________________________________________________________________________________________________ 12. Checking the balance In order to confirm correctness of the balance during its operation, before starting and after finishing every measurement series it is advised to check weighing accuracy. It can be done by weighing external calibration weight or other object with exactly known mass. - Page 15 Computer must have a special program for cooperation with data from a scale. Dedicated programs are also offered by AXIS. Except RS232C joint, the scale can be equipped with USB or Wi-Fi interface. Needed controllers and instruction can be found on a CD supplied with Axis scales. Detailed protocol description...
- Page 16 02h scale number command. To log the scale out use 03h command. For example: Using a program to test RS232 interface ( program is available in www.axis.pl / programy komputerowe ) for scale number 1 please write: $0201 to log in, then SI, and write: $03 to close communication.
- Page 17 Computer Scale: S H D1...DN CR LF (53h 48h D1...DN 0Dh 0Ah), D1...DN – threshold value (see ) Scale Computer: without response. Connecting cable WK-1 (scale – computer / 9-pin interface): BALANCE COMPUTER Connecting cable WD-1 (scale with AXIS printer): BALANCE PRINTER Setting internal AXIS printer swithces: SW-1 SW-2...
- Page 18 INSTRUKCJA OBSŁUGI _________________________________________________________________________________________________________________ ELtron protocol Transmission parameters: 8 bits, 1 stop bit, no parity, baud rate 9600bps, After using key in scale: ScaleLabel printer : set of instruction in EPL-2 language that initialize label printing: - Steering instruction FR"0001"...
-
Page 19: Special Functions
INSTRUKCJA OBSŁUGI _________________________________________________________________________________________________________________ Special functions All balances, beside basic metrological functions like weighing and taring, are equipped with set of special functions. Basic set of special functions is shown below. In respect of metrology calibration with external weight is important special function. -
Page 20: Autotaring Function
INSTRUKCJA OBSŁUGI ____________________________________________________________________________________________________________________ 14.1 Autotaring function This function automatically keeps zero indication when a pan is empty or zero indication was forced with key. USER FUNCTIONS&OPT. Press Menu key to enter the user function menu, choose Autotaring and Autotaring press ENTER key. -
Page 21: Pieces Counting Function
INSTRUKCJA OBSŁUGI ____________________________________________________________________________________________________________________ 14.2 Pieces counting function Pieces counting function allows determining the number of items in weighed sample according to: 1. Reference sample with known number of pieces (unitary mass is not known), 2. Unitary mass of an item. 1. - Page 22 INSTRUKCJA OBSŁUGI ____________________________________________________________________________________________________________________ 2. Unitary mass of an item (unit weight) is well known. USER FUNCTIONS&OPT. Press Menu key to enter the user function menu, choose PCS counting Autotaring with the cursor and press ENTER key. PCS counting . . . USER FUNCTIONS&OPT.
-
Page 23: Unit Selection Function
INSTRUKCJA OBSŁUGI 14.3 Unit selection function The function allows choosing the unit of mass indication. The following units can be selected: - gram (g) - kilogram (kg) - miligram (mg) - carat: 1ct=0,2g - pound: 1lb=453,592374g - grain: 1gr=0,06479891g - ounce: 1oz=28,349523g - ounce troy: 1ozt=31,1034763g - pennyweight: 1dwt=1,55517384g USER FUNCTIONS&OPT. -
Page 24: Percent Function
INSTRUKCJA OBSŁUGI ____________________________________________________________________________________________________________________ 14.4 Percent function The function allows replacing indication in mass units with percentage values according to assigned reference mass. Max ... Min ... e= ... d= .. Put a mass referenced to 100% on the 20.000 pan. 100% USER FUNCTIONS&OPT. -
Page 25: Function For Calibration With External Weight / Calibration Options
USER MANUAL 14.5 Function for calibration with external weight / calibration options Calibration with external weight should be performed if balance accuracy after internal calibration is not satisfactory. Calibration weight stated in technical data table for the balance (or of better accuracy) with valid verification certificate should be used then. - Page 26 INSTRUKCJA OBSŁUGI ____________________________________________________________________________________________________________________ Steps during calibration with external weight: USER FUNCTIONS&OPT. Autotaring Press Menu key, choose Calibration PCS counting option with the cursor and press . . . ENTER. Calibration . . . USER FUNCTIONS&OPT. \ CALIBRATION Check if External load value matches 1.
- Page 27 USER MANUAL Calibration options (internal and external): Except of Report printout, calibration options are available after changing position of adjustment switch. USER FUNCTIONS&OPT. Press MENU key, choose Calibration Autotaring option with the cursor and press PCS counting . . . ENTER.
- Page 28 INSTRUKCJA OBSŁUGI ____________________________________________________________________________________________________________________ The form of calibration report printout Date : ... Time: ... -----------Calibration report----------- Date of production: ... Scale type: Serial number: ... Program version: ... Adjustation no.: ... Date of adjustation: Temperature of adjust.: - external weight value registered during factory calibration Factory external weight: ...
-
Page 29: Function For Setting Serial Port
USER MANUAL 14.6 Function for setting serial port To enable cooperation with a printer (or a computer), transmission parameters in both devices have to be the same. This function allows to set the following transmission parameters: - send and receive baud rate (1 200 115 200bps), - number of bits in single character (7 or 8 bit), - parity control (none, even, odd), - protocole type (default protocol is LONG),... - Page 30 INSTRUKCJA OBSŁUGI ____________________________________________________________________________________________________________________ USER FUNCTIONS&OPT If the protocol is set to ELTRON (cooperation with label printer), in user Autotaring function menu Label function activates. PCS counting . . . This protocol allows printing scale Label indication and optionally date and time Exit on label printer, as variable texts.
-
Page 31: Print Settings Function
USER MANUAL 14.7 Print settings function This function allows to attach the following information to a printout: - numbers of succesive measurements, - date and time near each measurement. USER FUNCTIONS&OPT. Press MENU, choose Print settings Autotaring with the cursor and press ENTER key. PCS counting . - Page 32 INSTRUKCJA OBSŁUGI ____________________________________________________________________________________________________________________ An example of a full header printout: blank line --------------- WEIGHING --------------- mode name date and time Date : 2000-04-25 Time : 22:32 balance type Scale type : AGNZ200 serial number Serial number 123456 ...
- Page 33 USER MANUAL ____________________________________________________________________________________________________________________ Footer - the entrance to the printout footer definition menu; sign indicates if at least one option in Footer definition menu is checked. Footer definition menu \ PRINT SETTINGS \ FOOTER Blank line Mode name Date & time Balance type An element is checked/unchecked if Serial number...
-
Page 34: Time And Date Setting Function
INSTRUKCJA OBSŁUGI ____________________________________________________________________________________________________________________ 14.8 Time and date setting function The function allows to set current date and time, used in printouts: USER FUNCTIONS&OPT. Press MENU, choose Time&date Autotaring setting with the cursor and press PCS counting ENTER key..Time&date setting . -
Page 35: Lcd Settings Function
USER MANUAL ____________________________________________________________________________________________________________________ 14.9 LCD settings function This function allows to set contrast and backlight of balance display: USER FUNCTIONS&OPT. Autotaring Press MENU, choose LCD settings PCS counting with the cursor and press ENTER key..LCD settings . -
Page 36: Recipe Function
USER MANUAL ____________________________________________________________________________________________________________________ 14.10 Recipe function This function allows for weighing few ingredients in sequence in one vessel, with the possibility of continuous reading of summary mass value of all ingredients weighed so far. Press MENU key to enter the user USER FUNCTIONS&OPT. -
Page 37: Animals Weighing Function
USER MANUAL ____________________________________________________________________________________________________________________ 14.11 Animals weighing function This function allows for weighing of an animal, moving on the balance, by averaging of momentary values, measured by the balance. The samples number and sampling time, as well as operation mode are set by the balance operator. USER FUNCTIONS&OPT. -
Page 38: Tare Setting Function
USER MANUAL ____________________________________________________________________________________________________________________ 14.12 Tare setting function This function enables to measure gross weight of a sample placed in a container of a known weigh value (stored in the memory) and to display calculated net weight of the sample. Tare value may be entered using the keypad or by sampling container weight from the pan. -
Page 39: Force Unit Function
USER MANUAL ____________________________________________________________________________________________________________________ 14.13 Force unit function Function activation causes displaying result in force units (N). Press MENU key. Using ENTER key USER FUNCTIONS&OPT.\ STRENGHT UNIT choose Strenght unit function. 1. Activate Choose Activate option and confirm 2. Exit using ENTER. Attention: Units converting from mass (kg) to force (N) is made for acceleration of gravity (g=9,80665m/s2):... -
Page 40: Maximum And Minimum Value Indication Function
USER MANUAL ____________________________________________________________________________________________________________________ 14.14 Maximum and minimum value indication function This function allows for keeping the maximum value, indicated by the balance, on the display. Press MENU key to enter the user USER FUNCTIONS&OPT. functions menu, select Autotaring Maximum/minimal value with cursor PCS counting and press ENTER. -
Page 41: Anti-Disturbance Filter Function
USER MANUAL ____________________________________________________________________________________________________________________ 14.15 Anti-disturbance filter function This function allows using digital filter with selected intensivity during weighing. Filter reduces the influence of mechanical vibrations (air blasts, base vibrations) on measurement result. Press MENU key and choose Filter USER FUNCTIONS&OPT\FILTER ACTIVATION activation function. -
Page 42: Language Selection Function
USER MANUAL ____________________________________________________________________________________________________________________ 14.16 Language selection function This function allows for language selection for messages and print purposes. USER FUNCTIONS&OPT. Press MENU key, select Language Autotaring selection with cursor press PCS counting ENTER..Language Exit USER FUNCTIONS&OPT. \ LANGUAGE Using keys select proper... -
Page 43: Function Of Comparing With Preset Threshold Values
USER MANUAL ____________________________________________________________________________________________________________________ 14.17 Function of comparing with preset threshold values This function allows to compare the weighing result with two, previously programmed values: upper and lower threshold. The comparison result is signalled with the messages MIN, OK or MAX on the display. If the weighing result is: - smaller than lower threshold –... - Page 44 USER MANUAL ____________________________________________________________________________________________________________________ USER FUNCTIONS \ TRESHOLD SIGNAL. Buzzer option is used for selection of 1. Activate acoustic signalling method. Selection of 2. Zero treshold Stable OK option means acoustic signal 3. Min treshold 4. Max treshold 110g activation after indications stabilisation 5.
- Page 45 INSTRUKCJA OBSŁUGI ____________________________________________________________________________________________________________________ THRESHOLDS outputs states chart (with increasing balance load): 1. Signalling device mode: Outputs: zero treshold thresholdI threshold thresholdI 2. Impulse mode (approx. 2 sec.): threshold Outputs: threshold threshold 3. Level mode: zero treshold Outputs: zero treshold threshold threshold threshold treshold...
- Page 46 INSTRUKCJA OBSŁUGI ____________________________________________________________________________________________________________________ The THRESHOLDS connection contains three transoptor outputs P1, P2 and P3 of open collector type, with load capacity 25mA/24V. The connected relays are not supplied from the balance and require additional 24V power supply unit. The relays inputs must be protected with diodes, e.g. 1N4148. The balance producer offers ready electronic PCB MS3K/P, which contains RM96P relays with input voltage DC24V and output: AC250V, 8A.
-
Page 47: Funkcja Sumowania Ważeń Total
INSTRUKCJA OBSŁUGI ____________________________________________________________________________________________________________________ 14.18 Funkcja sumowania ważeń TOTAL The function allows calculating total weight for series of measurements, which can be greater than scale capacity. It allows calculating total weight as well as average value. Press MENU enter user USER FUNCTIONS functions, choose Total calculation and press ENTER. -
Page 48: Statistical Calculations Function
INSTRUKCJA OBSŁUGI ____________________________________________________________________________________________________________________ 14.19 Statistical calculations function This function allows for calculations of mean value, standard deviation, relative standard deviation, maximum and minimum value, and making the histogram of performed series of measurements. Press MENU key to enter the user USER FUNCTIONS&OPT. - Page 49 INSTRUKCJA OBSŁUGI ____________________________________________________________________________________________________________________ STATISTICS – RESULTS 2011-10-04 14:43 read statistical Number of samples parameters, press MENU key. It Average value will display report STATISTICS Stand. deviation – RESULTS. Relative deviation Minimal value Maximal value F1 PRINT F2 CHART F3 DONE F5 EXIT 7,5476 The individual measurements...
-
Page 50: Grammage Function
INSTRUKCJA OBSŁUGI ____________________________________________________________________________________________________________________ 14.20 Grammage function This function enables to calculate paperweight of 1m of paper basing on samples of known area. Press key. USER FUNCTIONS&OPTS \ GRAMMAGE Put on the pan a sample consisting of 1. Activate one or more paper sectors (pay 2. -
Page 51: Density Measurement Function (Option)
INSTRUKCJA OBSŁUGI ____________________________________________________________________________________________________________________ 14.21 Density measurement function (option) This function allows for determination of solid body density, upon the basis of weight in the air and weight of material immersed in liquid of known density, according to the formula: ρ = * ρ liquid m1- m2 where: m1-mass in the air... -
Page 52: Solid Body Density Determination
INSTRUKCJA OBSŁUGI ____________________________________________________________________________________________________________________ 14.21.1 Solid body density determination USER FUNCTIONS Suspend the trays and tare scale Autotaring pressing button PCS counting . . . Press button Menu, select Density Density measurement measurement with cursor and press . . . ENTER.. - Page 53 INSTRUKCJA OBSŁUGI ____________________________________________________________________________________________________________________ USER FUNCTIONS / DENSITY 1.Activate 2.Material type solid 3.Liquid type water T= 20.0 4.Liquid density 0.99820g/cm3 5.Report printout 6.Exit Press . to taring scale Max ... Min ... e= ... d= .. 0.0000 g >T< 100% Put the examine solid body on upper tray (measurement in the air) and press...
-
Page 54: Liquid Density Determination
INSTRUKCJA OBSŁUGI ____________________________________________________________________________________________________________________ 14.21.2 Liquid density determination USER FUNCTIONS Suspend the trays and tare scale pressing button Autotaring PCS counting . . . Press button Menu, select Density Density measurement measurement with cursor and press . . . ENTER.. - Page 55 INSTRUKCJA OBSŁUGI ____________________________________________________________________________________________________________________ USER FUNCTIONS / DENSITY 1.Activate 2.Material type liquid 3.Plunger volume: 5.00000 cm3 4.Report printout Press to taring scale 5.Exit Max ... Min ... e= ... d= .. 0.0000 g Suspend the plunger (measurement in >T< the air) and press Enter.
-
Page 56: Density Measurement Report
INSTRUKCJA OBSŁUGI ____________________________________________________________________________________________________________________ 14.21.3 Density measurement report To print the measurement results, connect the printer to RS232C connection of the balance. The connection method is described in the instruction manual. USER FUNCTIONS / DENSITY After each measurement the print may 1.Activate 2.Material type solid... -
Page 57: Procell Program Description (Demo Version)
1. Connect the balance to RS232C computer serial port, 2. Run ProCELL, 3. During first start-up close registration window (or contact AXIS to register the program), 4. Open spreadsheet (ProCELL will be covered by application window), 5. Set the cursor in desired place and press key on the balance several times. -
Page 58: Troubleshooting And Maintenance
INSTRUKCJA OBSŁUGI ____________________________________________________________________________________________________________________ Troubleshooting and maintenance 1. The balance should be kept clean. 2. Take care that no dirt is between the casing and the pan. If a dirt is noticed, take off the pan (lift it up), clean a dirt and then mount the pan. 3. -
Page 59: Declaration Of Conformity
USER MANUAL ____________________________________________________________________________________________________________________ Declaration of Conformity AXIS Spółka z o.o. 80-125 Gdańsk, ul.Kartuska 375B Confirm with all responsibility that balances: AGN50, AGN100, AGN200 and AGN220 marked with CE mark comply with the following: 1. EN 55022:2000 Electromagnetic compatibility (EMC) – information technology equipment –... - Page 60 INSTRUKCJA OBSŁUGI ____________________________________________________________________________________________________________________ Notice...
Need help?
Do you have a question about the AGN50 and is the answer not in the manual?
Questions and answers