Table of Contents
Advertisement
Quick Links
Advertisement
Table of Contents

Related Manuals for Ednet 84299

Summary of Contents for Ednet 84299
- Page 1 Smart Home Quick Installation Guide 84299...
-
Page 2: Safety Precautions
When not in use, store the product in a clean and dry place in temperatures between 0°C and 40°C Do not cover the camera and all other ednet.smart home products Do not let the indoor devices including camera and sensors come into... - Page 3 Only use the supplied power adapter. Never try to repair ednet smart home system by yourself. Repair and maintenance work must be carried out by specialists. In case of problems contact our customer service.
-
Page 4: Personal Information
Select a password with a high degree of safety for your ednet smart home account to protect it from unauthorized access. The password should contain at least 8 characters; we recommend case-sensitive letters and alphanumeric characters. -
Page 5: What's In The Box
1 x Motion Sensor 2 x AAA batteries for the Motion sensor 1 x Quick Installation Guide IP Camera Gateway Motion Sensor Door/Window Sensor Thank you for choosing ednet Smart Home, which can be up-and- running quick and easy without complicated network settings. -
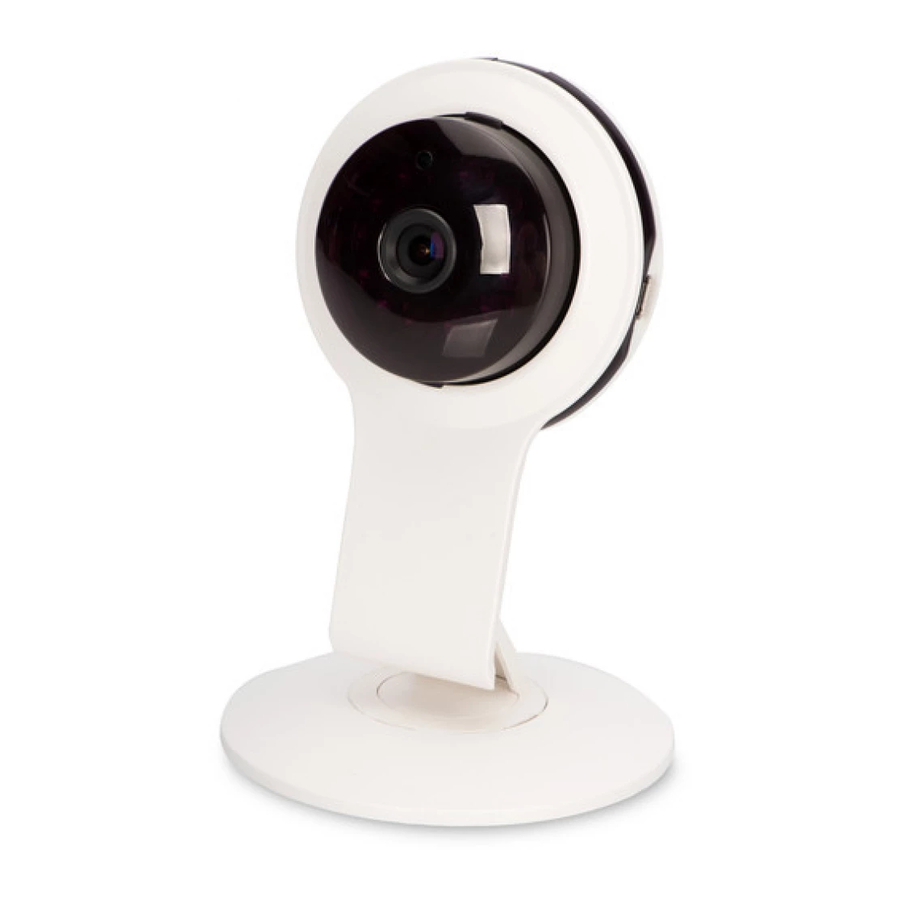
Page 6: Camera Connections
4. Microphone 5. Speaker 1. Setting up the ednet.home User Account In order to use your ednet smart home, you need to register an user account. The setup and control can be done from your Smartphone/tablet. 1.1 Create a user account with your Smartphone/ tablet ®... - Page 7 ® Apple App Store Google™ Play In the Search results the “ednet.home”-App will be marked with this symbol. Then please download and install the App on your mobile device. Start the App and you will enter the login page. For first time user, please create your account by “Signup”...
- Page 8 (Alphabet and numerical characters are supported). 3. Accept the privacy policy for using the ednet.home. 4. Press “Signup” to finish the account registration. Next you will also receive an e-mail notification for successfully account registration with your account information. Please keep the account information safely with you.
- Page 9 2. Connect IP Camera Gateway to your Wi-Fi With Smartphone/tablet Please power ON the IP camera Gateway with the power adapter. The audio assistant from the camera would inform you when the camera is booted up and enters “Sonic Mode”. Please follow the instructions in the App to connect your IP camera...
- Page 10 Please input the password of your Wireless router or Access-Point at home. Your smart phone would be broadcasting audio signal of your router/AP connection information towards the camera to setup Wi-Fi. So please bring your smart phone/tablet closer (within 20cm) towards your IP camera gateway.
- Page 11 Under this page, you can also check the event playback by clicking “Recording”. In addition, to install the sensors including motion sensors and contact sensors, please press the “Sensor/Actor” icon to start adding sensors into your ednet smart home system. (6)
-
Page 12: Sensor Connections
Sensor Connections Motion Sensor Please insert the 2x AAA batteries from the package and follow the +/- sign to install the battery. Anti-Tamper LED indicator: LED flashes once: detects motion LED flashes once every 3s: Low-voltage indication. Please change to the new battery as soon as possible. Anti-tamper Function: When the sensor’s back cover is opened, the anti-tamper button will be triggered. - Page 13 Mode Setting: There is a switch on the back of the Motion sensor. You can slide it to left or right for different settings to control: Interval: you can set the interval time between each motion detection as 5 seconds of 5 minutes apart. LED: you can select the LED indication on the motion sensor to be OFF or ON.
- Page 14 Floor Side View Top View Fix the detector on the bracket, and change the detecting angel and distance through adjusting the installation height and the bracket. The installation height is suggested to be 2 meters high from ground.
- Page 15 Contact Sensor for Door/Window The contact sensor consisted of 2 parts. Part A is the transmitter that communicates with the Gateway. Part B is the magnet. So when Part A and Part B are separated when the door/window is opened, the contact sensor is triggered. Anti-tamper switch Front Please insert the battery following below instruction.
- Page 16 LED indicator: LED flashes once: detects motion LED flashes once every 3s: Low-voltage indication. Please change to a new A23 battery (12V/23A) as soon as possible. Anti-tamper Function: When the sensor’s back cover is opened, the anti-tamper button will be triggered. The contact sensor’s light would flash once and send the alarm notification via APP.
- Page 17 3. Add Sensors to the Gateway After pressing the “Sensor/ Actor” icon on the camera live-view page, you will enter the Sensor/Actor list. (1) Please press the “+” sign on the top right corner to add a sensor or actor. Please select the “type”...
- Page 18 Then the IP camera gateway would enter “learning mode” for 60 seconds. During this 60-second period, please power on your Motion sensor and trigger the motion sensor with any movement. (4) Then the IP camera gateway would detect the motion sensor to complete the “learning/paring”...
- Page 19 4. Add Actors to the Gateway ednet Smart Home system provides Sensors (Transmitters) and Actors (Receivers). Transmitter sensors are Motion sensors and Contact sensors. Receiver devices are Siren, Power plug and others which can be activated in relation with the event triggered by Transmitter sensors such as motion sensor.
- Page 20 Please give a Name to the Power Plug. Then press the “Learn Sensor/Actor” button. (3) Before pressing “Learn” on the App side, please make sure your Power Plug is powered and entered “learning” mode already. Please long press the “Learn” button on the Power Plug (84291 or 84292) for 5 seconds until you see the flashing LED on...
- Page 21 Then you can enter the just-added Power Plug on the App to control Power-ON Power-OFF pressing the icons on the App. (6)
- Page 22 (1) Please select the Receiver device and define the “action” to power On/Off and press “Save” to complete the rules setting. (2) Now please try to trigger your motion sensor and check the linking on the ednet.power Plug side.
-
Page 23: Install Microsd Card
“Enable Partial Alarm”. Install MicroSD Card ednet Smart Home camera gateway can be equipped with a microSD card for event recording. Please insert the MicroSD card up to 32GB as shown below. -
Page 24: Motion Detection Setup
Motion Detection Setup Once the microSD card is inserted and formatted, we can then setup motion triggered recording on the camera side. Please go the “Advance Setting” on the App of the IP Camera gateway, then select “Motion Detection”. Please switch to “On” to enable motion detection. - Page 25 Trademarks ednet is a registered trademark of ASSMANN Electronic GmbH. Apple, Apple App Store are registered trademarks of Apple Inc. Android, Google, Google play are registered trademarks of Google Inc. AVM Fritz!Box is a registered trademark of AVM Computersysteme Vertriebs GMBH.
Need help?
Do you have a question about the 84299 and is the answer not in the manual?
Questions and answers