Table of Contents
Advertisement
Advertisement
Table of Contents

Subscribe to Our Youtube Channel
Related Manuals for GEO CRUISER DX

Summary of Contents for GEO CRUISER DX
- Page 1 Owner’s Manual DX, LX and Elite EX...
- Page 2 Geo Cruiser ™ Owner’s Manual 1590 Oakland Road Unit B109 San Jose, CA 95131 1-800-530-9594 ©Geo Cruiser 2017...
-
Page 3: Table Of Contents
Table of Contents I. INTRODUCTION II. SAFETY III. FOLDING ANDS UNFOLDING THE GEO CRUISER IV. INSTALLING THE JOYSTICK CONTROLLER V. BATTERY SETUP AND MAINTENANCE VI. RIDING YOUR GEO CRUISER VII. MAKING ADJUSTMENTS TO YOUR GEO CRUISER VIII. TRAVELING WITH YOUR GEO CRUISER IX. -
Page 4: Introduction
It is ideal for travel and an on the go lifestyle. What makes the Geo Cruiser unique is its ability to fold and unfold in less than a minute, while not compromising comfort and functionality. It is designed to provide years of dependable operation, while enabling you to enhance the quality of your life allowing you to experience an active daily lifestyle. - Page 5 Product Specifications Geo DX GEO LX GEO EX Product Weight (With Battery): 55 Lbs. 59 Lbs. 65 Lbs. Maximum Weight Capacity 270 lbs. 350 lbs. 350 lbs. Unfolded Size (L x W X H): 38" X 23" X 33" 37" X 27" X 35"...
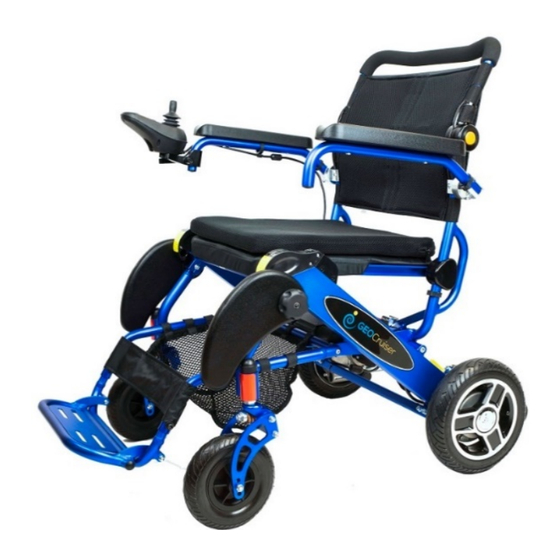
- Page 6 Product Diagram Armrest Adjustable Backrest Quick release Joystick Seat Cushion *Battery Backrest adjustment button Leg Guards Adjustable Footrest controller Rear Wheel Motor Under seat Assembly Basket Front Wheel Front fork *there are two batteries...
-
Page 7: Safety
IMPORATANT SAFTEY TIPS MOTOR VEHICLE SAFETY 1. Never sit in the Geo Cruiser while traveling in a van, train, bus or other vehicle that accommodates a power chair unless the Geo Cruiser is properly secured to the vehicle. This will allow you to avoid being thrown due to sudden braking, or an accident. - Page 8 Cruiser until you learn how to do these things safely. 5. Never try a new maneuver on your own unless you are sure it is safe. 6. Get to know the areas where you plan to use your Geo Cruiser. Look for hazards and learn how to avoid them.
- Page 9 Move your Geo Cruiser as close as you can to the object you wish to reach. b. Turn off all power to the Geo Cruiser. If you fail to do so, you may touch the joystick and cause your power chair to move when you do not expect it.
- Page 10 Beware of: 1. Steep slopes. Do not use your Geo Cruiser on a slope steeper than 10°. (A 10° slope means: One foot in elevation for every ten feet of slope length). 2. Wet or slippery surfaces (such as when an ice, snow, water or oil film is present). A loss of traction may cause a fall or tip-over.
- Page 11 5. Ramp must be sturdy. Add bracing if needed so the ramp does not “bow” when you ride on it. CURBS & SINGLE STEPS 1. Your Geo Cruiser is not designed to drive up or down a curb or step more than 1/2- inch high. Doing so may: a. Result in a fall or tip-over.
- Page 12 Geo Cruiser is IP4 it will not get any damage from water splashes. • Never take your Geo Cruiser into a shower, tub, pool or sauna. • Do not use your Geo Cruiser in fresh or salt water (such as at the edge of a stream, lake, or ocean).
- Page 13 Stop if one or both main wheels lose traction. If this occurs, you may lose control of your Geo Cruiser or fall. • Never operate your Geo Cruiser on a slope or ramp if there is snow, ice, water or oil film present. When in doubt, have someone help. •...
- Page 14 (Doing so will void the warranty and may create a safety hazard). 1. If you modify or adjust the Geo Cruiser, it may increase the risk of a fall or tip-over. 2. Modifications unauthorized by our company constitute remanufacturing of the Geo Cruiser.
- Page 15 2. Make sure the battery has a battery charge sufficient for your outing before operating your Geo Cruiser. Three green lights at the top of the battery light indicator a full charge. Yellow lights indicate battery charge level is getting low. Red lights indicate batteries are in immediate need of charging.
- Page 16 19. You may also want to use the kickstand after the unit is folded so that your hands are free to make it easier to: 1. Align both front wheels to lock the folded Geo Cruiser in place for transport. Again, this is covered on page 18.
- Page 17 The weight of the front end will allow the unit while pushing the footrest forward with the to continue unfolding the Geo Cruiser is fully other hand. This will allow you to start the unfolded. If the unit does not automatically unfolding process.
- Page 18 III. Unfolding the Geo Cruiser Unfold the footrest. Pull down both arrest forward. The unit is now ready to add the joystick. Refer to page 21 to proceed.
-
Page 19: Folding Ands Unfolding The Geo Cruiser
III. Folding the Geo Cruiser There are two ways to fold the unit. We will cover both methods. Squeeze the two “Release Lock Levers” Pull back the armrests as shown While squeezing the “Release Lock Levers” Continue to push the backrest forward in... - Page 20 III. Folding the Geo Cruiser Continue to pull the footrest toward the When the front wheels are straight like the rear backrest unit the unit locks into place. wheels, grab the footrest and pull it towards the seat, while pulling the unit forward to the upright position.
- Page 21 III. Folding the Geo Cruiser 10. Continue to gently lay the unit forward as the Squeeze inward the seat lock release levers as backrest and collapse forward. shown.
-
Page 22: Installing The Joystick Controller
IV. The Joystick Controller The joystick controller is used to navigate and operate the Geo Cruiser. Therefore, it is very important to understand the features and safety precautions required to safely use it. To ensure your safety while operating the power wheelchair, the control panel must be securely mounted (Fig. - Page 23 IV. The Joystick Controller Joystick Cable Routing 1. On newer model’s there is a plastic 2. On newer model’s there is a plastic cable holder under the armrest. You can cable holder under the armrest. You can easily start by locking the joystick cable easily start by locking the joystick cable into place as shown into place as shown...
- Page 24 IV. The Joystick Controller Number Function Action Power-On Button Pressing this button will turn the unit on Power-Off Button Pressing this button will turn the unit off Speed (+) Button Pressing this button repeatedly will increase speed to a maximum up to 5 miles Speed (-) Button Pressing this button continuously will reduce the speed Speed Indictor...
- Page 25 4-5 miles per hour depending on your weight, an incline or the terrain you are riding on. We recommend that you adjust to speed to the lowest setting when first driving the Geo Cruiser. This will allow you to get comfortable with the unit. Riding Tips To slow down, slowly bring the joystick back toward the default position until you reach your desired speed.
-
Page 26: Battery Setup And Maintenance
IV. The Joystick Controller Understanding Joystick LED Flashing If the LED lights on the Joystick speed indictor start to flash intermittently, the unit is signaling that there is a problem with one of the components or functions. Below is a table providing a list of potential issues based on which light(s) are flashing. - Page 27 V. Battery The Geo Cruiser comes with two (2) 24V 8 Ah lithium ion batteries that work in parallel. Both batteries are not required to be installed for operation. The batteries should be charged for twenty-four (24) hours before you operate the unit for the first time.
- Page 28 Removing Battery Make sure the Geo Cruiser is powered off before mounting or removing the battery. To remove the battery, press the battery release button as shown below. 1. Press the “Open” button and grab 2.
- Page 29 V. Battery Before charging your Geo Cruiser you should be aware of the following: 1. Do not leave children unsupervised near the Geo Cruiser while it is charging 2. Do not attempt to open the battery housing Charging the Battery 1.
- Page 30 V. Battery NOTE– Do not attempt to charge your battery if the Geo Cruiser battery is frozen. Do not use any third-party battery chargers unless certified by our company. Additional Safety Precautions: • Do not use batteries with different amp-hour (Ah) capacities. Do not mix use of old and new batteries.
- Page 31 Store the battery in a dry and warm place. • Avoid temperature variation • If you do not operate the Geo Cruiser for two months, we recommend that you charge the battery for 6-8 hours before use. Common Battery FAQ’s How often should I the batteries charge? The batteries do not need to be charged everyday unless the battery indictor shows a low charge, or you need to charge the batteries to support an outing.
- Page 32 Geo Cruiser. The EX and LX use the same batteries which are rated at 24 volts and 16 Ah (Tow batteries at 8 Ah), and the DX uses 24 volts 10 Ah batteries. Can I take the batteries on a commercial airline?
-
Page 33: Riding Your Geo Cruiser
LED’s will flash. The “Drive” position is when the release brake is pulled back in reverse. Note that the brake release levers on the DX and LX are “RED”, while the Elite EX levers are “Yellow”. This is the release brake lever. - Page 34 USING THE ANTI-TIP WHEELS The Geo Cruiser has extendable anti-tip wheels. You should extend them if you anticipate you will be going up speed bumps, ramps and any terrain that will cause your more weight to be unevenly distributed towards the rear of the unit.
- Page 35 DRIVING IN REVERSE Use extra care when you drive the Geo Cruiser in reverse. You may lose control or fall if one of the rear wheels hits an object. 1. Operate the Geo Cruiser slowly and at an even speed.
- Page 36 The leg-guards can be used if you need to keep your legs within the confines of the chair. 9. Operate the Geo Cruiser slowly and at an even speed. 10. Stop often and check to make sure your path is clear of obstacles.
- Page 37 VI. Riding the Geo Cruiser The Under- Seat Basket The under-seat-basket enables you to store personal items, or the joystick and power supply when traveling or transporting the unit. 1. To open the top cover peel back the 2. Place items in the storage area top as shown.
-
Page 38: Making Adjustments To Your Geo Cruiser
VII. Making Adjustment’s to the Geo Cruiser Adjusting the Backrest for Comfort The upper half of the backrest can be adjusted by four (4) positions. To adjust the backrest, do the following: 1. Press the two orange release buttons simultaneously while pulling... -
Page 39: Traveling With Your Geo Cruiser
These documents can also be mailed to you upon request. It is also possible to ride the Geo Cruiser all the way to the boarding terminal, once there, the unit can be folded and rolled away like luggage by the baggage attendant. - Page 40 However, if one of the six lights are flashing (on and off), it is an indication that there is a problem with the Geo Cruiser. We recommend you turn the unit off, then power back on in 1 minute. If any of the lights continue to flash, we recommend that you review the Geo Cruiser Diagnostic Code table below to get a diagnosis of the problem.
-
Page 41: Care Maintenance
To wash and clean the Geo Cruiser, take a non-abrasive lint free cloth like a micro fiber cloth and lightly dampen it with water, then proceed to softly clean the surfaces. Do not wash the Geo Cruiser with a water hose as this may create an electrical short and cause damage. - Page 42 IX. Care and Maintenance Bearings/Motor/Transmission Parts • These components have been lubricated and sealed at the factory. Therefore, there is no need to lubricate these parts. • Make sure that electronic components such as the control panel, battery charger, and other electric controlled components avoid moisture. If these components come into contact with moisture, dry before use.
-
Page 43: Warranty
Any damage caused by a natural disaster such as a flood, earthquake or fire will not be covered. g) This limited warranty does not cover normal maintenance service or periodic adjustments required for normal use. h) This warranty applies only to the original purchaser of the Geo Cruiser and is not transferable. -
Page 44: Product Registration
We strongly recommend that you register your Geo Cruiser as soon as possible. This is the only way that you will be able to have the unit warranted. You have two ways to do this: 1. Register your Geo Cruiser online. You can do this by going to the support section at www.pathwaymobility.com;... -
Page 45: Technical Support
Out of Service Warranty Repair If your Geo Cruiser is no longer covered under the warranty coverage period, you have the following options: 1. Purchase an extended warranty coverage plan. You can contact us directly and speak to a customer care representative 2. - Page 46 In your Ge VI. 1590 Oakland Road, Unit B109, San Jose CA 95131 Phone: 800-530-9594...
Need help?
Do you have a question about the DX and is the answer not in the manual?
Questions and answers