Advertisement
Quick Links
Advertisement

Related Manuals for Masterclean Products penguin PR200

Summary of Contents for Masterclean Products penguin PR200
- Page 1 Penguin PR200 Cordless Sprayer User’s Manual Serial Number: Date of Purchase: Distributor:...
- Page 2 MASTERCLEAN PRODUCTS, LLC AT ANY TIME WITHOUT NOTICE. WEAR PARTS 90-DAY LIMITED WARRANTY: Masterclean Products, LLC will replace all wear parts for 90 days from the date of original purchase. “Wear parts” are items which wear out as a result of usage or the passage of time and are consumed despite attempts to maintain them, such as gaskets, wheels, brass fittings, cords, wires, electrical terminals, hoses, switches, filters, bearings, o-rings, bulbs, castors or other parts deemed wear items in Masterclean Products, LLC’s sole discretion.
- Page 3 Prior to unpacking, please check the shipping carton for any obvious damages. Report the damages to the carrier prior to signing for it. During unpacking, check for any damages to the Penguin PR200 Cordless Sprayer and its components. Report any Penguin PR200 Cordless Sprayer damages to Masterclean Products, LLC Customer Service Department.
- Page 4 Safety Do not operate the Penguin PR200 Cordless Sprayer: Unless you are trained and authorized. If this unit is not in its proper operating condition. If you and the unit are in standing water. If you and the unit are in flammable or explosive areas.
- Page 5 Charging and Recharging First time use - It is important to charge the Penguin PR200 Cordless Sprayer prior to operating the unit. The external battery charger is a “SMART” charger. It will charge/recharge the battery and will not over-charge it.
-
Page 6: Operation
Operation Connect the Recoil Hose to the Spray Gun. Connect the other end of the Recoil Hose to the Quick-Disconnect at the top-rear of the unit. Connect the Stainless Steel Lance to the Spray Gun. Prior to operating the unit, unscrew the Fill Cap and fill the Tank. ... - Page 7 It is important that the tank and pump are clear of any chemical solution for any period of time that the Penguin PR200 Cordless Sprayer is idle. This is necessary, since some solutions contain d’Limonene or a caustic material, which tends to deteriorate the pump.
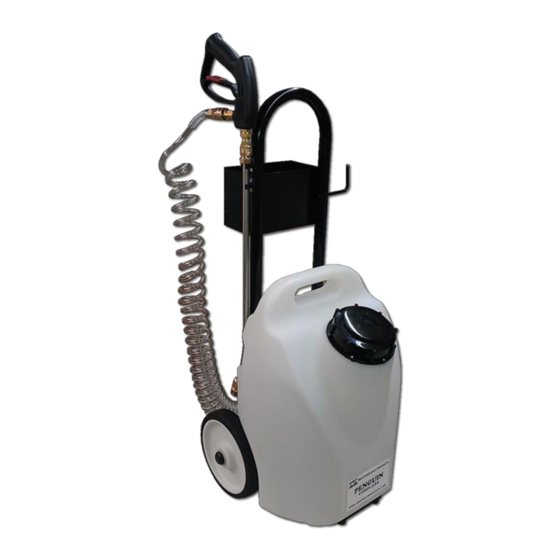
- Page 8 Penguin PR200 Spray Gun Upholstery Tool Handle Basket Recoil Hose Hanger Stainless-Steel Lance Fill Cap Recoil Hose...
- Page 9 Penguin PR200 Charger Jack...
- Page 10 Quick-Disconnect Charger Jack Power Lamp Power Switch...
- Page 11 Tank Rinse-Ease To change the solution that is already in the Tank with another type of solution or to rinse out the lines. There is a built-in 33” Dip-Tube with a Stainless Steel Strainer inside the Tank. Please read the following step-to-step instruction below: Step 1: Turn the unit “OFF”.
- Page 12 Step 4: Insert the 33” built-in Dip-Tube into a suitable external container with clean warm water. Step 5: Turn the unit “ON”. Step 6: Depress the Spray Gun. The internal pump will begin siphoning the water from the external container. Continue depressing the Spray Gun until all of the solution in the line is rinsed out.
- Page 13 Step 7: Turn the unit “OFF”. Step 8: Carefully, re-insert the 33” Dip-Tube into the Tank with the Stainless Steel Strainer resting at the bottom of the Tank. Step 9: Refill the Tank with another solution. Step 10: Re-screw the Fill Cap. The unit is ready for the next use.
- Page 16 www.mastercleanstore.com 2015 REV F...
Need help?
Do you have a question about the penguin PR200 and is the answer not in the manual?
Questions and answers