TTS Pro-Bot Manual
Programmable floor robot for
more advanced control techniques
Hide thumbs
Also See for Pro-Bot:
- Teachers manual (12 pages) ,
- User manual (16 pages) ,
- Teachers manual (19 pages)
Table of Contents
Advertisement
Warranty & Support
This product is provided with a one year warranty for problems found during normal
usage. Mistreating the Pro-Bot or opening the unit will invalidate this warranty. Any
data stored on the unit and any consequential loss is not covered by this warranty.
The battery is not user replaceable.
Technical Support
Please visit www.tts-group.co.uk for the latest product information.
Email feedback@tts-group.co.uk for technical support.
TTS Group Ltd.
Park Lane Business Park
Kirkby-in-Ashfield
Nottinghamshire,
NG17 9GU, UK.
Freephone: 0800 318686 Freefax: 0800 137525
WARNING:
Do not dispose of this product in household waste.
Hand it over to a collection point for recycling
electronic appliances. Not suitable for children under
36 months due to small parts – choking hazard.
Made in China, on behalf of the TTS Group Ltd.
TTS Product Code:
EL00535
TTS is proud to be part of
plc
Advertisement
Table of Contents

Related Manuals for TTS Pro-Bot


Summary of Contents for TTS Pro-Bot
-
Page 1: Technical Support
This product is provided with a one year warranty for problems found during normal usage. Mistreating the Pro-Bot or opening the unit will invalidate this warranty. Any data stored on the unit and any consequential loss is not covered by this warranty. -
Page 2: User Guide
® Pro-Bot Programmable floor robot for more advanced control techniques USER GUIDE... -
Page 3: Table Of Contents
Contents Care and Maintenance of Pro-Bot ® Battery Precautions and Requirements Know Your Pro-Bot Pro-Bot Basics – A Program Editing Your Program Repeat Loops Different Step Lengths and Angles Using the Pen Mechanism K’Nex Compatibility Procedures – What is a Procedure? Procedures –... -
Page 4: Care And Maintenance Of Pro-Bot
Built-in light, touch and sound sensors” (x2) and the ability to add a pen to the device so that Pro-Bot can draw its own route. There are also four locator points on the body so that K’Nex can be used to build frames. -
Page 5: Battery Precautions And Requirements
If you have the Pro-Bot docking station, then place the Pro-Bot into the docking station and connect the power cable. The green LED in the left eye will turn on to show that the Pro-Bot battery is charging. The green LED in the left eye switches off when the Pro-Bot is fully charged It may take up to 2 hours to fully charge the Pro-Bot if the battery has been fully discharged. - Page 6 ® Pro-Bot Installing the Battery in Pro-Bot On first use, fully charge before inserting the backup battery. Ensure the power slide switch is set to “OFF”. Use a cross head screwdriver to remove the backup battery cover. Remove an exhausted battery by moving spring clip sideways.
-
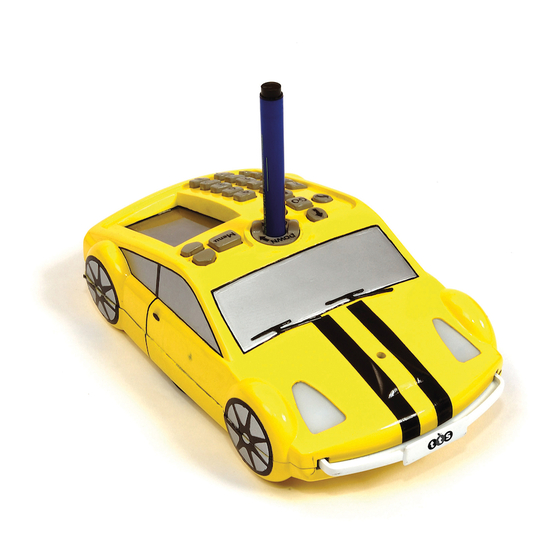
Page 7: Know Your Pro-Bot
Know Your Pro-Bot Pen holder Light Sensor Arrow keys Numeric keypad Front touch sensor Rear touch sensor LCD Panel K’Nex Menu key Scroll keys mounting Sound On/ hole Off switch Sound sensor Reset hole Power Main On/Off battery switch cover... -
Page 8: Pro-Bot Basics - A Program
Here’s a sample program to get you started. After entering the following commands press and the Pro-Bot will trace out a square with 25cm sides When writing programs on the Pro-Bot, the short form of the program commands is displayed on the LCD screen of the Pro-Bot: Forward Back Right turn... -
Page 9: Editing Your Program
Editing Your Program One of the great strengths of the Pro-Bot is its ability to edit the programs using the built-in LCD. Use the scroll keys above the display to move the cursor up and down the list of commands. -
Page 10: Different Step Lengths And Angles
Pro-Bot Different Step Lengths and Angles Pro-Bot is not limited to 25cm steps and 90º turns. To go different distances and angles, simply use the same commands you are used to but add the number of cm or degrees afterwards. For instance, to move 37cm forward, press: To turn Pro-Bot left by 30º, press:... -
Page 11: Using The Pen Mechanism
TIP: Don’t put the pen in with the lid still attached or the lid will stay in! To remove the pen lid from the Pro-Bot, put the pen back in so that it fits back into the lid then push the pen up from the underneath using a ball-pen or similar. -
Page 12: Procedures - What Is A Procedure
The main program could use all these three procedures to draw a complete flower. Pro-Bot, of course, can do exactly this. In fact different groups of students could write the different procedures and the main program, then put them all together and see how well it works! Pro-Bot has several different types of procedure. -
Page 13: Procedures - Using Procedures
Procedures – Using Procedures To use an existing procedure in your program, press the key followed by the number of the procedure you want to run. For example, to run the built-in hexagon procedure, you would use: The following example draws a simple flower, with each petal being drawn using a Procedure 1 (petal), which itself uses Procedure 2 (half petal). -
Page 14: Procedures - Defining And Editing
. Edit the commands in the list as normal and press once more to complete the procedure editing. Pro-Bot allows you to run any procedure from within any other procedure, even ones that haven’t any commands in yet. If you run procedures that call each other, you may get into an endless loop. -
Page 15: Menu System
Menu System Using the menu key gives you access to a number of other functions within Pro-Bot. Special commands can be added to your program, different configuration options can be selected and procedures can be managed. The Menu system is entered by pressing the key above the display. -
Page 16: Special Commands Menu
1½ seconds and a list of special commands will appear. Use the scroll keys to select the desired command, then select it with the key. The special commands available are: Light On: Switches the Pro-Bot’s headlights on whilst running Light Off: Switches Pro-Bot’s headlights off Sound 1: Plays sound “switch on”... -
Page 17: Using Sensors
Using Sensors The most exciting thing about learning to program with the Pro-Bot is the four built-in sensors that can be used to control your program. Before you can use sensors in your program, you must enable them by selecting sensors from the Menu system and checking that they say “On”. -
Page 18: Light Sensor
Pro-Bot Light Sensor The light sensor, mounted on the front of Pro-Bot, is sensitive to changes in the light level in the room. When the room lights go dark (below about 50 lux), procedure 35 DARK will be run. Similarly, when the room lights come back on (more than about 350 lux), procedure 36 LIGHT will be run. -
Page 19: Examples Using Sensors
Press and hold the button to access the special commands Select ‘Light Off’ Press to return to the main screen At the main screen, program Pro-Bot to move forward by pressing the forward arrow several times Press to start Pro-Bot... -
Page 20: Connecting To A Pc
Code – EL00477) (available separately) to connect Pro-Bot to the PC. Follow the instructions with Probotix to install the PC software. The upload/download process is managed completely from the PC and all that needs to be done on the Pro-Bot is to ensure that it is switched on. -
Page 21: More Example Programs
More Example Programs 6-Pointed Star Rpt 6 [Fd 10 Rt 120 Fd 10 Lt 60] 5-Pointed Star Rpt 5 [Fd 10 Rt 132 Fd 10 Lt 60] Complex Flower Main Proc 1 Proc 2 Rpt 12 Rpt 30 Rpt 15[ [Proc 1 [Fd 1 [Fd 1... -
Page 22: Technical Specification
® Pro-Bot Technical Specification Feature Specification Forward/backward movement 1cm (Up to 499cms [max]) Left/right turn 1° (Up to 499°) Pause 1 second ±15% Speed of movement ~65 mm/sec(depends on battery condition) Batteries 850mAH LiPo (Not replaceable) & 1 x 3V... -
Page 23: Warranty & Support
This device complies with Part 15 of the FCC Rules. Operation is subject to the following two conditions : (1) this device may not cause harmful interference, and (2) this device must accept any interference received, including interference that may cause undesired operation. Warning: Changes or modifications to this unit not expressly approved by the party responsible for compliance could void the user’s authority to operate the equipment. - Page 24 ® Pro-Bot Notes...
Need help?
Do you have a question about the Pro-Bot and is the answer not in the manual?
Questions and answers