Table of Contents
Advertisement
Before Initial use
Thank you for purchasing this new digital cordless telephone.
Intended Purpose:
This product is intend to be connected indoor to an analogue telephone line.
This product is made in accordance with the Digital Enhanced Cordless Telecommunications (DECT).
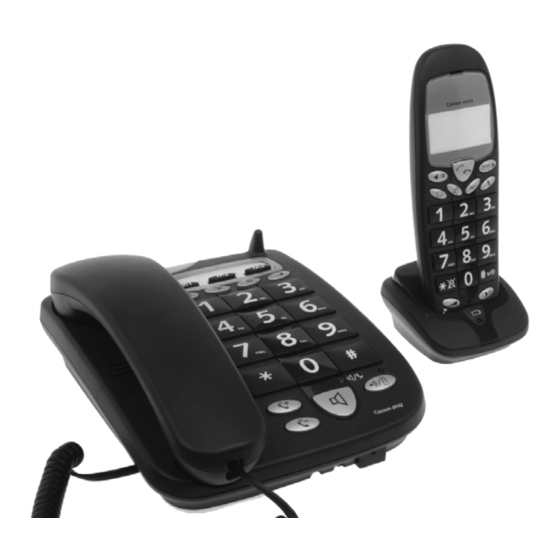
COCOON 8002
DECT technology is characterized by high-security protection against interceptions as well as high-
quality digital transmission. This telephone was designed for a wide range of applications. For exam-
ple, this telephone can be used within a network of 4 handsets.
Caller ID is a network provider service. After subscribing to Caller ID, this phone will display the
caller's phone number.
Important
To use 'Caller ID' (display caller), this service has to be activated on your phone line. Normally you
need a separate subscription from your telephone company to activate this function. If you don't have
the Caller ID function on your phone line, the incoming telephone numbers will NOT be shown on the
display of your telephone.
To be connected to the public analogue telephone network.
User guide
The features described in this manual are published with reservation to modifications.
v 1.3
The CE symbol indicates that the unit complies with the essential
requirements of the R&TTE directive.
Advertisement
Table of Contents

Related Manuals for UCOM COCOON 8002


Summary of Contents for UCOM COCOON 8002
- Page 1 This product is intend to be connected indoor to an analogue telephone line. This product is made in accordance with the Digital Enhanced Cordless Telecommunications (DECT). COCOON 8002 DECT technology is characterized by high-security protection against interceptions as well as high- quality digital transmission.
-
Page 2: Table Of Contents
Outgoing calls ........................9 Hands free mode on / off ..................... 10 Programming memory numbers ..................10 Dialling a memory number ....................10 Cocoon 8002 Mute ............................. 10 Setting the speaker and handset volume ................10 - 2F Base (corded telephone) - Setting the ring tone ...................... - Page 3 Storing a number from the call list into the memory............17 Register / deregister a handset....................17 Register a handset onto the Cocoon 8002 base station ............17 Deregistering a handset from the Cocoon 8002 base station..........18 10 Call forwarding and internal calls from one handset to another ........18 10.1 Call forwarding and conference calls during an external call..........
-
Page 4: Safety Notes
Safety notes Safety notes The following basic safety notes must always be taken into account when using electrical devices. Carefully read the following safety notes and details on the correct use of the device. Familiarise yourself with all the functions of the device. Keep these notes in a safe place and pass them on to another user if necessary. -
Page 5: Cleaning
Cleaning Note: • Only use the supplied mains adapter. Do not use any third-party adapters as the rechargeable batteries could be damaged. • The socket for connecting the mains adapter must be near the device and easily accessible. • Only use rechargeable batteries of the same type. Insert the rechargeable batteries in the right direction for the terminals (this is shown in the battery compartment of the handset). -
Page 6: Installing The Base Station
First steps Installing the base station Install the base station as follows: 1 Connect the mains adapter to the base station and then plug it into a mains socket. 2 Connect one end of the telephone cable to the telephone socket on the wall and the other to the connector on the back of the base station. -
Page 7: Wall Mounting
First steps - 2C Back of the handset - A. Cover B. Rechargeable batteries Wall mounting You can fix the corded telephone to the wall using 2 screws, one 75 mm below the other. In order to hang the handset on the corded telephone, the cradle (see point 28 - figure 2F on page 8) must be rotated by 180°... -
Page 8: Keys / Display
First steps Keys / Display Cordless handset 1. Call key Cocoon 8002 2. Call list / Handsfree / Scroll key 3. INT / Escape key 4. Mute key 5. Alphanumeric keys 6. Key lock 7. Redial / Pause key 8. Volume / Ring tone key 9. -
Page 9: Display
Using the corded telephone Charger 29. LED: Handset charging - 2G Charger - Display More numbers left or scroll direction in More numbers right or scroll direction the menu in the menu New numbers in the call list You are online Battery charge indicator Hands free mode on The antenna indicates the strength of... -
Page 10: Hands Free Mode On / Off
Using the corded telephone Hands free mode on / off You can use this function to answer a call without having to lift the handset or if the handset is already in your hand. 1 Press the hands free key to activate the function. 2 Press the hands free key again to switch the call back to the handset. -
Page 11: Setting The Ring Tone
“5 Using the corded telephone” . Navigating the menu The Cocoon 8002 has a menu system which is easy to use. Each menu leads to a list of options. The menu map is shown on the following paragraph. -
Page 12: Changing The Language
Using the cordless handset Menu Submenu items: NAME LANGUAGE DATE/TIME YEAR MONTH HOUR MINUTE REMOVE HS RESET REGISTER Changing the language 1 Press the menu key. 2 Select “LANGUAGE” and confirm. 3 Select the language and confirm. 4 Press the INT -key to return to stand-by. Setting the date and time 1 Press the menu key. -
Page 13: Incoming Calls
Using the cordless handset 2 Press the call key. The telephone number is automatically dialled. 3 Press the call key again to end the call. To redial the last telephone number called. 1 Press the call key. 2 Press the redial key. The last number called is automatically dialled. -
Page 14: Setting The Volume
Using the cordless handset Setting the volume 1 Press the volume key during a call. You can set the volume from 1 to 5. The R key (Flash) Press the Flash key (key 12 - figure 2E on page 8) to use particular services on your external line such as "call waiting"... -
Page 15: Setting The Dialling Mode
Phonebook 6.12 Setting the dialling mode There are two dialling modes: DTMF/tone dialling (default and most commonly used mode) Pulse dialling (in older devices) To change the dialling mode: 1 Hold down the Flash key to toggle between the two dialling modes. "PULSE"... -
Page 16: Edit A Phonebook Entry
5 Press menu key to confirm. Calling line identification (CLIP) The Cocoon 8002 displays the telephone number of incoming calls. This function can only be used if you are registered for this service with your network provider. For more information, please contact your network provider. -
Page 17: Calling A Number In The Call List
• the handset had previously been deregistered from this base station (e.g. for reinitialisation). • you want to register a different handset onto the base station. The following description only applies to Cocoon 8002 handsets and base stations. 1 Hold down the paging key on the base station for 10 seconds. -
Page 18: Deregistering A Handset From The Cocoon 8002 Base Station
The PIN number of the base station CANNOT be changed. Deregistering a handset from the Cocoon 8002 base station You can log a handset off from a base station in order to log on a different handset. -
Page 19: Internal Call (House Phone Function)
Reset to default settings 10.2 Internal call (house phone function) You cannot conduct a call between the corded telephone and the cordless handset, only between two cordless handsets. 1 In standby mode, press the INT key and then the number of the handset (1-4). -
Page 20: 13 Technical Data
Technical data Fault Possible cause Solution Cannot dial a number Wrong dialling mode see "6.12 Setting the dialling mode" to set the correct dialling mode Handset is out of range Move closer to the base symbol is flashing station with the handset The base station has no power Check the mains adapter and cable... -
Page 21: 14 Default Settings
If the device is replaced, the colour and model may vary from the device originally purchased. The start of the warranty period is determined by the original date of purchase. The warranty period will not be extended if the device is repaired or replaced by Ucom or one of its authorised service centres. - Page 23 SERVICE RETURN CARD Please fill in this card in CAPITAL LETTERS and attach to the product when you return in for service. Customer Details Name: Surname: Street: Nr.: Box: Location: Post code: Country: Tel.: E-mail: Product Details Model name: Serial Nr: Purchase date: (DD/MM/YYYY) Fault description:...
- Page 24 COCOON 8002 www.ucom.be MD2500189...
Need help?
Do you have a question about the COCOON 8002 and is the answer not in the manual?
Questions and answers