Table of Contents
Advertisement
Advertisement
Table of Contents

Related Manuals for IK Multimedia iRig Pro Duo


Summary of Contents for IK Multimedia iRig Pro Duo
-
Page 1: User Manual
Universal audio/MIDI interface USER MANUAL... -
Page 2: Table Of Contents
Phantom and MIDI LEDs Direct monitoring Connecting microphones Dynamic microphones Condenser microphones Ribbon microphones Connecting instruments Connecting monitors and headphones MIDI IN/OUT MIDI IN MIDI OUT Setting input gain on iRig Pro DUO Troubleshooting Specifications Warranty Support and more info... -
Page 3: English
• Quick start guide • Registration card iRig Pro DUO is a universal mobile 2 channel audio and MIDI interface with an ultra-compact and highly portable enclosure, that packs all the necessary connections for making and recording high-quality music on the go with iOS/Android or Mac/PC. -
Page 4: Irig Pro Duo Overview
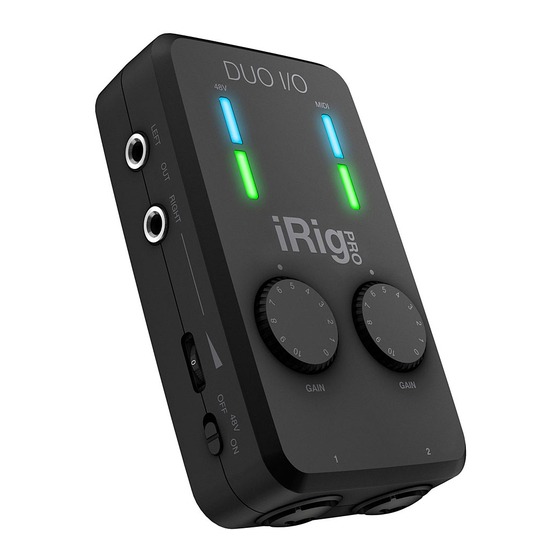
English iRig Pro DUO overview 13 14 1. Microphone/Instrument inputs 2. Input gain knobs 3. Audio level/Status LEDs 4. Phantom power (+48V) LED 5. MIDI LED 6. Headphone output 7. Main line outputs 8. Direct monitor switch 9. Phantom power (+48V) switch 10. -
Page 5: Installation And Setup
See specifications about battery life. Insert the included AA batteries in the battery compartment on the bottom side of iRig Pro DUO. If you want to play for a long time, you can connect the DC In port on iRig Pro DUO to an external 9VDC - 500mA (minimum) PSU, for unlimited playing time without a battery. -
Page 6: Ios/Android Devices
App Store (both free and full versions are available), Google Play or Samsung Store, and launch the one that best fits your music and audio needs. iRig Pro DUO is compatible with any other app that supports digital audio input from the 30-pin or Lightning connectors. - Page 7 English 4. If you are using a microphone connect it using an XLR cable to one of the iRig Pro DUO microphone inputs. 5. If you are using an instrument like a guitar or a bass, connect it using a regular ¼” guitar cable to one of the...
- Page 8 7. To control an external MIDI device from an app, use the included MIDI cable to connect the MIDI OUT port of the iRig Pro DUO to the MIDI IN port of the external device. Always check for specific MIDI output...
- Page 9 9. Connect your mixer or powered speakers to the Main Line Output jacks on iRig Pro DUO and set its level via the dedicated volume wheel. These outputs are high quality balanced outputs, so you don’t need to use any...
-
Page 10: Mac/Pc
3. Make sure phantom power is turned off by setting the Phantom Power switch to the OFF position. Check that the phantom power LED is OFF. 4. If you are using a microphone connect it using an XLR cable to one of the iRig Pro DUO microphone inputs. 5. If you are using an instrument like a guitar or a bass, connect it using a regular 1⁄4” guitar cable to one of the iRig Pro DUO instrument inputs. -
Page 11: Irig Pro Duo Leds
Status / Audio level LEDs For each channel iRig Pro DUO will show the audio signal level and the status of the unit as follow: • Both LEDs Off: iRig Pro DUO is not connected to any power source. -
Page 12: Direct Monitoring
Pro DUO. NOTE: In your audio software, select the appropriate iRig Pro DUO input (1 or 2) as the source of the track you will be recording to. Adjust the channel gain knob until you have a sufficient audio signal without clipping. -
Page 13: Dynamic Microphones
LED doesn’t turn blue, check that working batteries are inserted in the iRig Pro DUO’s battery compartment on the bottom side, and that an application that is using iRig Pro DUO is open. Phantom power will NOT turn ON if iRig Pro DUO is in standby (status LED lit up dark blue). -
Page 14: Ribbon Microphones
English Ribbon microphones Before connecting a ribbon microphone, turn OFF phantom power and check the microphone’s operating instruction manual to see if it requires it. Most ribbon microphones don’t require phantom power, and some can even be damaged by it. If you’re in doubt just leave it OFF. If the microphone won’t work, check its user manual, it may need phantom power. -
Page 15: Connecting Instruments
NOTE: In your audio software, select the appropriate iRig Pro DUO input (1 or 2) as the source of the track you will be recording to. Adjust the channel gain knob until you have sufficient audio signal without clipping. -
Page 16: Midi Out
English MIDI OUT • Connect the 2.5mm-to-MIDI cable to the iRig Pro DUO MIDI OUT port and to the MIDI IN port on, for example, your sound module. • Open a Core MIDI compatible application on your iOS device or on your computer. -
Page 17: Troubleshooting
30-pin or Lightning dock connector. Mac: be sure you have set “iRig Pro DUO” as the audio or MIDI input device on the audio app you are using. -
Page 18: Specifications
English Specifications Microphone Input Microphone Inputs: 2x balanced, XLR. Pin 2: hot / Pin 3: cold / Pin 1: ground Microphone Input Level: from 6 mVpp to 1.4 Vpp Microphone Input Impedance: approx 2 kOhms Gain Range: 48 dB Phantom Power: +48V ± 4V Frequency Response: • from 5 Hz to 21 kHz (-3dB) Gain @ min • from 30 Hz to 21 kHz (-3dB) Gain @ max... -
Page 19: Warranty
English Common AD and DA Resolution: 24-bit Sampling Rate: 44.1 kHz and 48 kHz Power: USB bus power, battery power (2xAA), or DC power supply (9VDC - 500mA min. positive outside - not included) Metering: Multicolor LED Size: 75mm/2.95” x 127mm/5” x 37mm/1.46” Weight: 197.2g/6.96oz (batteries excluded) Battery Life: • Recording - Max load*: 3 hours, 30 minutes (NiMH rechargeable);... - Page 20 Pro Duo, AmpliTube®, iRig® Recorder, VocaLive®, SampleTank® are trademarks property of IK Multimedia Production Srl. iPad, iPhone, iPod touch, Retina and Mac are trademarks of Apple Inc., registered in the U.S. and other countries. iPad Air, iPad mini, and Lightning are trademarks of Apple Inc. All other trademarks are property of their respective owners.
Need help?
Do you have a question about the iRig Pro Duo and is the answer not in the manual?
Questions and answers