Table of Contents
Advertisement
Quick Links
Item: 61351
1x Robin
2x Blade(A)
2x Blade(B)
For questions or difficulties operating your TDR devices, please contact:
service@tenergy.com
I N N O V A T I V E L E G A C Y
5.8G FPV STREAMING DRONE
Instruction Guide
Keep the Instruction Guide for future reference. Do not discard.
CONTENT LIST
Controller
1x
1x USB 3-Port Charger
1x Battery
(for Controller)
1x 8GB Micro SD Card
Ages: 14+
2x Battery
(for Robin)
1x USB Card Reader
Advertisement
Table of Contents

Related Manuals for TDR ROBIN PRO

Summary of Contents for TDR ROBIN PRO
- Page 1 CONTENT LIST Controller 1x Robin 1x Battery 2x Battery (for Controller) (for Robin) 2x Blade(A) 1x USB 3-Port Charger 1x 8GB Micro SD Card 1x USB Card Reader 2x Blade(B) For questions or difficulties operating your TDR devices, please contact: service@tenergy.com...
- Page 2 DISCLAIMER Read this disclaimer and instructions thoroughly before operating this device. THE USE OF THIS PRODUCT IS A SIGN OF YOUR COMPLIANCE WITH THIS DISCLAIMER. You are responsible for your own actions, behavior, and conduct while using this device. You agree to use this product in such a way that you will comply with all local and federal regulations, including, but not limited to, personal privacy laws.
- Page 3 FCC Statements The crossed-out dust bin symbol indicates that batteries This device complies with Part 15 of the FCC Rules. Operation is subject to the (primary, rechargeable, button cells, packs, etc) must not following two conditions: be put in household waste. These items may be composed 1.
- Page 4 Product Features Advance Auto-hovering Technology Wrap-around Shot With Orbit Video 6-axis Flight Control System 5.8GHz Real-time Video Streaming 2MP / 720p HD Camera Advance Headless Flight Mode 4-way 360 Stunt Rolls (Left, Right, Forward, Backward) Capable Of Outdoor Flight Modular Battery Design...
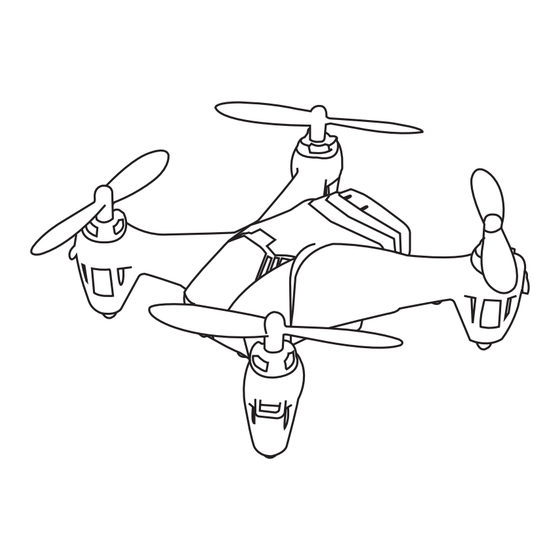
- Page 5 Diagrams 1. Blades 2. Canopy 3. Receiver Board 4. Battery 5. 5.8G Camera Board 6. Motors 7. Main Frame Controller Short Press: Photo 360° Roll Photo/Orbit Video Long Press: Orbit Video Display Speed Selection Video Throttle Trim Forward/Backward Trim Throttle/Rudder Stick Elevator/Aileron Stick Rudder Trim Left/Right Trim...
- Page 6 Charging and installing battery for the drone Charge the battery for the drone 1. Connect the USB cable to the battery charger. 2. Connect the USB cable to USB power source. 3. Connect the battery to the charger. 4. The LED light will be on while charging, and off once charging completed.
- Page 7 Binding drone to the controller 1. Fully insert battery into drone unit and place on level surface 2. When 2 red LEDs flash rapidly, the drone is ready to bind 3. To turn on the controller and begin binding, switch the power switch to “ON” 4.
-
Page 8: Photo Taking
Basic operation controls Basic operation: Left stick controls altitude and direction. Right stick controls the rotation forward, backward, left or right movement. Press down to trim Press up to trim Press left/right to trim Press left/right to trim Photo Taking Video Shooting Short press the button Short press the button... - Page 9 Special operation controls 360° Roll 1. Bring the drone to a mid-air hover, without flying towards any direction. Remove finger from the direction (Elevator/Aileron) stick once in hover. 2. While hovering, press the 360° Roll button. The remote will start beeping rapidly as the drone will enter rolling-ready mode.
- Page 10 Special operation controls Speed/Sensitivity Selection The drone's flying speed and sensitivity can be adjusted by pressing the Speed Selection button. Pressing the button will switch the speed in the following speed settings: Low > Medium > High > Low Medium High Tip: It is best to start flying in default low speed setting until you are comfortable to the flying speed.
-
Page 11: Specifications
Specifications Drone 13.2x13.2x6cm / 5.2x5.2x2.4inch Weight 55g / 1.94oz Operating Temperature 0°C to 40°C Control Distance 70m / 230ft Memory Card Micro SD card (Supports up to 64G) Video Format 2MP/720P/30FPS Camera Viewing Angle 120° Battery Capacity 380mAh Flight Time approx. - Page 12 Blade installation To disassemble the blade: To install the blade: Remove the blade by pulling Match blade with the blade socket upward. and press down. Blades must be installed as shown: Front: use Yellow Blade A and Yellow Blade B Rear: use Black Blade A and Black Blade B Yellow Yellow...
- Page 13 Transfer photos and videos to your computer Turn off the drone by disconnecting the battery. Locate the Micro SD Card on the side of the drone. Press in and release. The Micro SD Card will pop out. Remove the Micro SD Card. Insert the Micro SD Card into the USB Card Reader.
-
Page 14: Flying Tips
Flying Tips When launching the drone, face the same direction as the drone. The yellow blades should be in front. Practice launching, hovering, and landing before attempt to learn other moves. Flying 2 to 3 feet above the ground will reduce ground turbulence and make flying easier. When first attempting to fly in a different direction, start by tapping the Direction Stick until you get the hang of it. -
Page 15: Troubleshooting
Troubleshooting Problem/Issue Cause Soluction a) Make sure the batteries in both drone and a) Battery Cannot bind drone to controller are fully charged b) Electromagnetic interference controller b) Clear out objects between drone and controller c) Out of range c) Put drone and controller closer to each other a) Battery too low a) Charge battery 2 Drone does not turn on... - Page 16 Thank You Happy Flying...
Need help?
Do you have a question about the ROBIN PRO and is the answer not in the manual?
Questions and answers