Table of Contents
Advertisement
EN
Instruction manual
3-axes stabilized steady stative
for mirrorless cameras and digital single lens reflex cameras (SLRs)
Pilotfly Technology Co. LTD. ■ Jiafeng S. Rd. No.118,2F-2 ■ Zhubei City, Hsinchu County 30271 ■ Taiwan
Pilotfly GmbH ■ Wendelsteinstr.12 ■ 86163 Augsburg ■ Deutschland
IM_208.CCF.20170508-EN
Advertisement
Table of Contents

Related Manuals for Pilotfly H2


Summary of Contents for Pilotfly H2
- Page 1 3-axes stabilized steady stative for mirrorless cameras and digital single lens reflex cameras (SLRs) Pilotfly Technology Co. LTD. ■ Jiafeng S. Rd. No.118,2F-2 ■ Zhubei City, Hsinchu County 30271 ■ Taiwan Pilotfly GmbH ■ Wendelsteinstr.12 ■ 86163 Augsburg ■ Deutschland...
- Page 2 Version IM_208.CCF.20170508-EN English, 2 Edition, 05.2017 © Pilotfly Copyright This document is protected by copyright. All rights, including those of the whole or partial photo-mechanical reproduction, duplication and spreading (e. g., by means of data processing, to data carriers and data network works) as well as content and technical changes, are left in the course of constant product improvements.
- Page 3 Dear customer, We thank you for your confidence and wish you a lot of joy and success with your new Pilotfly product. You have decided in favor of a high-quality product with that. Thanks to new efficient motors with built-in MCUs (micro controller units) the Pilotfly H2 Gimbal is suitable as well for mirrorless cameras as for digital single lens reflex cameras.
-
Page 4: Product Overview
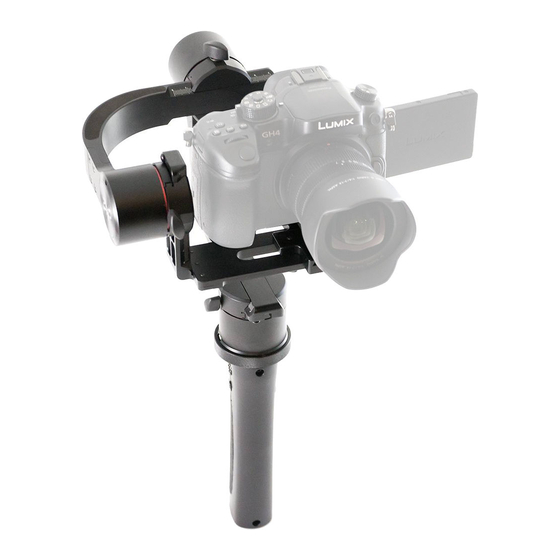
Product Overview Components IM_208.CCF.20170508-EN... - Page 5 Product Overview Fuction keys and LED displays „Mode“ -key button You can change the mode or calibrate the device by pressing the key button. 4 way joy-stick With the joy-stick you can change the angle of inclination of the camera and the horizontal angle of rotation. LED display LED display power adapter IM_208.CCF.20170508-EN...
- Page 6 Product Overview “Mode” button The respective operating mode of your Pilotfly Gimbal can be set using the mode button. The mode button can be assigned different profiles using the SimpleBGC software GUI. A profile is respectively a set of predefined settings such as, for example, different provisions for the...
-
Page 7: Scope Of Delivery
Use the SimpleBGC 32 Bit Software GUI to change the volume oft he buzzer or to deactivte the buzzer 5.9 Extended settings for advanced users – View Level „Advanced“ 5.12 Buzzer and LED settings. Scope of delivery 1 x Pilotfly H2 Gimbal 1 x Carrier bag with belt 1 x USB cable 1 x Power adapter (charger) -
Page 8: Technical Data
Max. transmitting power 2,5mW/ Range ca. 10m Communication interface (Models from Mai 2017 support Bluetooth Versin 4.0. Older models can be upgrated from our Pilotfly service.) Operating system Windows, MAC OSX, LINUX und Android APP 1x Camera-IMU, 1x Frame-iMU (if the system is equipped with... -
Page 9: Table Of Contents
Table of contents IMPORTANT SAFETY INSTRUCTIONS ..................... 11 ............11 EANING OF THE SYMBOLS USED IN THIS INSTRUCTION MANUAL ..........................12 NTENDED USE ................ 12 OSSIBLE DANGERS FOR CERTAIN PERSON GROUPS ................12 ERSONAL RIGHT AT THE PICTURE OF ONE S OWN ............ - Page 10 Table of contents 5.9.6 Monitoring (Real-Time view of the sensors - raw data).............. 42 5.9.7 Hardware (Calibration of the gyrometer and accelerometer) ............. 42 5.9.8 Adjustable Variables ......................... 42 5.9.9 Scripting ............................ 42 5.10 F – ADVANCED ............43 TUNING BY ADJUSTING THE SETTINGS 5.10.1 Manually optimising the PID control settings .................
-
Page 11: Important Safety Instructions
Important Safety Instructions Please read these safety instructions attentively before you take your Pilotfly product into operation to avoid damages to the product and prevent possible injuries. Keep these safety instructions available for all persons who will use this product. -
Page 12: Intended Use
Also use only the accessories specified by the manufacturer. Please pay attention to the local regulations and laws of the country in which you use the Pilotfly Gimbal. 1.3 Possible dangers for certain person groups This device is not designated for the use by children and certain other person groups with restricted physical, sensory or intellectual abilities or lack of experience and/or lack of knowledge. -
Page 13: The Use At Ceratin Places And Environmental Conditions
1.5 The use at ceratin places and environmental conditions For a safe use of your Pilotfly H2 you have to pay attention, that … you use the device only at places which are suitable also for your camera. Implicitely follow the instructions within the instruction manual of the camera which you use with the Gimbal. -
Page 14: Power Supply And Operating Conditions
Important Safety Instructions 1.6 Power supply and operating conditions For a safe use of your Pilotfly H2 pay attention, that … you make sure that the specified voltage data on the rating label are fitting to the specification of the power socket. -
Page 15: Precautions At Handling With Li-Po Accumulators
Pilotfly H2. Generally, for charging Li-Po accumulators only use battery chargers with a Li-Po charging program and balancer. Charge the accumulator only supervised on a fire-proof pad. -
Page 16: Safe Disposal
Important Safety Instructions 1.8 Safe disposal Endangering health and environment by accumulators and batteries! In the Europian Economic Area this symbol indicates that consumers are required by law to return all waste batteries to either a store or another collection point for waste batteries. -
Page 17: Setup And Operating
1. Open the transport box very carefully to prevent a possible damage to the product. This can happen if a knife is used for opening with a long blade. 2. Your Pilotfly product is in its own carrier bag. Unpack it and all its accessories. 3. Please check the completeness and integrity of the scope of delivery. -
Page 18: First Steps
Setup and operating 2.2 First steps Warning Injury danger! Check the device and the cable before every use. A damaged device may not be used. Warning Injury danger! Do not take the device in operation in explosive surroundings! Follow the safety instructions to this 1.5 The use at ceratin places and environmental conditions. - Page 19 Setup and operating 3. Check at the assembly that the grip fits with the markings (arrows) and is screwed together tightly. Warning Injury danger! Never grasp the power adapter with wet hands. Caution Property damage! Use only the delivered power adapter for charging. Caution Property damage! Before plugging the power adapter in to the power socket, make sure that the electrical data indicated on the rating label...
-
Page 20: Assembling And Adjustment Of The Camera
Set up and operating 2.3 Assembling and adjustment of the camera Warning Injury danger! Implicitely follow the safety instructions and warning notices within the instruction manual of your camera! Function! Make sure that both, the camera and the Gimbal remain switched off during the assembly and adjustment. - Page 21 Setup and operating 5. Hold the Gimbal vertical, ideally supported on a table. 6. Balancing the camera with the assembly plate. Loosen the locking screws of the assembly plate a little bit and balance first roughly the camera forwards and backwards as well as on to the right and to the left side.
- Page 22 Set up and operating 12. Yaw. Incline the device by approx. 45° to the left or to the right. The yaw axis must keep its position now (Figure 10). If the axis turns, you must proceed balancing the axis. 13. Loosen the locking screw of the yaw axis and move the L-arm forwards or backwards.
-
Page 23: Switch On And Basic Operating
Setup and operating 2.4 Switch on and basic operating Warning Injury danger! Before you switch on the device, please read the instruction manual completely and get familiar with all use and safety instructions. Follow the notes and tips so that you can use the device optimally. -
Page 24: Fine-Tuning Using The Simplebgc Gui Software
Setup and operating 2.5 Fine-tuning using the SimpleBGC GUI software Function! Create the best possible stabilisation effect by using the SimpleBGC software 5.Software user surface (GUI). As every camera has a different weight, the settings for the PID controller and the motor output can be individually set and optimized. -
Page 25: Making A Bluetooth Connection
Making a Bluetooth connection Legal hint! All Pilotfly products are equipped with an active Bluetooth to be able to make a wireless connection with the device and control this via remote control. Probably there are restrictions at certain places for the use of a Bluetooth-capable and wireless equipment. -
Page 26: Software Installation
Software Installation All Pilotfly products use the Alexmos Chip and therefore can be used with the SimpleBGC software which is provided by Basecam Electronics. The software can be installed on different operating systems, such as Windows, OSs, Linux and Android App. -
Page 27: Installation On Mac Os
Software Installation 4.3 Installation on MAC OS 1. Go to our webseite www.pilotfly.de www.pilotfly.com.tw on to the support page. 2. Download the most current version of the SimpleBGC software there. 3. Download the most current version of the "CP2102 USBtoUART" driver there. -
Page 28: Installation Of The Android App
5.3 Saving and loading profiles onto the computer and chapter Making a backup with the backup manager. 1. Go to the Google Play Store and download the SimpleBGC App there. 2. Ensure that Pilotfly product is paired with your Android Smartphone or Tablet 3. Making a bluetooth connection. - Page 29 „Connect at startup“. 6. The Bluetooth window should show you detected devices as shown. 7. Close the application and start it again while the Pilotfly device is powered on. 8. While starting the application the App tries to connect with the Pilotfly device and will show a Pop-up window with information of proper connetion and current firmware version.
-
Page 30: Using The Software Pc/Mac - Overview
Using the Software PC/MAC - Overview Function! Connect the device via USB cable or Bluetooth 3. Making a bluetooth connection with a PC or MAC to optimize the stabilization settings or to upgrade the firmware. Function! Implicitly make a backup copy of your profiles before you make changes or upgrade the firmware. -
Page 31: Connecting The Gimbal With The Simplebgc Software Gui
Using the Software PC/MAC – Connecting The surface is seperated into different functional blocks. Under the main menu point "View" you choose the desired configuration depth (View level). Depending on your user abilities you can set to display more or less functional blocks for various settings. -
Page 32: Saving And Loading Profiles Onto The Computer
Using the Software PC/MAC – Profiles 5.3 Saving and loading profiles onto the computer A profile corresponds to a set of predefined settings, as for example different default settings for the follow mode, the rotation speed of the single axes, the orientation of the axes when switching on, time-lapse settings, axis acceleration, control parameters respectively adapted on your camera weight for the optimum reduction of vibrations, parameters for jerk-free operating, etc.). -
Page 33: Making A Backup With The Backup Manager
Using the Software PC/MAC – Backup manager 5.5 Making a backup with the backup manager 1. Making a backup in a file on your computer. Define a name for your backup file and save your backup as a file on your computer or other data storage of your choice. -
Page 34: Calibrating The Gyrometer
A calibration of the Gyrometer is necessary for the exact determination of the orientation of the camera in the Pilotfly-Gimbal. Though the sensors are calibrated before delivery, however, sometime you must perform a calibration of the Gyrometer. Models shipped after April 2017 perform a gyro-calibration directly during switching on. -
Page 35: Calibrating The Accelerometer
Though the sensors are calibrated before delivery, however, in rare cases you must carry out a calibration of the acceleration sensors. These measure linear movements of your camera in the Pilotfly- Gimbal. With the software, a calibration is possible as shown below. You need to carry out only a simple calibration of the +Z axis. -
Page 36: Basic Settings For Beginners - View Level "Basic
We don't assume any liability for damages resulting from it! The view level "BASIC" is suitable for beginners. Here you have access to the basic features of your Pilotfly Gimbal to reach an optimized stabilisation of your camera: 5.8.1 RC-Settings (Remote control, Joystick settings) -
Page 37: Follow-Mode
Caution Function! The software SimpleBGC offers further possibilities, which are however not necessary for the use and the adjustment of the Pilotfly Gimbals. Thus, these functions are not described within the context of this introduction manual. For the use of this extended functionality we refer you to the user manual of the SimpleBGC 32bit 3-Axis software, which you can download in its newest version from our web side www.pilotfly.de. - Page 38 Using the Software PC/MAC - BASIC Follow-Mode - Continued Follow Frame – Here you can set additional criteria, when the roll-axis should be unlocked and should follow the orientation of the Gimbal. Namely as a function of the orientation of the pitch. Follow ROLL start,deg –...
-
Page 39: Service (Assigning The Mode-Button, Startup Behavior)
Using the Software PC/MAC - BASIC 5.8.3 Service (Assigning the Mode-button, Startup behavior) You can make different adaptations for your Gimbal and save your respective setting as a profile Saving and loadin profiles on a computer or directly transfer to your Gimbal 5.4 Writing and reading profiles onto/from the Gimbal. -
Page 40: Extended Settings For Advanced Users - View Level "Advanced
Caution Function! The software SimpleBGC offers further possibilities, which are however not necessary for the use and the adjustment of the Pilotfly Gimbals. Thus, these functions are not described within the context of this introduction manual. For the use of this extended functionality we refer you to the software user manual SimpleBGC 32bit 3-Axis. -
Page 41: Service (Assigning The Mode-Button, Startup Behavior)
Using the Software PC/MAC - ADVANCED 5.9.3 Service (Assigning the Mode-button, Startup behavior) You will find the same settings as described at the basic settings 5.8.3 Service and additionally the following extended settings: Working positions – Frame upside-down auto detection – if enabled, the controller detects startup in the upsidedown mode: if you switch Gimbal ON when frame is turned over by ROLL axes, but camera is not, - system enters upside-down mode automatically. -
Page 42: Stabilization (Reducing Vibrations)
Automatic gyro calibration – Our default setting: “Skip calibration and use saved values” 5.9.8 Adjustable Variables Please don’t change any settings in this tab for the correct use of your Pilotfly Gimbal. Use on your own risk. 5.9.9 Scripting Please don’t change any settings in this tab for the correct use of your Pilotfly Gimbal. -
Page 43: Fine-Tuning By Adjusting The Pid Settings - Advanced
5.10 Fine-tuning by adjusting the PID settings – ADVANCED Prior to delivery, the Pilotfly Gimbal is optimally tuned to a camera weight in line with commonly used cameras ranging from approx. 800 g to approx. 1.2 kg. If your camera weight is outside this range (max. permissible approx. - Page 44 Using the Software PC/MAC – PID control 5. Gradually increase the P value on the axis to be set. As soon as the axis begins to swing independently (see adjacent illustration of “monitoring”), leave the P value for the moment and increase the D value until the axis no longer swings by itself.
- Page 45 Using the Software PC/MAC – PID control 10. After you have optimally set the PID parameter for all axes in a static state, move the Gimbal in all directions, as in later real use. If you can still determine vibrations due to the mutual interaction of the three axes in certain positions, reduce the PID values slightly for the axis that is still disruptive.
-
Page 46: Automatically Optimize The Pid Control Settings
Using the Software PC/MAC – PID control 5.10.2 Automatically optimize the PID control settings 11. Automatically optimize the PID control settings. Before you start ensure that the Gimbal is stable. For general information on mechanisms of the PID parameter read Fine-tuning using the SimpleBGC software 12. - Page 47 Using the Software PC/MAC – PID control 18. Mark the remaining check boxes as shown in the adjacent illustration. You can also have the data entered into a log file during process. This called “auto_pid_log.csv”. 19. Press the “Start“ button to begin the automatic fine-tuning process with the PID control parameter.
-
Page 48: Using The Timelapse Settings - Advanced
5.11 Using the timelapse settings – ADVANCED Your Pilotfly Gimbal supports a time lapse function. You should determine an end point and a starting point for the scenes you wish to capture. The Gimbal then moves the camera at a speed set by you from the starting position to the end point. - Page 49 Using the Software PC/MAC - Timelapse 7. To use the timelapse function, first select the time duration by pressing the mode button for the profile number 1 to 4, which you have determined yourself for the respective time- lapse time. 8.
-
Page 50: Buzzer And Led Settings - Advanced
Using the Software PC/MAC – Buzzer 5.12 BUZZER and LED settings – ADVANCED 1. Select the register "Service" and go to the functional block „Buzzer and LED“. 2. Here you can set, when the Buzzer should give an acoustic signal and if the Buzzer shall be deactivated completely. -
Page 51: Using The Digital Filter (Reducing Resonance) - Expert
Using the Software PC/MAC – Digital Filter 5.13 Using the digital filter (reducing resonance) - EXPERT Warning Risk of injury! Before you switch on the device, please read the instruction manual in full and familiarize yourself with all operational and safety notes. Follow the information and tips, so you can use the device to its full potential. -
Page 52: Low-Pass Filter - Reduce High-Frequency Vibrations
Using the Software PC/MAC – Digital Filter 5.13.2 Low-pass filter – Reduce high-frequency vibrations Low pass filters: In particular when you are using a heavy camera, it can be necessary to dampen any emerging resonances with a low-pass filter. As the D factor favours the PID control resonances in connection with heavy cameras at high frequencies, a low-pass filter can dampen the amplification of high frequencies and as such... - Page 53 “Stabilization”: Frequency 100, width 10, gain: 80 and activate the filter using the check box “enabled”. 5. Transfer the parameter for your Pilotfly Gimbal by pressing on the “WRITE” button. 6. Now attempt to provoke the vibrations again. You can now see for example that the vibration at 100 Hz has been reduced significantly but is still there at 105 Hz.
-
Page 54: Using The Android App
5. Using the Software PC/MAC Legal hint! Pilotfly is license holder and partner of Basecam electronics and is using their products and software, but is not responsible for any software bug or malfunction of the provided software itself. -
Page 55: Misc Settings
Using the Android App 6.2 Misc settings 2. In the Misc Settings you are able to change the command of the 4-way-joysticks, change sound commands e.g. for errors or other system hints. IM_208.CCF.20170508-EN... -
Page 56: Rc Settings
Using the Android App 6.3 RC settings 3. In this area you are able to change the settings of the joystick, change speed and angel of moving area. IM_208.CCF.20170508-EN... -
Page 57: Follow Mode
Using the Android App Function! If you experiencing any malfunction like that you are unable to control the axes, please ensure that all RC Mode for each axes is set to „Speed Mode“ instead of „Angle Mode“. 6.4 Follow mode 4. -
Page 58: Control
Using the Android App 6.6 Control 6. The control panel enables you to control each axis while moving the white cursor. In the sub menu „Settings“ you are able to set which axis you want to control on the touch panel or by moving the smartphone (Tilt mode). -
Page 59: Settings
Function! Although you are able to „RESET“ your Gimbal. Please do not use the „RESET“ Function otherwise you will delete your default profiles which has been individually set by Pilotfly. Please make a backup of each profile and save it to your computer before you change any settings. -
Page 60: Failure / Repair
Failure / Repair Before you contact the service hotline Pilotfly-Service, please check by using the following table whether you can solve the problem by yourself. Warning Injury danger! Do not carry out any repairs at the device by yourself. Let the repairs at the device or at the cable only carried out by us Pilotfly-Service. - Page 61 Failure / Repair System is flattering in each Wrong Motor setup. Hold the Gimbal steady and start “Auto” for the direction. Motors in the Basic Tab of SimpleBGC GUI. Ensure that all motor poles are set to “14”. After that perform a calibration for Camera and Frame IMU sensors. Video: https://youtu.be/IxpdtzvjzoQ System starts beeping...
-
Page 62: Maintenance And Care
Maintenance and care The device is maintenance-free. In case of a reduction of the accumulator performance you can order a replacement at our service Pilotfly-Service. Follow especially the safety instructions 1. 7 Precautions at handling with Li-Po accumulators! Clean the device with a dry antistatic cloth. -
Page 63: Service
(Germany). We help you along willingly promptly and give you information about the next steps. Service Adresse Taiwan Service Adresse Germany Pilotfly Technology Co. LTD. Pilotfly GmbH Jiafeng South Rd. No.118, 2F-2 Wendelsteinstr.12 Zhubei City, Hsinchu County 30271 86163 Augsburg... -
Page 64: Eu Declaration Of Conformity (Doc)
EU declaration of conformity (DoC) Hereby Pilotfly declares that the Gimbal type H2 and its accessories are in compliance with the relevant harmonisation legislation of the European Union: Directive for radio equipment 2014/53/EU, RoHS-directive 2011/65/EU restricting the use of hazardous substances in electrical and electronic equipment as well as ERP-directive 2009/125/EU concerning energy related products. - Page 65 IM_208.CCF.20170508-EN IM_208.CCF.20170508-EN...
Need help?
Do you have a question about the H2 and is the answer not in the manual?
Questions and answers