Table of Contents
Advertisement
Quick Links
Download this manual
See also:
User Manual
Advertisement
Table of Contents

Related Manuals for Sonoma M1


Summary of Contents for Sonoma M1
-
Page 1: User Manual
Model One Electrostatic Headphone System USER MANUAL December 2016 Version 1.0 Sonoma Acoustics Inc., 1434 Spruce St., Suite 100, Boulder, CO 80302, USA... -
Page 2: Revision History
Sonoma Acoustics Inc. The Sonoma logo is a registered trademark of Super Audio Center LLC, Colorado, USA and is used under license. REVISION HISTORY... -
Page 3: Table Of Contents
CONTENTS TRANSLATED WARNING AND CAUTION MESSAGES REGULATORY COMPLIANCE STATEMENTS CHAPTER 1 INTRODUCTION Thank You ............................................1 Safety Information ........................................CHAPTER 2 INSTALLATION System Contents........................................3 Front Panel Controls .......................................3 Rear Panel Connections/Controls ................................4 Headband Adjustment ......................................4 Positioning The Headphones ..................................5 Connecting The Headphone Cable ................................5 Detaching The Headphone Cable................................ - Page 4 CHAPTER 5 CARE AND MAINTENANCE Power Down ..........................................15 Cleaning ............................................15 Replacing The Ear Pads .....................................15 Replacing The Headband Pad ..................................16 CHAPTER 6 TROUBLESHOOTING CHAPTER 7 CUSTOMER SERVICE GLOSSARY SPECIFICATIONS WARRANTY...
- Page 5 TRANSLATED WARNING AND CAUTION MESSAGES The following caution statements, warning conventions, and warning messages apply to the Sonoma Model One (M1) system and manual. Warning Symbol Hazard Symbol Caution Symbol BEFORE OPERATION PLEASE READ THESE INSTRUCTIONS Warning! Read and follow all warning notices and instructions marked on the product or included in the documentation.
- Page 6 Warning! Do not install near any heat sources such as radiators, heat registers, stoves, or other apparatus (including amplifiers) that produce heat. Avertissement! N’installez pas l’appareil près d’une source de chaleur telle que des radiateurs, des bouches d’air de chauffage, des fourneaux ou d’autres appareils (amplificateurs compris) qui produisent de la chaleur.
- Page 7 Warning! Since the Mains plug is used as the disconnection for the device, it must remain readily accessible and operable. Avertissement! Puisque la prise principale est utilisée pour débrancher l’appareil, elle doit rester aisément accessible et fonctionnelle. Warnung! Da der Netzstecker als Trennvorrichtung dient, muss er stets zugänglich und funktionsfähig sein.
- Page 8 Betrieb vorgenommen. ¡Advertencia! No abra el chasis. El interior no contiene piezas reparables por el usuario. El abrir el chasis anulará la garantía a menos que se lo haga en un centro de servicio Sonoma o en un local autorizado.
- Page 9 è stato esposto alla pioggia o a umidità, non funziona normalmente o è caduto. Aviso! O Sonoma M1 não tem partes de manutenção pelo utilizador. Para retirar a energia da unidade, retire o conector de energia, para assegurar a desconexão. Indique toda a manutenção para pessoal de manutenção qualificado.
- Page 10 REGULATORY COMPLIANCE STATEMENTS This is just a place-holder for the official text!
-
Page 12: Introduction
Precision-machined aluminum case Custom, fixed-frequency universal power supply unit In developing the Sonoma Model One, our paramount goal was to stay true to the precedent for uncompromised audio quality set by its namesake, the Sonoma Digital Audio Workstation. We value your thoughts so please let us know if you think we have achieved our goal: www.sonomaacoustics.com/feedback. -
Page 13: Safety Information
SAFETY INFORMATION For your safety, and to ensure optimum performance, please thoroughly review the information in this manual before using the product. In particular, please pay attention to the following: place the amplifier on a solid, level surface such as a desk or table, and do NOT block the ventilation holes as this could result in damage to the amplifier. -
Page 14: Installation
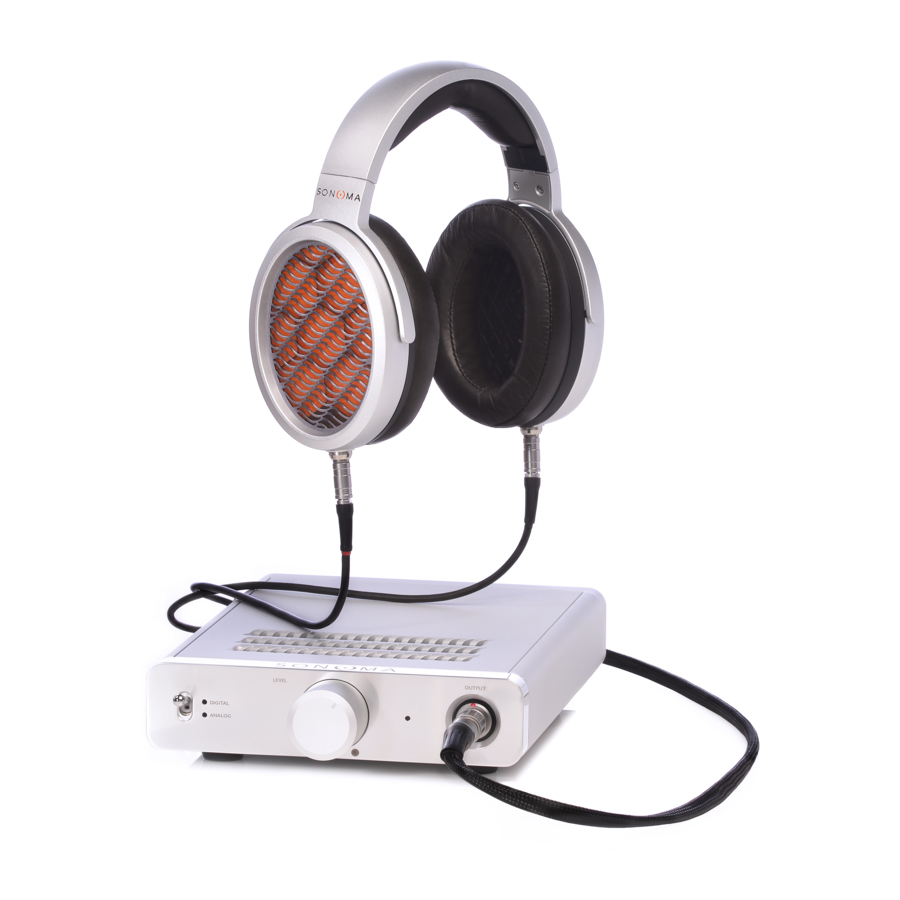
CHAPTER 2 INSTALLATION SYSTEM CONTENTS The M1 system comprises two parts, a headphone and an associated amplifier/digital-to-analog converter (DAC). These are packed separately: the amplifier/DAC in the larger of the two packing boxes. The headphone box contains the following items: •... -
Page 15: Rear Panel Connections/Controls
Coaxial S/PDIF input HEADBAND ADJUSTMENT To get the best from your M1 headphones, it is important to ensure that they are correctly adjusted to fit your head, and that they are properly positioned on your head. The headband can be adjusted by means of an inner band that can be lengthened/shortened as needed. -
Page 16: Positioning The Headphones
POSITIONING THE HEADPHONES The headphones should be positioned on your head such that the headband is vertical. When you have the correct adjustment and orientation, you will have a good seal of the ear-cup pad around your ear which is essential for correct bass response. -
Page 17: Detaching The Headphone Cable
DETACHING THE HEADPHONE CABLE Should you need to detach the cable for any reason, grasp the barrel of the cable and carefully pull backwards until the cable disconnects. You can then release the barrel andit will return to its usual position. CONNECTING THE HEADPHONES TO THE AMPLIFIER With the cable connected to both ear-cups, connect the headphone to the amplifier/DAC... -
Page 18: Assembling And Connecting The Power Supply Unit
Connect the coaxial digital (S/PDIF) stereo output of a digital audio disc player (CD/DVD/SACD/BD) to the coaxial S/PDIF digital input. Use a digital interlink fitted with RCA connectors. Push the jack until it makes a firm connection. To remove, simply pull on the connector (not the cable!). Connect a digital audio player or computer to the USB digital input. -
Page 19: Powering The Unit On
Provided all connections have been properly made, the front panel status indicator should glow WHITE. Your Sonoma M1 system is then ready to use. If the amplifier/DAC detects a fault condition, the status indicator will glow RED. In this case, first power the unit OFF and re-check all the... -
Page 20: Operation
RCA analog source. DIGITAL INPUT SELECTION The M1 amplifier/DAC unit has been configured to monitor the presence of a valid S/PDIF signal. When detected, the unit switches the digital input to S/PDIF mode. The USB connection is then effectively disconnected, and you will not be able to hear music via this connection while the S/ PDIF signal is present. -
Page 21: Computer-Based Audio Set-Up
Use a web browser to go to the following URL address: https://sonomaacoustics.com/support/ There locate the support features (manuals, downloads, etc.) for the M1, and click on the link for XMOS USB Driver. This will link to the following filename: XMOS-Stereo-USB-Audio-Class2-Driver-308E_v3.20.0.exe... -
Page 22: Checking The Firmware Version (Windows Users)
Yes, and then power cycle your PC and the M1 system. CHECKING THE FIRMWARE VERSION (WINDOWS USERS) As soon as the XMOS Driver has been successfully installed, and your PC and M1 are both powered ON, use File Explorer to navigate to the following folder:... -
Page 23: Updating The Firmware Version (Windows Users)
This will launch a small utility called the Control Panel, and you should see the following information displayed: The Status tab indicates that (a) the PC is correctly ‘seeing’ the Sonoma M1 system, and (b) that it is capable of communicating at its highest operating PCM sample rate (384 kHz). -
Page 24: Checking The Firmware Version (Macintosh Users)
The final step in the configuration process is to make each of the applications which you want to play through the M1 system use the appropriate USB driver. We can only give general suggestions here, as every software package has different menus, configuration options, etc. In principle, you want to select one of the two following driver options within your software application: XMOS USB Audio 2.0 ST 308E (ASIO) - Page 25 DSD64 and 352.8 kHz for DSD128 due to the need to use the DoP format for transmission. If you plan to play DSD source files through your M1, you will need to ensure that your playback software is configured for:...
-
Page 26: Care And Maintenance
CARE AND MAINTENANCE POWER DOWN Due to the fact that the M1 amplifier/DAC generates high-voltages and also runs warm in use (this is perfectly normal for a Class-A amplifier), it should be powered down when not in use for extended periods or left unattended. -
Page 27: Replacing The Headband Pad
REPLACING THE HEADBAND PAD The headband pad is held in place by the small plastic lugs marked L and R on each side of the headband. To remove one of the lugs, use your thumb to carefully push the sidewall outwards (do this at the thicker part as indicated). -
Page 28: Troubleshooting
CHAPTER 6 TROUBLESHOOTING If you are encountering problems with using your Sonoma M1 system, it could be the result of something simple. Please consult the following checklist first, and perform only the specific remedy for a particular symptom. If the remedy does not resolve your problem, please contact our Customer Service team (see Page 19) to assist you further. - Page 29 Customer Service team via one of the following methods. Please provide as much detail as you can about the problem and your specific configuration. Be sure to leave your name and contact details too! E-mail: support@sonomaacoustics.com Online: https://sonomaacoustics.com/support/contact/ Phone: +1-844-5-SONOMA / +1-844-576-6662 < is this toll free in the US? CUSTOMER SERVICE...
- Page 30 GLOSSARY Analog-to-Digital Converter ASIO Audio Stream Input/Output Blu-Ray Disc Compact Disc Computer Numerical Control Digital-to-Analog Converter DSD Over PCM Direct Stream Digital Digital Versatile Disc Field-Effect Transistor HPEL High-Precision Electrostatic Laminate Hertz (aka cycles/second) International Electro-technical Commission Kilohertz Model One Megahertz OFHC Oxygen-free High-purity Copper...
-
Page 31: Specifications
3570 mm Frequency Response 10 Hz – 60 kHz Output Level Compliant with EN 60065/A12:2011 (EN50332) when driven by M1 amplifier (for all inputs) Ear and Headband Cushions “Cabretta” top-grain, sheepskin leather Input Polarized, 4-pin, self-latching connectors for left and right... - Page 32 WARRANTY Your Sonoma M1 product is under warranty for the period as indicated below from the original date of purchase as stated on the original sales invoice. HPEL Transducers 2 Years DAC / Amplifier / Energizer 2 Years Earpads / Headband...
Need help?
Do you have a question about the M1 and is the answer not in the manual?
Questions and answers