Table of Contents
Advertisement
Advertisement
Table of Contents

Related Manuals for MICROPOINT QLABS VET

Summary of Contents for MICROPOINT QLABS VET
- Page 1 REF QV-1...
-
Page 2: Table Of Contents
Table of Contents Introduction..................3 1.1 Before You Start 1.2 Intended Use 1.3 Test Principle 1.4 Packaging Accessory List................5 Product Overview................5 Operation Summary..............7 Before Testing................7 Precautions, Limitations and Warnings........8 6.1 Care of Your qLabs ® 6.2 Patient Health Status 6.3 Performing a Test 6.4 Collecting Blood Sample 6.5 Electromagnetic Compatibility Powering the qLabs... - Page 3 9.7 After Confirming the Code 9.8 Heating Up 9.9 Getting a Finger stick Sample 9.10 Performing the Test 9.11 Results and Explanation 9.12 Finishing the Test 10. Reviewing Previous Results............21 10.1 Displaying QC Test Results 10.2 Displaying Patient Test Results 11.
-
Page 4: Introduction
1. Introduction 1.1 Before You Start Before using qLabs Vet, read the User’s Manual carefully. ® 1.2 Intended Use The qLabs Vet is intended for use with qLabs Vet test strips for in vitro ® ® quantification measurement of a patient’s PT and APTT. The qLabs Vet is for veterinary use only. -
Page 5: Accessory List
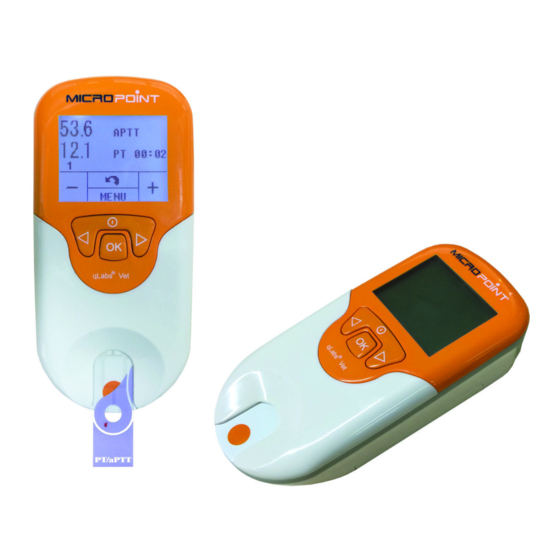
® • Standard AA batteries can also be used for qLabs Vet. ® • The qLabs eStation can be purchased separately from Micropoint ® Biotechnologies, Inc. Please contact your local distributor for ordering information. 3. Product Overview Identification of Components... - Page 6 Back View 1) Battery Cover 2) Battery Cover Screw 3) Battery Cover Release Top View 1) Power Supply Jack 2) Data Port Bottom View 1) Barcode Scanner (Laser) qLabs Vet Test Strip ® 1) Electrode Leads 2) Test Zone 3) Sample Well 4) Test Name...
-
Page 7: Operation Summary
4. Operation Summary Operation Preparation Normal Range Lot Number Date Setting Setting Meter Setup Language Power ON Time Setting Patient ID Performing a Test Enter Patient ID and Test Sample Select Species Collect Sample or Strip Lot Number Reviewing Previous Results Review QC Data Review Patient Data... -
Page 8: Precautions, Limitations And Warnings
® secure container. • DO NOT spill any liquid on the qLabs Vet. If it happens, ® immediately contact local distributor from Micropoint Biotechnologies, Inc. • DO NOT store the qLabs Vet below -10 ºC or above 40 ºC. ®... -
Page 9: Performing A Test
6.3 Performing a Test • The qLabs Vet should be operated on a level surface that is free ® of vibration. Testing on an uneven or unstable surface may cause inaccurate results. DO NOT hold the qLabs Vet in your hands ®... -
Page 10: Powering The Qlabs
7. Powering the qLabs Vet ON and ® 7.1 Power Connection The qLabs Vet comes with a power supply which must be plugged into ® the qLabs Vet power supply jack. Alternatively, the qLabs Vet can use 4 ® ® standard AA batteries (See Section 12.2). -
Page 11: Powering The Qlabs ® Vet Off
V8.0.02 MICROPOINT 023300E1200001 • Enter Setup mode by pressing “SET” button to change the Vet setting, or • Enter Memo mode by pressing “MEM” button to review previous results. Turning the qLabs Vet ON in CHOICE 2, allows the user to: ®... -
Page 12: Qlabs ® Vet Settings
8. qLabs Vet Settings ® Follow the steps below to set up the qLabs Vet. ® 8.1 Enter Setup Mode 01/02/12 When the qLabs Vet is turned on for the first ® 12:00 time, it will automatically enter to the Setup Mode. -
Page 13: Setting The Time
8.3 Setting the Time The time is in 24-hour format: “HH:MM” (Hour: Minute) 01/02/12 After the day setting, the setting option will prompt you to the hour setting mode. The 12:00 hour will be highlighted on the display. Use “+” and “-” functional buttons to adjust the DD/MM/YY HH:MM hour. -
Page 14: Patient Id Setup
8.5 Patient ID Setup You can use “+” or “-” buttons to set the input of Patient ID ON or OFF. PATIENT ID If you set the Patient ID ON, the meter will prompt you to input the Patient ID before you process a patient test. -
Page 15: Perform A Test
9. Perform a Test 9.1 Entering Test Mode When the qLabs Vet is turned on by ® pressing the “OK” button, the display screen will prompt the user to insert a test strip. Go to Section 9.2 for test strip insertion. When the qLabs Vet is turned on by ®... -
Page 16: Confirming The Patient Id
9.3.1 Manual Input Use “+” and “-” buttons to change the PATIENT ID highlighted digit. Press “NEXT” button to A000 accept and advance to next digit. ---------- If the input of the Patient ID is completed, NEXT press “OK” button to accept. 9.3.2 Auto Scan In the Patient ID INPUT/SCAN interface, press “SCAN”... -
Page 17: Entering The Strip Code And Lot Number (If Enabled)
9.6 Entering the Strip Code and Lot Number (if enabled) If the displayed strip code and lot number STRIP CODE (if enabled) match those on the strip pouch, PT/APTT 471213408 press “OK” button to confirm. Otherwise, you can use “ ”... -
Page 18: After Confirming The Code
9.6.2 Auto Scan User can also use the built-in barcode scanner to scan the strip code on the pouch. 9.7 After Confirming the Code If you input the lot number, the meter will automatically check whether the strip is expried after confirming the code is correctly EXPIRED STRIP! entered. -
Page 19: Performing The Test
NOTE: • To avoid mechanical hemolysis of the blood sample, nonheparinized syringe with 21 gauge needle or larger is highly recommended. • Since the interstitial fluid (thromboplastin) will accelerate the clotting process, vascular puncture action is preferably a one-time action so as to minimize the interstitial fluid from entering into the blood sample. -
Page 20: Results And Explanation
21.6 APTT When testing is complete, the qLabs ® will beep and the test results will appear on PID0002 the screen along with the patient ID and test time. CODE: 471213408 If the test results need to be reported LOT: 3052E0503 instantly, press “... - Page 21 21.6 APTT Before turning off the meter, press the “ ” PID0002 button to return to the test mode. Remove the test strip from the meter. To perform another test, please use a fresh test strip. Please use a different finger for a new test.
-
Page 22: Reviewing Previous Results
10. Reviewing Previous Results Follow these steps to review previous results that are stored in the meter memory. In the Test Mode where the display prompts the user to insert a test strip. Press “MEM” button. RESULTS Select the type of results you want to view: PATIENT TESTS Display QC TEST results QC TESTS... -
Page 23: Displaying Patient Test Results
10.2 Displaying Patient Test Results Whenever a test is successfully performed, the result is automatically stored in the meter memory along with the date of the test. The meter memory will store up to 200 results. Press the “á” button to select previous 03/08 a010010001 results. - Page 24 DELETE DELETE CURRENT Press the “OK” button to confirm or press “ ” button to exit. If the option to delete the current result is selected, the “DELETED” symbol will flash on DELETED the display for a short time, the subsequent results will be displayed.
- Page 25 10.2.3 Uploading Patient Test Results Press the “ ” button to upload the selected ß results to the qLabs Data manager. ®...
-
Page 26: Quality Control
(which could happen if the foil pouch is torn or punctured). 11.2 Liquid QC Test Micropoint Biotechnologies, Inc. has optional liquid controls for qLabs ® Vet system. The qLabs PT and APTT liquid controls are used with ®... -
Page 27: Installing/Replacing Batteries
• If storing the Vet for an extended period, completely remove the batteries before the next use. Dispose of the batteries in compliance with local regulations. 12.3 Servicing All servicing and adjustment must be performed by Micropoint Biotechnologies, Inc.’s service engineers only. -
Page 28: Troubleshooting
13. Troubleshooting CORRECTIVE ERROR CODE DISCRIPTION ACTIONS qLabs ElectroMeter is Connect the qLabs ® ® not connected to qLabs ElectroMeter to the qLabs ® ® eStation. eStation properly. The qLabs eStation is Out of ® Replace the thermal paper. thermal paper. Retest with a new strip. - Page 29 CORRECTIVE ERROR CODE DISCRIPTION ACTIONS 1. Make sure the strip and liquid controls are within the expiry date. External liquid QC check out 2. Make sure the Strip Code E006 of specifications. is consistent with the code printed on the liquid controls vial label.
-
Page 30: Symbols
14. Symbols SYMBOLS EXPLANATION SYMBOLS EXPLANATION Caution. Read Expiry Date Carefully Avoid Liquid Fragile Spills Separate Biological Risk Collection Temperature DO Not Reuse Limitation Laser Radiation Manufacturer Risk Consult Lot Number Instructions For Catalog Serial Number Number... -
Page 31: Performance Characteristics & Product Specifications
15. Performance Characteristics & Product Specifications 15.1 Operation Condition between 10ºC and 35ºC (50ºF Temperature and 95ºF) Humidity 10% and 90% Atmospheric Pressure 700 hPa and 1060 hPa 15.2 Product Specifications 32 V1 ColdFire Display screen 128×96 LCD Test memory 200 test results Laser Class 2, according to EN Barcode scanner... -
Page 32: Warranty
Micropoint Biotechnologies, Inc.’s only liability and purchaser’s only remedy under this warranty is that during the warranty period Micropoint Biotechnologies, Inc. shall replace or repair, at no charge, any Meter component with defects in material or workmanship. MICROPOINT BIOTECHNOLOGIES, INC. - Page 33 IF MICROPOINT BIOTECHNOLOGIES, INC. OR ITS DISTRIBUTORS ARE AWARE OF THE POSSIBILITY OF SUCH CLAIM OR DAMAGES AND NOTWITHSTANDING THE ESSENTIAL PURPOSE OF ANY REMEDY.
-
Page 34: Contact Address And Phone Number
Customer Service and Technical Support Available 8:30 AM to 5:30 PM (Beijing Standard Time), Monday-Friday. Tel: +86 755 86296766 Micropoint Biotechnologies, Inc. 6F, No.3, Industry 5 Road, Shekou, Shenzhen, Guangdong 518067, China Tel: +86 755 86296766 Fax: +86 755 86673903... - Page 35 Shekou, Shenzhen, Guangdong China, 518067 Tel. : +86 755 86296766 Fax : +86 755 86673903 E-mail : info@micropointbio.com www. micropointbio.com ©2014 Micropoint Biotechnologies, Inc. All rights reserved. Printed in China. qLabs and Micropoint are registered trademarks of Micropoint Bioscience, Inc. ® ®...
Need help?
Do you have a question about the QLABS VET and is the answer not in the manual?
Questions and answers