Advertisement
Advertisement
Table of Contents

Subscribe to Our Youtube Channel
Related Manuals for Frister Rossmann 404 QUILTER PROFESSIONAL


Summary of Contents for Frister Rossmann 404 QUILTER PROFESSIONAL
- Page 1 QUICK REFERENCE INSTRUCTIONS 404 QUILTER PROFESSIONAL...
-
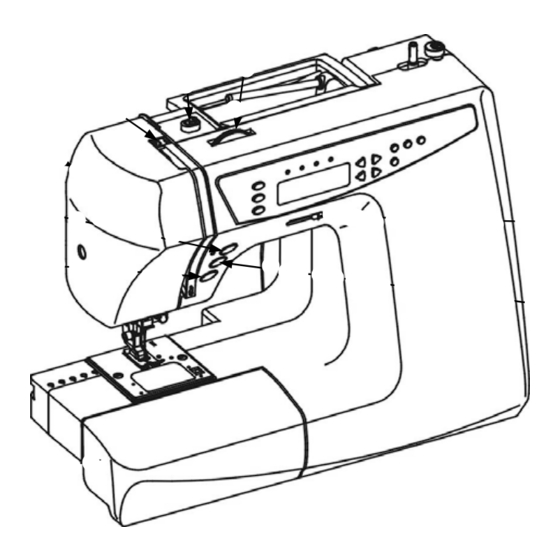
Page 2: Principal Parts Of The Machine
PRINCIPAL PARTS OF THE MACHINE 1. Upper thread guide 2. Tension dial 3. Speed adjustment lever 4. Reverse button 5. Take up lever 6. Face cover 7. Needle position button 8. Start/Stop button 9. Extension table 10. Needle clamp screw 11. - Page 3 ACCESSORIES 13. Bobbin 1. All purpose foot (On machine) 14. Screw driver (Large) 2. Narrow hem foot 15. Screw driver (Small) 3. Buttonhole foot 16. Needle plate screw driver 4. Zipper foot 17. Spool cap (Large) 5. Button foot 18. Spool cap (Small) 6.
-
Page 4: Winding The Bobbin
WINDING THE BOBBIN Spool 1. Place thread spool and spool cap onto spool Spool cap pin. (Make sure the cut on the thread reel is towards right side before threading) Spool pin 2﹒Follow the arrow direction, thread as diagram. 3﹒Thread through inside of the opening on the bobbin edge, then place empty bobbin onto spindle. - Page 5 5﹒When bobbin winder is completed, release the foot control to stop machine then cut the thread. 6﹒Return winder spindle to left and remove wound bobbin. If it is not winding evenly, make adjustments: Turn screw clock wise: position down. Turn screw counter clockwise: position up. Until winding is even in bobbin.
-
Page 6: Inserting And Removing The Bobbin
INSERTING AND REMOVING THE BOBBIN 1. Release the lock of bobbin cover plate (push to right) and remove the bobbin cover. 2. Remove the bobbin. 3. With newly wound bobbin draw thread on bobbin out approx 10 cm, then put the bobbin in bobbin case. - Page 7 UPPER TENSION THREADING 1. TURN HANDWHEEL TOWARDS YOU UNTIL NEEDLE IS IN ITS HEIGHEST POSITION. 2. RAISE PRESSER FOOT. 3. PLACE REEL OF THREAD ON VERTICAL SPOOL PIN, AND FIT SPOOL PIN CAP 17 OR 18 ONTO SPOOL PIN TO SECURE COTTON REEL. 4.
-
Page 8: Drawing Up Bobbin Thread
DRAWING UP BOBBIN THREAD 1. Hold the upper thread with your left hand and turn hand wheel slowly and towards you. 2. Gently pull the upper thread, and the lower thread will come up in a loop. 3. Pull both threads together taking them backwards and through presser foot to the rear of machine. -
Page 9: Setting Stitch Width
SETTING STITCH WIDTH 1. THE WIDTH OF EACH PATTERN IS SET AUTOMATICALLY. HOWEVER IT IS POSSIBLE ON SOME PATTERNS TO ADJUST WIDTH. IF BUZZER GIVES 3 BEEPS THE WIDTH LIMIT HAS BEEN REACHED. ADJUSTMENT IS DONE BY PRESSING+ OR – WIDTH BUTTONS. IT IS NOT POSSIBLE TO ADJUST SIZE OF LETTERS. - Page 10 DROP FEED MECHANISM USED FOR FREE HAND EMBROIDERY 1. TO LOWER THE FEED MECHANISM, IN ORDER TO SEW ON BUTTONS & DO FREE HAND EMBROIDERY, SLIDE “FEED DOG HEIGHT LEVER” No 28 TO LEFT. THIS WILL ENABLE THE TEETH TO DISENGAGE. 2.
-
Page 11: Automatic Needle Threader
AUTOMATIC NEEDLE THREADER NOTE: NEEDLE MUST BE IN ITS HEIGHEST POSITION PRESSER FOOT MUST BE REMOVED WHEN USING AUTOMATIC THREADER. NEEDLE THREADER CANNOT BE USED WHEN USING A TWIN NEEDLE 1. RAISE NEEDLE TO ITS HEIGHEST POSITION. 2. LOWER NEEDLE THREADER TO ITS LOWEST POSITION. 3. -
Page 12: Pattern Selection
PATTERN SELECTION 1. SELECT THE PATTERN LIST YOU WISH TO CHOOSE FROM BY PRESSING BUTTON No 1. 2. PRESS BUTTON No 6. 3. USING BUTTONS No 7 SCROLL ALONG THE PATTERN LIST TO SELECT WHICH PATTERN YOU WANT. THEN PRESS BUTTON No 6 AGAIN TO CONFIRM PATTERN. WHEN SCROLLING THROUGH THE PATTERN LIST BY PRESSING BUTTONS No 5 THIS WILL TAKE YOU TO THE NEXT OR PREVIOUS LINE OF PATTERNS. - Page 13 USING MACHINE MEMORY MEMORY CAN BE USED FOR LETTERS & NUMBER SECTION, “A&1”. 1. TO SELECT “MEMORY SECTION” PRESS SELECT BUTTON No 1 TO MEMORY MODE. 2. PRESS “EDIT” BUTTON No 5 TO OPEN MEMORY. 3. PRESS BUTTON No 8, “PATTERN SELECTION BUTTON”, AND USING BUTTONS No 9 SCROLL UP &...
-
Page 14: Buttonhole Sewing
BUTTONHOLE SEWING Remake: Buttonhole patterns are one time stitches. 1. PLACE BUTTON IN BUTTONHOLE FOOT AND ADJUST SLOT TO SIZE OF BUTTON. Buttonhole lever 2. REMOVE ORDAINARY SEWING FOOT & FIT BUTTONHOLE FOOT. (Diagram 1) 3. PULL UPPER & LOWER THREADS APPROX 10cm &... - Page 15 681414000 - 15 - 13.06.18...
Need help?
Do you have a question about the 404 QUILTER PROFESSIONAL and is the answer not in the manual?
Questions and answers
Buttonhole keeps stopping and too many tackbars I think. Tried different sized buttons. It did start and do half but then fabric stopped again.
The buttonhole function on the Frister Rossmann 404 Quilter Professional sewing machine could stop working if the buttonhole lever (No. 12) is not lowered properly. This lever is located under the light at the rear of the needle threader. If it is not in the correct position, the machine may not complete the buttonhole cycle. Additionally, the fabric must be placed correctly under the buttonhole foot, and the buttonhole foot must be lowered before sewing.
This answer is automatically generated