Table of Contents
Advertisement
Advertisement
Table of Contents

Related Manuals for Hisense SERO 7 LE


Summary of Contents for Hisense SERO 7 LE
- Page 1 User Manual...
-
Page 2: Table Of Contents
Need to Know ............3 Model and Serial Numbers ............. 3 Getting Started ............4 Package Contents ................4 Understanding Your Sero 7 LE Tablet ........5 Home Screen ..................7 Buttons ......................8 Making Connections ...........11 Battery ...................... 11 Micro-USB .................... - Page 3 Appendix A ............27 Specifications ..................27 Troubleshooting ................28 Appendix B.............29 Important Safety Instructions ............ 29 Certification and Compliance............ 32 Appendix C ............36 Legal Terms ................... 36 Copyright and Trademark Notices .......... 38...
-
Page 4: Need To Know
Need to Know Read this chapter to learn where to view the model and serial numbers. Model and Serial Numbers Model Number You can go to Settings > SYSTEM > About tablet to view the Model number. Serial Number You can go to Settings >... -
Page 5: Getting Started
Getting Started Read this chapter to learn about Sero 7 LE features, how to use the controls, and more. Package Contents The following items are included with the Sero 7 LE: Power Adapter Use the power adapter to connect the outlet to charge the battery. -
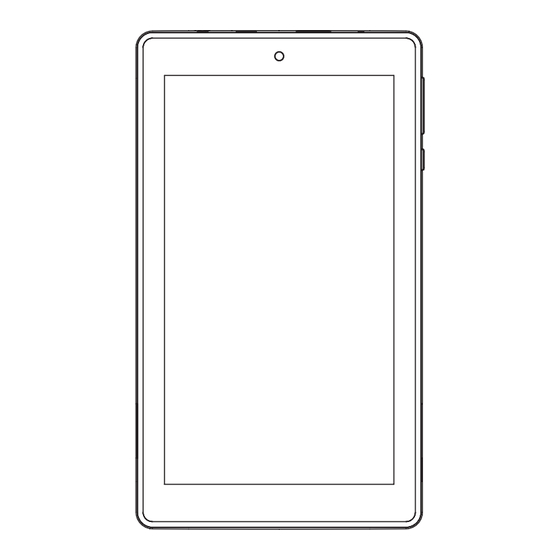
Page 6: Understanding Your Sero 7 Le Tablet
Understanding Your Sero 7 LE Tablet Camera Volume Up/Down Buttons Power Button Item Function Volume Up/Down Press to adjust the volume. Buttons Power Button Press & hold to turn on/off; Press it to put/wake the unit in/from sleep mode. Getting Started... - Page 7 Micro SD port Micro-USB port Micro- Head- phone phone port Speaker Wireless Antenna Item Function Micro SD port Plug microSD card (up to 32G). Micro-USB port Connect to wall outlet with Micro-USB cable and power adapter for charging. Connect to a computer, keyboard, more other devices with USB port.
-
Page 8: Home Screen
Notification and Status Bar At the top of the screen, you’ll see indicators that inform you about the status of your Sero 7 LE. You can open the Notification Tray or the Quick settings by pressing the Notification or Status bar and dragging it down. -
Page 9: Buttons
Buttons Power Button Turn Sero 7 LE On Press & hold the Power button until the Hisense logo displays. Turn Sero 7 LE Off In awake mode, press & hold the Power button until a message displays. Next, tap Power Off >... -
Page 10: Forced Shutdown
Put Sero 7 LE in Sleep Mode Press the Power button to put the Sero 7 LE in sleep mode. If you do not touch the screen for several minutes, then the Sero 7 LE will automatically go into sleep mode. -
Page 11: Navigation Buttons
Home screen, no further history will be available. Home Button Tap this button from anywhere on your Sero 7 LE to return to the Home screen. If you’re viewing a left or right Home screen, this will open the central Home screen. -
Page 12: Making Connections
High battery Low battery Needs to be charged Charging Charging the Battery The best way to charge the battery is to plug your Sero 7 LE into a wall outlet using the power adapter and Micro-USB cable included with your accessories. Power... -
Page 13: Micro-Usb
Sero 7 LE’s Micro-USB port to your computer’s USB port. To change your Sero 7 LE’s USB connection options, go to Settings > DEVICE > Storage > Menu icon > USB computer connection. You can select the Sero 7 LE is connected as MTP or PTP. Micro SD Card... -
Page 14: Wi-Fi
Status bar when your device detects an open Wi-Fi network. Uncheck this option to turn off notification. Keep Wi-Fi on during sleep - To select whether to put the Sero 7 LE in sleep mode when it’s connected to Wi-Fi. Making Connections... -
Page 15: Vpn
Wi-Fi is turned off. Install certificates - To use a certificate to identify your Sero 7 LE, you must obtain it with help from your system administrator, and install it in your tablet’s trusted credential storage. Wi-Fi optimization - By default, when Wi-Fi is on the battery usage is optimized. - Page 16 solution, you may need to obtain a VPN app, either from your administrator or on Google Play. Go to Settings > WIRELESS & NETWORKS > More > VPN. Add a VPN From the VPN screen, tap the Plus icon to add VPN profile.
-
Page 17: Basic
Setup Guide Turning Your Sero 7 LE On for the First Time To start, turn on your Sero 7 LE by pressing and holding Power button until the Hisense logo appears. After the animation appears, follow the on-screen instructions to set up your Sero 7 LE. -
Page 18: Basic Operation
Basic Operation Using Apps You interact with the Sero 7 LE using your fingers to tap, double tap, press & hold, slide, pinch, and rotate objects on the touchscreen. Tap or Double Tap To select a feature or item, quickly touch the screen. -
Page 19: Manage Downloads
Rearrange Home Screen Move apps or widgets: Press & hold an icon or widget, slowly to drag it to the screen edge, the screen will switch. View info about an app: Press & hold it, drag it to the top of the screen, and drop the app over the App Info icon Uninstall an app: Press &... -
Page 20: Sharing
Sharing The Sero 7 LE gives you lots of ways to share with other people. In many apps, tap Share or Share icon and choose a sharing method from the list for sharing. The options vary depending on the app you’re using. -
Page 21: Encrypt Your Data
Read the information about encryption carefully. The Encrypt tablet button is dimmed if your battery is not charged or your Sero 7 LE is not plugged in. If you change your mind about encrypting your Sero 7 LE, tap the Back button... -
Page 22: Settings
NETWORKS > More > Airplane mode. DEVICE Sound You can set your Sero 7 LE to play a sound whenever you get a new message, email, alert, or reminder. You can also set sounds for pressing icons and locking your Sero 7 LE. Display You can adjust the brightness of the display or the screen timeout. - Page 23 RAM they are using. All - Displays all apps that came with the Sero 7 LE and all apps you downloaded from Google Play or other sources. To switch the order of the lists displayed in the Downloaded or All tabs, tap Menu icon >...
-
Page 24: About Tablet
Printing You can print directly from Sero 7 LE. Tap Cloud Print to view a list of available printers. To add a printer or manage settings, tap the Menu icon... -
Page 25: Location
Location for Sero 7 LE To control what location information Sero 7 LE can use, go to Settings > PERSONAL > Location. Apps Using Your Location... -
Page 26: Syncing
Settings screen. Remove an Account You can remove any account and all information associated with it from your Sero 7 LE, including email, contacts, settings, and so on. To remove a Google account, go to Settings > ACCOUNTS >... - Page 27 Tap items as needed. Unchecking an option does not remove the information from your Sero 7 LE; it simply stops it from being kept in sync with the version on the web. Sync a Google Account Manually Go to Settings >...
-
Page 28: Specifications
-4°F to 113°F (-20°C to 45°C) 1 : Because the system will occupy part of the memory space, the available user space will be less than 8GB. 2 : The rechargeable battery in Sero 7 LE should be replaced only by Hisense Service. Appendix A... -
Page 29: Troubleshooting
Sero 7 LE displays network or service error message When you are located in places with poor signals, then your Sero 7 LE may not be able to connect. Try to move to other places to get a stronger signal strength. -
Page 30: Important Safety Instructions
Appendix B Important Safety Instructions WARNING RISK OF ELECTRIC SHOCK DO NOT OPEN WARNING: TO REDUCE THE RISK OF ELECTRIC SHOCK, DO NOT REMOVE COVER OR BACK. NO USER-SERVICEABLE PARTS INSIDE. REFER SERVICING TO QUALIFIED SERVICE PERSONNEL. The lightning flash with arrow head symbol, within an equilateral triangle is intended to alert the user that parts inside the product constitute a risk of electric shock to persons. - Page 31 7 LE, please stop immediately. In case of long periods of use, take frequent breaks. If a small part is coming out of the Sero 7 LE, do not try to remove it. Keep it away from small children. Appendix B...
- Page 32 Never force a connector into a port of Sero 7 LE. If a connector and a port do not join with reasonable force, make sure that the connector matches the port and that you have positioned the connector correctly in relation to the port.
-
Page 33: Certification And Compliance
If Sero 7 LE has not been used for a long period of time, then the battery might be in an over-discharge protection mode and take longer to charge. Never remove or insert microSD card while the Sero 7 LE is powered on. -
Page 34: Additional Information
In general, the closer you are to a WLAN Router, the lower the WLAN transmitting power level. Sero 7 LE has been tested, and meets the FCC and European Union RF exposure guidelines for WLAN operation. When tested at direct body contact, Sero 7 LE’s maximum SAR value... - Page 35 FCC RF Exposure Information and Statement The SAR limit of USA (FCC) is 1.6 W/kg averaged over one gram of tissue. Device types Sero 7 LE/E2371 (FCC ID: W9HPADP0005) has also been tested against this SAR limit. The highest SAR value reported under this standard during product certification for use at the properly worn on the body is 0.6186W/kg.
-
Page 36: Disposal And Recycling Information
NOM warning This equipment complies with Mexican Standard Regulations. Disposal and Recycling Information The symbol means that according to local laws and regulations your product should be disposed of separately from household waste. When this product reaches its end of life, take it to a collection point designated by local authorities. -
Page 37: Legal Terms
Co., Ltd. or it’s Parent Company, affiliates and/or Subsidiary Company, its successors and/or assigns (hereinafter referred to as “Hisense”) provides direct access to the internet through one or more internet provider services (hereinafter referred “Web Service”). All content and services accessible through this device belong to Hisense Co., Ltd. - Page 38 You understand and agree that, to the extent permitted by law, Hisense shall in no event be liable for any direct, indirect, incidental, special or consequential loss or damages,...
-
Page 39: Copyright And Trademark Notices
Hisense may impose limits on the use of, or access to, certain services or content in any case and without notice or liability. - Page 40 Ver. 14.01...
Need help?
Do you have a question about the SERO 7 LE and is the answer not in the manual?
Questions and answers