Table of Contents
Advertisement
Quick Links
FCC Notice
This equipment has been tested and found to comply with the limits for a Class B dig-
ital device, pursuant to part 15 of the FCC Rules. These limits are designed to provide
reasonable protection against harmful interference in residential installation. This
equipment generates, uses and can radiate radio frequency energy and if not installed
and used in accordance with the instructions, may cause harmful interference to radio
communications. However, there is no guarantee that interference will not occur in a
particular installation. If this equipment does cause harmful interference to radio or
television reception, detectable by turning the equipment in question off and on, the
user is encouraged to try to correct the interference by one or more of the following
measures:
• Reorient or relocate the receiving antenna
• Increase the distance between the equipment and the receiver
• Connect the equipment to an outlet on a different circuit than that which the receiver
is connected to
• Or consult the dealer or an experienced radio/TV technician for help.
This device complies with Part 15 of the FCC Rules. Operation is subject to following
two conditions:
1. This device may not cause harmful interference, and
2. This device must accept any interference that may cause undesired operation.
i
Advertisement
Table of Contents

Related Manuals for Vivitek DS230


Summary of Contents for Vivitek DS230
-
Page 1: Fcc Notice
FCC Notice This equipment has been tested and found to comply with the limits for a Class B dig- ital device, pursuant to part 15 of the FCC Rules. These limits are designed to provide reasonable protection against harmful interference in residential installation. This equipment generates, uses and can radiate radio frequency energy and if not installed and used in accordance with the instructions, may cause harmful interference to radio communications. -
Page 2: Safety Instructions
Safety instructions Read all of these instructions before you operate your projector and save for future reference. 1. Read instructions All the safety and operating instructions should be read before the appliance is operated. 2. Notes and warnings All notes and warnings in the operating instructions should be adhered to. 3. - Page 3 Notes on the AC Power Cord AC Power Cord must meet the requirement of countries where you use this projector. Please confirm your AC plug type with the graphics below and ensure that the proper AC Power Cord is used. If the supplied AC Power Cord does not match your AC out- let, please contact your sales dealer.
-
Page 4: Table Of Contents
Table of contents Introduction ................... 1 Projector Features ..........................1 Projector Overview ..........................2 Using the Product ................. 4 Control Panel ............................4 Connection Ports ........................... 5 Remote Control ............................6 Installing the Batteries ..........................9 Remote Control Operation ........................10 Connection .................. -
Page 5: Introduction
The projector offers the following features: ® • DLP technology • DS230/DS234: 800 x 600 SVGA resolution • DX251/DX255: 1024 x 768 XGA resolution ® • Compatibility with Macintosh computers • Compatibility with NTSC, PAL, SECAM and HDTV •... -
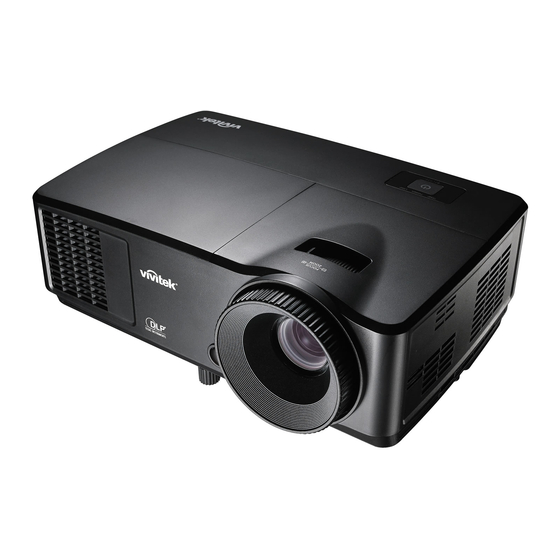
Page 6: Projector Overview
Projector Overview Front View 1. Front IR remote control sensor 2. Elevator foot 3. Projection lens 4. Focus ring 5. Ventilation holes 6. Control panel 7. Speaker sound holes 8. Zoom ring 9. Lamp cover... -
Page 7: Rear View
Rear View DS230/DX251 DS234/DX255 1. Connection ports 2. AC power socket Bottom View Ceiling mount screws: M4 x 8 (Max. L = 8 mm) Unit: mm 1. Security bar 2. Ceiling mount holes Note • This projector can be used with a ceiling mount for support. The ceiling mount is not included in the package. -
Page 8: Using The Product
Using the Product Control Panel 1. SOURCE No function POWER Turns the projector on or off 3. TEMP (Temp LED indicator) Refers to "LED Indicator Messages” 4. POWER (Power LED indicator) Refers to “LED Indicator Messages” 5. LAMP (Lamp LED indicator) Refers to "LED Indicator Messages”... -
Page 9: Connection Ports
Connection Ports DS230/DX251 DS234/DX255 1. COMPUTER Connect image input signal (analog RGB or component) to this jack. 2. RS-232 When operating the projector via a computer, connect this to the controlling com- puter's RS-232C port. 3. SERVICE This connector is for firmware update. -
Page 10: Remote Control
Remote Control 1. IR transmitter Transmits signal to projector 2. Status LED Lights when the remote control is used 3. Power Turns the projector on or off 4. VGA Displays COMPUTER signal 5. Source Displays the source selection bar Keystone Corrects image-trapezoid (wider top/bottom) effect Up/Down Navigates and changes settings in the OSD... - Page 11 Left mouse No function 12. Mouse No function Lock No function 14. Pattern No function 15. Blank Makes the screen blank 16. Eco Displays the lamp mode selection bar (Normal/Economic/Dynamic ECO). 17. Auto Sync Auto adjustment phase, h.size, position 18. Video Displays VIDEO signal (only for DS234 and DX255) 19.
- Page 12 Using the remote mouse control The capability of operating your computer with the remote control gives you more flexibility when delivering presentations. 1. Connect the projector to your PC or notebook with a USB cable prior to using the remote control in place of your computer’s mouse. See "Connecting a computer"...
-
Page 13: Installing The Batteries
Installing the Batteries 1. Open the battery cover in the direction shown. 2. Install batteries as indicated by the diagram inside the compartment. 3. Close the battery cover into position. Caution • Risk of explosion if battery is replaced by an incorrect type. •... -
Page 14: Remote Control Operation
Remote Control Operation Point the remote control at the infrared remote sensor and press a button. • Operating the projector from the front Note • Do not point the laser directly to the people's eyes (especially small children). There is a danger of injury to the eyes. -
Page 15: Connection
1. Turn all equipment off before making any connections. 2. Use the correct signal cables for each source. 3. Ensure the cables are firmly inserted. DS230/DX251 VGA cable (D-Sub to D-Sub) 2. USB cable (Mini B type to A type) - Page 16 DS234/DX255 Audio cable 2. VGA cable (D-Sub to D-Sub) 3. USB cable (Mini B type to A type) 4. HDMI cable 5. VGA (D-Sub) to HDTV (RCA) cable 6. Composite Video cable Important • In the connections shown above, some cables may not be included with the projector. They are commercially available from electronics stores.
-
Page 17: Connection
Connection Connecting a computer The projector provides two VGA input sockets that allow you to connect them to both ® ® compatibles and Macintosh computers. A Mac adapter is needed if you are connecting legacy version Macintosh computers. To connect the projector to a notebook or desktop computer: •... -
Page 18: Operation
Operation Powering On/Off the Projector Powering On the Projector: 1. Complete the AC power cord and peripheral signal cable(s) connections. 2. Press to turn on the projector. The projector takes a minute or so to warm up. 3. Turn on your source (computer, notebook, DVD, etc.). The projector automatically detects your source when Auto source setting is ON. -
Page 19: Adjusting The Projector Height
Adjusting the Projector Height Adjuster foot Elevator foot The projector is equipped with 1 elevator adjuster foot and 1 rear adjuster foot. These adjusters change the image height and projection angle. 1. Use the elevator adjuster foot to raise/lower the image to the desired height. 2. -
Page 20: Adjusting Projection Image Size
Adjusting Projection Image Size Refer to the graphic and table below to determine the screen size and projection distance. Maximum zoom Minimum zoom Screen Center of lens Vertical offset Projection distance Screen size 4 : 3 Screen Diagonal Projection distance [inch (m)] Vertical offset Image height [inch (cm)]... -
Page 21: Securing The Projector
Securing the projector Setting and changing a password 1. Open the OSD menu, go to the Settings 2 > Security Settings menu and press Enter. 2. Highlight Change Password and press Enter. 3. To set the password: According to the password you desire to set, press the arrow keys to enter six dig- its for the password. -
Page 22: Setting The Presentation Timer
Setting the presentation timer The presentation timer can indicate the presentation time on the screen to help you achieve better time management when giving presentations. Follow these steps to utilize this function: 1. Press Timer on the remote control to access the Presentation Timer menu or go to the Settings 1 >... -
Page 23: Menu Operation
Menu operation The projector has multilingual on-screen display (OSD) menus that allow you to make image adjustments and change a variety of settings. How to operate 1. Press Menu to open the OSD menu. 2. When OSD is displayed, use to select any feature in the main menu. - Page 24 Menu tree Note • Supported on-screen display (OSD) menus vary by different input sources. The un- suported functions will be grayed out. • * : Only available when Display Mode is selected to User1 or User2. • * : Only for DS234 and DX255 Main Menu Sub Menu Settings...
- Page 25 SOURCE Auto Source On / Off Timer Period 1,2,3,4,5,10 - 240 Min Always / 3 min / 2 min / 1 min / Timer Display Never Top-Left / Bottom-Left / Top- Presentation Timer Timer Position Right / Bottom-Right Timer Counting Count Down / Count Up Direction On / Off...
- Page 26 Source Display Mode Resolution Lamp Mode INFORMATI Current System Status 3D Format Color System Equivalent Lamp Firmware Version...
- Page 27 DISPLAY Wall Color Corrects the projected picture’s color when the projection surface is not white. Aspect Ratio There are four options to set the image's aspect ratio depending on your input signal source. Auto Keystone Corrects any keystoning of the image automatically. Keystone Corrects any keystoning of the image.
- Page 28 PICTURE Display Mode Pre-defined display modes are provided so you can optimize your projector image set- up to suit your program type. Reference Mode Selects a display mode that best suits your need for the image quality and further fine- tune the image based on the selections listed on the same page below.
- Page 29 SOURCE Auto Source If you want the projector to automatically search for the signals, be sure the Auto Source function in the SOURCE menu is On (which is the default of this projector). Settings 1 Presentation Timer Reminds the presenter to finish the presentation within a certain time frame. Language Sets the language for the On-Screen Display (OSD) menus.
- Page 30 High Altitude Mode A mode for operation in high altitude areas. Audio Settings (only for DS234 and DX255) • Mute: Sets the mute function. • Volume: Adjusts the audio volume level. Lamp Settings • Lamp Mode: Using Economic/Dynamic ECO mode will reduces system noise and power consumption.
- Page 31 INFORMATION Current System Status • Source: Shows the current signal source. • Display Mode: Shows the selected mode in the IMAGE menu. • Resolution: Shows the native resolution of the input signal. • Lamp Mode: Shows the current lamp mode. •...
-
Page 32: Maintenance
Maintenance The projector needs proper maintenance. You should keep the lens clean as dust, dirt or spots will project on the screen and diminish image quality. If any other parts need replacing, contact your dealer or qualified service personnel. When cleaning any part of the projector, always switch off and unplug the projector first. -
Page 33: Replacing The Lamp
Replacing the Lamp As the projector operates over time, the brightness of the projector lamp gradually decreases and the lamp becomes more susceptible to breakage. We recommend replacing the lamp if a warning message is displayed. Do not attempt to replace the lamp yourself. - Page 34 1. Turn off the projector. 2. If the projector is installed in a ceiling mount, remove it 3. Unplug the power cord. 4. Use a screwdriver to remove the screw from the cover. (Illustration #1) Push up and remove the cover. (Illustration #2) 5.
-
Page 35: Cleaning And Replacing The Dust Filters (Optional Accessory)
Cleaning and replacing the dust filters (Optional accessory) Cleaning the dust filters Clean the dust filters after every 1000 hours of use. If they are note cleaned periodically, they can become clogged with dust, preventing proper ventilation. This can cause overheating and damage the projector. Follow these steps: 1. -
Page 36: Specifications
Specifications Model name DS230 DX251 DS234 DX255 Display system Single 0.55" DLP panel SVGA SVGA Resolution (800 × 600) (1024 × 768) (800 × 600) (1024 × 768) Throw ratio 1.97 - 2.17 Optical zoom 1.1X F/No. 2.5 - 2.7 Focal length 22.08 - 24.28mm... -
Page 37: Dimensions
Dimensions 285 mm (W) x 208 mm (D) x 116 mm (H) 67.6 Ceiling mount installation Ceiling mount screws: M4 x 8 (Max. L = 8mm) Unit: mm 76.5 207.6... -
Page 38: Appendix
Appendix LED Indicator Messages POWER LED TEMP LED (Red) LAMP LED (Red) Description Power Messages Solid Orange Stand-by 1Hz Green Blinking Powering up Solid Green Normal operation 1Hz Orange Blinking Normal power-down cooling Lamp Error Messages Solid First Lamp-lit error cooling Blinking 1 Hz Lamp error in normal operation Thermal Error Messages... -
Page 39: Compatibility Modes
Compatibility Modes Supported timing for PC input Horizontal Vertical Pixel 3D Field 3D top side Resolution Timing frequency frequency Frequency Sequent bottom (KHz) (Hz) (MHz) side VGA_60 59.94 31.469 25.175 ◎ ◎ ◎ VGA_72 72.809 37.861 31.500 640 x 480 VGA_75 37.5 31.500... - Page 40 1920 x 1920 x 1080_60 67.5 148.5 1080 (Reduce Blanking) 1920 x 1920 x 1200_60 59.95 74.038 154.000 1200 (Reduce Blanking) 640 x 480 MAC13 66.667 30.240 @67Hz 832 x 624 MAC16 74.546 49.722 57.280 @75Hz 1024 x 768 MAC19 75.02 60.241 80.000...
-
Page 41: Troubleshooting
Troubleshooting Refer to the symptoms and measures listed below before sending the projector for repairs. If the problem persists, contact your local reseller or service center. Please refer to "LED Indicator Messages" as well. Start-up problems If no lights turn on: •... -
Page 42: Rs-232 Protocol
RS-232 Protocol RS-232 Setting Baud rate: 115200 Parity check: None Data bit: Stop bit: Flow control: None Function Type Operation ASCII 0D 24 50 4F 57 3D 4F 4E Write Power On <CR>$pow=on#<CR> 23 0D 0D 24 50 4F 57 3D 4F 46 Power Write Power off... - Page 43 Bright 0D 24 41 50 50 4D 4F 44 Write Bright <CR>$appmod=bright#< 3D 44 59 4E 41 4D 49 43 CR> 23 0D 0D 24 41 50 50 4D 4F 44 <CR>$appmod=preset#< Write Presentation 3D 50 52 45 53 45 54 23 CR>...
- Page 44 0D 24 42 41 55 44 3D 32 Write 2400 <CR>$baud=2400#<CR> 34 30 30 23 0D 0D 24 42 41 55 44 3D 34 Write 4800 <CR>$baud=4800#<CR> 38 30 30 23 0D 0D 24 42 41 55 44 3D 39 Write 9600 <CR>$baud=9600#<CR>...
Need help?
Do you have a question about the DS230 and is the answer not in the manual?
Questions and answers