Table of Contents
Advertisement
Advertisement
Table of Contents

Related Manuals for ion science TIGER


Summary of Contents for ion science TIGER
- Page 1 ® TIGER Instrument User Manual V3.7 Unrivalled Detection. www.ionscience.com...
- Page 2 Thank you for purchasing your Ion Science product. The standard warranty of your instrument can be extended to up to five years on Tiger and two years on other Ion Science product. To receive your extended warranty, you must register your instrument online within one month of purchase.
-
Page 3: Warnings
SERVICING: Do not remove the sensor cover in the hazardous area. No part of the Tiger may be opened in a hazardous area except for replacement of the battery pack. The Tiger must be serviced in a Non Hazardous environment and by Ion Science authorised service centres only. -
Page 4: Avertissement
PROPRIETES NTISTATIQUES : matériaux utilisés. Employez uniquement un chiffon humide. EXPOSITION AUX N'exposez pas le Tiger à des atmosphères connues pour avoir un effet MATERIAUX : indésirable sur la polyoléfine thermoplastique ou le PC/l'ABS antistatique. Ne retirez pas le couvercle du capteur dans les zones dangereuses. -
Page 5: Declaration Of Conformity
BS EN 80079-34: 2011 manufacture On behalf of Ion Science Ltd, I declare that, on the date this product accompanied by this declaration is placed on the market, the product conforms to all technical and regulatory requirements of the above listed directives. -
Page 6: Table Of Contents
Soft key areas ............................... 13 Using your Tiger ............................. 14 Tiger PC software ............................18 PC Requirements............................18 Installation of TIGER PC Software ....................... 18 Connecting TIGER to a PC ........................... 19 The Features Screen ............................ 21 The Configuration Screen ..........................22 The Gas Table Screen (including setting alarm levels) ................ -
Page 7: Statements
IMPORTANT It is essential that the TIGER is always used with a supplied 0.5 micron PTFE Filter Disc fitted to the front of the instrument. Without a filter, particles of debris and dust can be drawn into the detector inhibiting the function of the instrument. -
Page 8: Introduction To Tiger
(non-rechargeable) are also available for when power to recharge is unavailable. The TIGER has true USB capability so the instrument can be connected directly to a PC via a standard USB cable. It also offers fast data download. -
Page 9: Getting Started
Inlet Probes Ensure that the inlet probe supplied is fitted to your TIGER. Details on how to fit and change inlet probe is detailed in the ‘Maintenance’ section. If the supplied inlet probe is unsuitable for your application, details of alternative probes can be found in the ‘Maintenance’... -
Page 10: Understanding The Keypad
Up and Down keys are used to adjust settings and navigate through the menu structure. Enter / On/Off key is used to accept adjustments and select functions; also to turn the TIGER on and off. Escape (Esc) key is used to abort an adjustment or exit from a menu. -
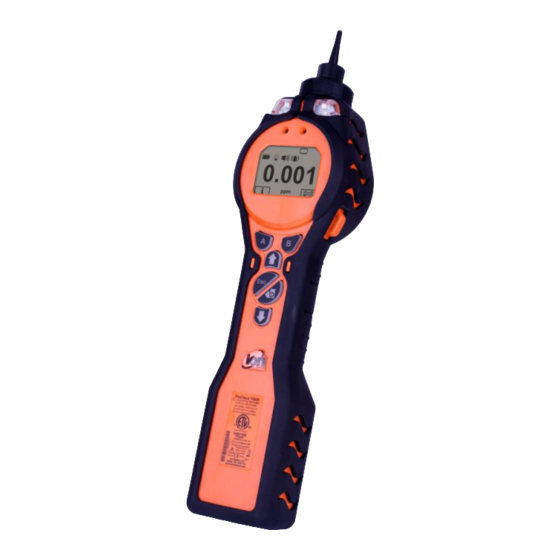
Page 11: Understanding The Display Screen
The main central viewing screen shown below displays readings in large numbers. The Tiger instrument auto-ranges therefore the number of decimal places reduce as the VOC reading increases. The minimum achievable sensitivity is 0.001 ppm, the maximum range is 19,999 ppm (Isobutylene equivalent). -
Page 12: Main Screen Area
Flashlight / Torch: When the flashlight / torch is illuminated the light beams appear. Lock: The Lock icon will appear when the configuration of the TIGER has been locked in TIGER PC. Soft keys in Button A column are enabled and Buttons in column B disabled, see page 13. -
Page 13: Soft Key Areas
The following icons will appear in the soft key areas as soft key options. They are selected using the Up and Down keys. Those labelled ‘optional’ will only appear if your TIGER has that functionality. These icons can be reorganised using the TIGER PC software. Button A Button B... -
Page 14: Using Your Tiger
Press the Zone soft key to display the currently selected Zone: 'Zone 1' Zones are set up in TIGER PC only and the name given to the zone(s) will appear on the screen. Use the Up and Down keys to select alternative zones. - Page 15 Up and Down keys scroll through the gases starting with that letter to find the subject gas. Press Enter to select the chosen gas. If a tick appears, press Enter again and TIGER will use the relevant data for the chosen gas from the gas table for alarms and response factor etc.
- Page 16 Using your Tiger Sound The sound options are presented as set up in TIGER PC. Use the Down key to select either keypad beep, alarm sound, crescendo or percentage volume. Press Enter to turn selection on or off. For percentage volume, press Enter again to confirm selection.
- Page 17 Date of Factory calibration Date of Custom calibration Date of Select tube calibration (optional) Third Screen SPAN 1 (gas concentration set in TIGER PC) SPAN 2 (gas concentration set in TIGER PC) PID detector in units PID sensor A/D reading...
-
Page 18: Tiger Pc Software
Tiger PC software PC Requirements TIGER PC Software must be used in conjunction with a PC or laptop using Windows XP, Windows Vista or Windows 7. The software is supplied on a USB memory stick. Installation of TIGER PC Software Download the TigerPC software from the Ion Science website: http://www.ionscience.com/customer-support/media-centre/instrument-software/... -
Page 19: Connecting Tiger To A Pc
Ion Science Ltd Tiger PC software Connecting TIGER to a PC Double click the TIGER icon on your desktop and open TIGER PC. The Home page should appear: The Help Screen This screen will show you if a new version of PC software is available. You can then install the upgrade if required. - Page 20 ‘Instrument(s) again and proceed as below: Switch TIGER on and when fully booted up connect to a USB socket on your PC using the USB cable supplied. If the ‘Found New Hardware’ screen appears, follow the prompts to install your instrument on your PC.
-
Page 21: The Features Screen
(see ’TIGER PC Software’). The Features Screen The ‘Features’ screen indicates which of the available updates has been added to your TIGER. Should you wish to purchase additional features, contact Ion Science Ltd or your Distributor. Some updates may be available on the website www.ionscience.com. -
Page 22: The Configuration Screen
TIGER MANUAL Ion Science Ltd Tiger PC software The Configuration Screen Use this screen to configure your TIGER. Backlight Choose from ‘Permanently Off’, ‘Permanently On’, ‘On in low ambient Light’, or ‘On For Limited Time’. Backlight Timeout can be set from 1 to 99 seconds. - Page 23 Enables the selection of different lamp types you may have purchased to use with your instrument. Ensure that the lamp selected is the same as that fitted in your TIGER. If not, select the correct lamp from the options provided.
- Page 24 Log Full If you select the bell symbol your TIGER will alarm when the memory log is full. Alternatively, if you wish new data to overwrite the oldest stored data in the memory and continue to store new data during data- logging, select the recycle symbol.
- Page 25 PC’ above. If the ‘Summary’ screen for your TIGER appears, visit the configuration screen again. If not, repeat the entire procedure. If your PC still fails to read or write to your TIGER seek advice from your distributor or from Ion Science Ltd.
-
Page 26: The Gas Table Screen (Including Setting Alarm Levels)
Tiger PC software The Gas Table Screen (including setting alarm levels) Connect your TIGER to your PC as described previously. Any fresh data-logged readings will be down loaded as the software ‘reads’ your TIGER. Select ‘Gas Table’ from the menu to display the Gas Table. -
Page 27: The Firmware Screen
Tiger PC software The Firmware Screen This screen displays the current firmware version installed on your TIGER. It also provides a facility to download updated versions to your TIGER. At this point you can also check the ‘View Release Notes’ information which is a description of the changes in the new version as shown here. - Page 28 IMPORTANT: Do not attempt to operate your TIGER during the update process. The firmware on your TIGER will be updated and the new version will be shown on the ‘Firmware’ screen. A bar at the bottom of the screen will indicate the progress of the update.
-
Page 29: Downloading Data Logged Readings
Use the menu function at the top right hand corner of the window to print, export or delete the data. CAUTION: The delete function deletes all logged data from your TIGER. Ensure all valuable data is exported to your PC before selecting ‘Delete’. -
Page 30: The Health Safety Screen
Be aware that this process will replace all setup and calibration files On the restore screen click ’Yes’. When complete, click ‘Close’ and restart your TIGER. Your TIGER will now be restored to the settings and calibration data stored at the time of that snapshot. -
Page 31: Software Disclaimers
Ion Science Ltd entire liability and the original Licensee’s exclusive remedy under this agreement are at the discretion of Ion Science Ltd, to either (a) return of payment as evidenced by a copy of the Receipt, or (b) replacement of the memory stick that does not meet Ion Science Ltd limited warranty and which is returned to Ion Science Ltd with a copy of the Receipt. -
Page 32: Batteries
Recharging Batteries Ensure the TIGER is charged for at least 7 hours before using it for the first time. To ensure optimum charging the TIGER should be switched off during charging. If left on, the TIGER will take longer to charge, but should not suffer any damage. -
Page 33: Replacement / Exchange Of Battery Packs
To replace the Rechargeable Battery Pack (A2), proceed as follows: Ensure TIGER is switched Off; Remove the Instrument Boot (8) from your TIGER (this is most easily achieved by starting at the front end of the instrument (step 4 below));... -
Page 34: Replacement Of Non-Rechargeable Batteries In Battery Pack
Never replace primary Alkaline battery cells while in a potentially explosive or hazardous location. Use only Duracell Procell Alkaline batteries MN1500. Ensure TIGER is switched Off. Remove the AA Battery Pack (A3) as in (b) and (c) on page 34; Remove the screws retaining the battery cover and lift it off. -
Page 35: Diagnostics
Diagnostics Basic faults or diagnostics are presented as symbols. Should a fault occur most can be corrected by pressing Enter or Esc to clear the fault message. All fault conditions cause the TIGER to alarm. Pump failure Pump blocked or pump failure The flow of gas through the instrument has fallen below 50cc/minute. -
Page 36: Calibration
TIGER) ready before starting the procedure. Demand flow regulators are recommended for the calibration of the Tiger. If flow regulators are to be used then a 0.3L/min is recommended, a flow adaptor should be used to avoid over-pressurising the instrument (sold separately).Alternatively a known clean air supply may be used as the ‘zero’... -
Page 37: Inlet Probe Assembly
TIGER MANUAL Ion Science Ltd Maintenance Press Enter again and the gas and concentration for Span 1 (previously set up in TIGER PC) are displayed Attach the ‘Span 1’ gas using the Calibration Adaptor (861476) along with a 15 second countdown. -
Page 38: Pid Sensor/Lamp Replacement And Cleaning
The TIGER is a sensitive detector. Internal components must be handled with clean hands and clean tools. The TIGER lamp is fragile. Handle with great care. Never touch the window and do not drop!! To remove the MiniPID 2 Sensor for cleaning or lamp... -
Page 39: Lamp Cleaning
The TIGER lamp is fragile. Handle with great care! First ensure that the TIGER is turned off and that you are in a clean environment such that the sensor parts will not be contaminated by dust, oil or grease. -
Page 40: Tiger Parts
TIGER MANUAL Ion Science Ltd Tiger parts Tiger main assembly PART ITEM DESCRIPTION NUMBER Instrument body A-8611274 Rechargeable battery pack A-861240 AA battery pack A-861241 Charge cradle A-861220 Sensor cover A-861259 MiniPID 2 sensor MP6SX6BXU2 Sensor gasket 861203-9 Instrument boot... -
Page 41: Accessories
TIGER MANUAL Ion Science Ltd Accessories Ion Science Ltd has developed an exclusive range of high quality accessories to compliment the TIGER. Please see a selection of these below: Part Number Accessory Description Car Charger Lead – Allows the Charger Cradle (A4) to be powered from a... -
Page 42: Instrument Warranty And Service
Instrument warranty and service Warranty Standard Warranty can be extended to up to 5 years on the TIGER when registering your instrument via our website: www.ionscience.com/instrument-registration To receive your Extended Warranty, you need to register within one month of purchase (Terms and Conditions apply). -
Page 43: Service
Ion Science Ltd Service Ion Science Ltd also offers a number of service options for your TIGER that allows you to choose the instrument cover to best suits your requirements. At Ion Science Ltd we recommend that all of our gas detection instruments be returned for service and factory calibration once every 12 months. -
Page 44: Technical Specification
TIGER MANUAL Ion Science Ltd Technical specification Response time: T90 < 2 second 0 – 10,000 ppm Isobutylene / equivalent (0 to 20,000ppm for specific gases) Detectable Range: Resolution: +/- 0.001ppm (1 ppb) Accuracy: +/- 5% displayed reading +/- one digit... -
Page 45: User Manual Log
– not the IRN number Page 42 23/12/2014 V0.4.28 V 1.0.0.75 Tiger PC software updated Declaration of conformity updated and 19/06/2015 V0.4.33 V1.0.0.76 warnings in French added 27/01/2016 V0.4.33...
Need help?
Do you have a question about the TIGER and is the answer not in the manual?
Questions and answers