Sign In
Upload
Download
Table of Contents
Contents
Add to my manuals
Delete from my manuals
Share
URL of this page:
HTML Link:
Bookmark this page
Add
Manual will be automatically added to "My Manuals"
Print this page
×
Bookmark added
×
Added to my manuals
Manuals
Brands
ThingMagic Manuals
Card Reader
Mercury6
User manual
ThingMagic Mercury6 User Manual
Hide thumbs
1
2
Table Of Contents
3
4
5
6
7
8
9
10
11
12
13
14
15
16
17
18
19
20
21
22
23
24
25
26
27
28
29
30
31
32
33
34
35
36
37
38
39
40
41
42
43
44
45
46
47
48
49
50
51
52
53
54
55
56
57
58
59
60
61
62
63
64
65
66
67
68
69
70
71
72
73
74
75
76
77
78
79
80
81
82
83
84
85
86
87
88
89
90
91
92
93
94
page
of
94
Go
/
94
Contents
Table of Contents
Troubleshooting
Bookmarks
Table of Contents
Table of Contents
Introduction
Hardware Overview
What's in the Box
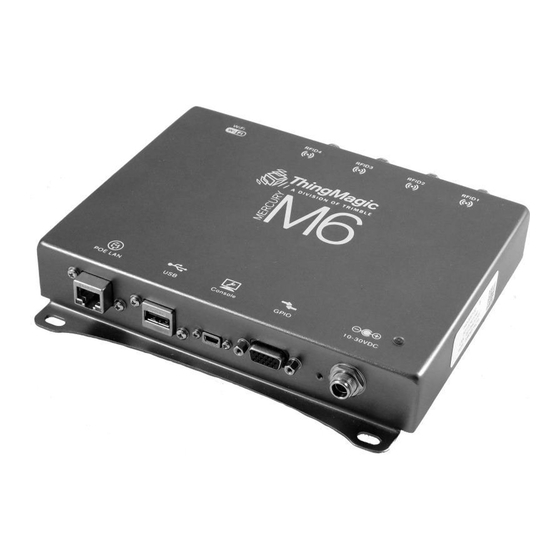
M6 Reader
Astra-EX Reader
Ports and Connectors
Antenna Connections
Ethernet/Poe
USB Accessory
Console
Gpio
DC Power
Reset Button
Programming Interfaces
Mercuryapi
Demo Applications
Llrp
On-Reader Applications
Setting up the Reader
Equipment Required
Setup Procedure
Connecting Antenna(S) to the Reader
Powering up the Reader
Interpreting the Reader Indicator LED
Connecting Your PC to the Reader
Communicating with the Reader Using a Link-Local Address
Logging on to the Reader
Networking the Reader
Setting up the Network Hardware
Using the Wireless Network
Using Power over Ethernet (Poe)
Using DHCP
M6 and Astra-EX Setup
PC Setup
Automatic Hostname: M6-XXXXXX or Astra-EX-XXXXXX
MAC Address
Fallback Interface Options
Fallback to the same Physical Interface
Fallback to the Other Physical Interface
Reader Discovery
Using Mdns
Reader Listing
Identify Reader
Connecting to the USB Console Port
Using GPIO
Inputs
Outputs
Connector Pinout
Controlling the Reader
Using the Browser-Based Interface
Status
Query
Settings
Restart
Diagnostics
Statistics
Firmware Upgrade Utility
Using Safe Mode
Force M6 and Astra-EX to Boot in Safe Mode
Advanced Reader Functionality
Protocol Support
ISO 18000-6C (Gen2)
Iso 18000-6B
Protocol Configuration Options
Tag Read Meta Data
Reader RF Power
Power Settings for Authorized Antennas and Cables
Setting the Reader RF Power
Mounting the Reader
Astra-EX
Variables Affecting Performance
Environmental
Tag Considerations
Multiple Readers
M6 Specifications
UHF RFID Antenna Interface
Power
Environmental
Physical Dimensions
Supported UHF Tag Protocols
Data/Control/Wireless Interfaces
Performance
Regulatory & Safety
User Memory
Astra-EX Specifications
UHF RFID Antenna Interface
Power
Environmental
Physical Dimensions
Supported UHF Tag Protocols
Data/Control/Wireless Interfaces
Performance
Regulatory & Safety
User Memory
Compliance and IP Notices
Regulatory Compliance
Federal Communication Commission Interference Statement
Industry Canada
Appendix A: M6 and Astra-EX Antenna and Cable Information
Authorized Antennas
Authorized Cables
Appendix B: M6 and Astra-EX Dimensions
Appendix C: Advanced Administration
Changing the Web Interface Uid/Passwd
Changing Console/Root Password
Appendix D: Troubleshooting
Reset to the Default Configuration
Analyzing the Boot Logs
Advertisement
Quick Links
1
Console
2
Connecting Your Pc to the Reader
Download this manual
875-0058-05 RevC
Mercury6(M6) and Astra-EX
User Guide
For firmware version 4.17 and later
1
Table of
Contents
Previous
Page
Next
Page
1
2
3
4
5
Advertisement
Table of Contents
Need help?
Do you have a question about the Mercury6 and is the answer not in the manual?
Ask a question
Questions and answers
Related Manuals for ThingMagic Mercury6
Card Reader ThingMagic Astra-EX User Manual
(94 pages)
Card Reader ThingMagic Astra User Manual
(73 pages)
Card Reader ThingMagic Nomad RFID Setup Manual
(36 pages)
This manual is also suitable for:
Astra-ex
Table of Contents
Print
Rename the bookmark
Delete bookmark?
Delete from my manuals?
Login
Sign In
OR
Sign in with Facebook
Sign in with Google
Upload manual
Upload from disk
Upload from URL


Need help?
Do you have a question about the Mercury6 and is the answer not in the manual?
Questions and answers