
Related Manuals for Elkay DSWH160UVPC


Summary of Contents for Elkay DSWH160UVPC
-
Page 1: Table Of Contents
ENERGY SAVING Installation and Maintenance Manual DSWH160UVPC Table of Contents Before You Begin – Requirements for Operating the Keypad Installation Routine Maintenance Mounting Dimensions Declaration of Conformity Troubleshooting Operating Environment Association Replacement Parts Water Recommendations for Safeguarding the Environment Electrical... -
Page 2: Declaration Of Conformity
DSWH160UVPC Installation and Maintenance Manual Declaration of Conformity D.M. 174 Materials compliant for contact with drinking water This unit is intended for the dispensing of drinking water, and so the materials that enter into direct contact with water meet the criteria for food-grade components pursuant to the current legislation. In addition, the unit is manufactured in compliance with Italian Ministerial Decrees 174 of 04/06/2004 and 25 of 02/07/2012. -
Page 3: Recommendations For Safeguarding The Environment
For safety reasons keep the packaging material out of the reach and sight of children. Scrappage The DSWH160UVPC water cooler is made using recyclable material. This unit is marked in compliance with European Directive 2002/96/EC on Waste Electrical and Electronic Equipment (WEEE). By ensuring that the product is scrapped correctly, you will help to prevent potential negative consequences for the environment and for health. -
Page 4: Introduction
Installation and Maintenance Manual Introduction The DSWH160UVPC cooler brings contemporary style and state-of-the-art technology to commercial water dispensers. DSWH160UVPC offer the highest level of quality and modern design. Multiple dispensing options: cold still water, cold sparkling water, and hot water... -
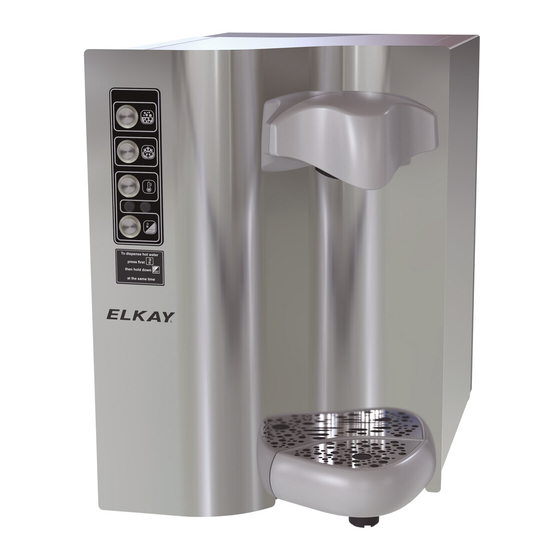
Page 5: Components Guide
Components Guide DSWH160UVPC Removable top cover Keypad Front door Drip tray Front Panel lock Water inlet inlet Power cord DSWH160UVPC Keypad Cold sparkling dispenser Cold still dispenser Hot dispensers ENERGY SAVING Energy Saving ENERGY SAVING button LED alarms Energy Saving... -
Page 6: Product Specifications
DSWH160UVPC Installation and Maintenance Manual Product Specifications Specification DSWH160UVPC Cooling capacity gal/h (lt/h) 4 (15) 85 6 oz. cups/h Cold water temperature 42°F – 48°F (5.5°C – 8.8°C) Ice bank capacity gal (lt) 2 (7) Ice bank lb (kg) 6.6 (3.5) -
Page 7: Before You Begin - Requirements For Installation
Before You Begin – Requirements for Installation Mounting Dimensions Over counter (includes 4" clearance on sides and back) DSWH160UVPC Depth Width 23.2” (589mm) 20.9” (531mm) Height 22.4” (569mm) Footprint: 12.9” wide x 19.2” deep 330mm x 489mm Under counter Width Depth 3.25"... -
Page 8: Operating Environment
Always connect the water cooler to a water main that supplies drinking water only. Use of 3/8" diameter connections for DSWH160UVPC is recommended. Turn off the main water inlet tap if the unit is not to be used for a long period. -
Page 9: Tools You Will Need
Tools You Will Need (2) 8" adjustable wrenches (1) 12" adjustable wrench (1) 12" pipe cutter (1) 10" adjustable pliers (1) universal screwdriver (1) wire cutting pliers Unpacking the Kit Remove the front panel (labeled FRONT) and cover of the wooden packing case. -
Page 10: What's In The Kit
(2) 3/8" – quick (1) 3/8” x (1) water connect connector 3/8” 90° quick pressure connect elbow regulator (1) DSWH160UVPC water cooler (1) external water filter (1) 10' coil CO tubing (natural) 1/4” OD (1) 3/8” x 1/4” quick connect (1) 4”... -
Page 11: Installing The Machine
Installing the Machine CAUTION: Wear safety gloves when handling the machine. Metal edges are sharp, and touching them could result in minor or moderate injury. CAUTION: The unit weighs more than 100 lbs (45 kg) when the ice bank is filled. Lifting without proper support could result in minor or moderate injury. - Page 12 DSWH160UVPC Installation and Maintenance Manual 2. Cut, size and connect water and CO piping to fit your installation. NOTICE: The water pressure entering the machine must be between 14.5 psi (0.10 MPa) minimum and 51 psi (0.35 MPa) maximum. If the inlet water pressure is higher than 51 psi, the water pressure regulator supplied must be used.
- Page 13 3. Fill the ice bank in your machine. DSWH160UVPC 1. Unlock and open the side door using the supplied key (A). ENERGY SAVING 2. Look for the bright yellow label with the arrow (B), which points to the ice bank inlet hole (C).
- Page 14 DSWH160UVPC Installation and Maintenance Manual 5. Connect external water and CO piping. DSWH160UVPC Water input input 6. Plug the machine into the wall socket and turn it on. 1. Connect the power cable to the nearest socket. 2. Open the front panel with the supplied key and press the power button at the top left of machine (B).
- Page 15 7. Purge the water lines. 1. Place receptacle beneath tap to catch dispensed water. Discard water as necessary. DSWH160UVPC Press dispensing button 2. Allow water to run continuously until flow is clear of air. 3. Repeat for all taps. NOTICE: The "No/low CO...
- Page 16 DSWH160UVPC Installation and Maintenance Manual 9. Open the CO valve. 1. Using a screwdriver slowly turn valve screw counterclockwise (left) to open valve. 2. Continue until pressure reads 50 to 58 psi max. 10. Re-purge the line for sparkling water.
-
Page 17: Operating The Keypad
Operating the Keypad To dispense your water serving Hold down the button for that dispenser. Note: For safety reason, to dispense hot water you must hold down the upper hot water button first and then the lower hot water/Energy Saving button at the same time. To stop dispensing your water serving Release the button for that dispenser. -
Page 18: Routine Maintenance
DSWH160UVPC Installation and Maintenance Manual Routine Maintenance Daily Clean all external surfaces of the machine, the drip tray and the dispensing nozzles. NOTICE: It is recommended that all external components of the product be cleaned daily. It is recommended that you use dish soap, warm water and a clean, soft cloth to clean the product. - Page 19 4. Place a receptacle under the still water dispenser and dispense continuously for a minimum of two gallons to purge air and fine carbon particles from filter. Sanitize the machine NOTICE: This operation must be carried out by your ELKAY reseller or by a qualified technician. When required Replace the UV lamp CAUTION: The light emitted by the ultra-violet lamp may cause serious burns to the eyes and skin.
- Page 20 DSWH160UVPC Installation and Maintenance Manual Set the thermostat COLDER 1. Set the thermostat between 5 and 6 to control the temperature of the cold water. 2. If you want to avoid the formation of ice in the bank, turn the thermostat...
-
Page 21: Troubleshooting
Troubleshooting Problem Possible Cause Action To Take No water dispense The main water valve is closed Open the valve The power switch is set to OFF Set the power switch to ON Malfunction in the ribbon cable connection/ Repair connection to main circuit board spade connectors The water inlet solenoid is not working Bypass the solenoid and replace it... - Page 22 DSWH160UVPC Installation and Maintenance Manual Problem Possible Cause Action To Take Poor sparkling water quality Incorrect air gap in the carbonator Close the CO cylinder valve, pull up the ring on safety valve (on the carbonator bowl head) until all air gap is out...
- Page 23 Contacting Customer Support Elkay Manufacturing Company 2222 Camden Court Oak Brook, IL 60523 800-726-0553 1000003740 (Rev. A - 02/2017)
-
Page 24: Replacement Parts
DSWH160UVPC Installation and Maintenance Manual Replacement Parts DSWH160UVPC DSCABWH Part Number Product Name 1000002622 Motor Fan 120x120x25 1000002623 Booster Pump 1000003891 Main PCB 1000002625 General Power Switch 1000002626 Ice Bank Thermostat K55 1000002627 Feet 4MA 1000002629 Submerged Agitator Pump 1000002631... - Page 25 1000003740 (Rev. A - 02/2017)
- Page 28 160219...
Need help?
Do you have a question about the DSWH160UVPC and is the answer not in the manual?
Questions and answers