Table of Contents
Advertisement
Quick Links
TBS XRACER Micro FPV Racer
Ready-to-fly micro fpv racer
It's a parrot frame, that we build up with BetaFlight, Spektrum R/C receiver and a TBS UNIFY PRO VTX. Aimed
at indoor office/warehouse race flying, or people getting started with carpark racing and other shenanigans.
Key features
Ready-to-fly 120-size FPV racer
●
Brushed motors, 56mm Props
●
●
32-bit Brushed CleanFlight Flight Controller
●
BNF Spektrum R/C receiver
●
55g weight incl. battery
1
Revision 2016-10-30
Advertisement
Table of Contents

Subscribe to Our Youtube Channel
Related Manuals for tbs electronics XRACER


Summary of Contents for tbs electronics XRACER
- Page 1 TBS XRACER Micro FPV Racer Revision 2016-10-30 Ready-to-fly micro fpv racer It's a parrot frame, that we build up with BetaFlight, Spektrum R/C receiver and a TBS UNIFY PRO VTX. Aimed at indoor office/warehouse race flying, or people getting started with carpark racing and other shenanigans.
-
Page 2: Table Of Contents
Table of content Attention Disclaimer Overview Quick Start Guide - BNF set Setup Charging battery Mounting battery Changing video transmitter settings Channel select mode Band select mode Unlock and power select mode Saving settings LED flash codes for channel, band and power Radio channel setup Binding Spektrum receiver Flight controller setup... - Page 3 ° Parrot 120 mm, diagonally Frame size: Size: 140 x 140 x 30 mm, prop tip-to-tip Weight: 55 grams incl. battery Kit contents: 1x TBS XRACER, 1x 600mAh battery, 4x Extra propellers (2x CCW, 2x CW), 2x Extra motors...
-
Page 4: Attention
Attention Thank you for buying a TBS product! The TBS XRACER is a new micro racing multirotor aircraft from Team BlackSheep (TBS). A general rule for RC aircrafts is that they must be controlled always under sight of view, check your RC regulation to keep up to date with regulations. -
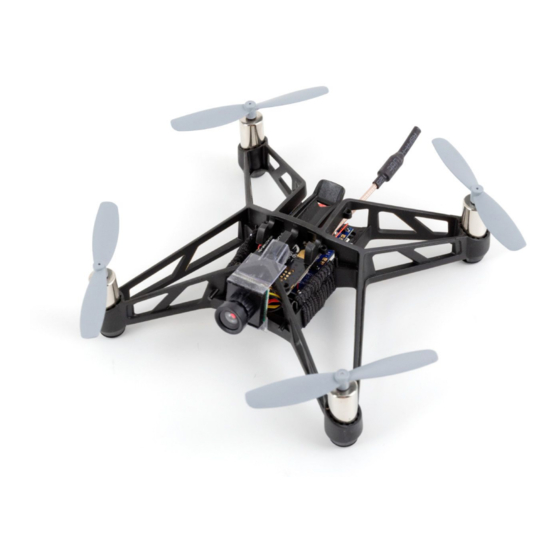
Page 5: Overview
Overview The following diagram shows the main features of the TBS XRACER and the component layout. -
Page 6: Quick Start Guide - Bnf Set
Quick Start Guide - BNF set The following steps will get you setup and ready to fly quickly. It is a condensed version intended for experienced pilots/builders. Each step is elaborated in more detail in this manual if you are new to this. You will need to charge and mount the battery, bind the R/C receiver, configure the flight control, and potentially adjust VTX channel. -
Page 7: Setup
The supplied 1S 600mAh battery is charged for storage and transportation (50%). It needs to be charged at 1C, 600mA, before being used. You can still setup and configure the XRACER but it is not recommended to fly without charging the battery fully first. -
Page 8: Changing Video Transmitter Settings
Changing video transmitter settings On the underside of the XRACER is a slot to access the menu button and two status LEDs for the VTX. In the menu there are categories and setting entries. Pressing the button for 3 seconds will toggle between categories, pressing it for a short (1 second) press toggles between settings. -
Page 9: Led Flash Codes For Channel, Band And Power
LED flash codes for channel, band and power The TBS UNIFY PRO 5G8 signals selected channel, band and power levels using a startup sequence of LED codes. The same sequence is also repeated in the menu to make it unified. First the R ED ... -
Page 10: Radio Channel Setup
To bind the XRACER to a S pektrum r adio: 1. Power on the XRACER, either by connecting the battery or USB power, and wait 10 seconds or longer for the receiver to enter bind mode, indicated by rapid red LED flashing 2. - Page 11 T 10J manual To bind the XRACER to a F rSky r adio: 1. Push and hold bind button while plugging in the battery. XRacer is now in bind mode. Orange LED is on, Red LED is flashing rapidly.
-
Page 12: Flight Controller Setup
Flight controller setup The main flight controller board comes pre-flashed with BetaFlight and proper settings for the XRACER already set up but you still need to configure the receiver settings. Also if you upgrade the firmware or reset settings, you will lose the receiver settings and need to set them up again. - Page 13 4. For V1.0, in the same tab, change “Receiver Mode” to “RX_SERIAL” and “Serial Receiver Provider” to “SPEKTRUM1024” for DSM2 or “SPEKTRUM2048” for DMSX, hit “Save and Reboot”. For all V1.1, please set the “Receiver mode” to PPM. 5. Now, power up the the radio and open the “Receiver”-tab, the stick movements should now show on the screen - the channel mapping is probably wrong, in the “Channel Map”-field, select “Spektrum TAER123”...
- Page 14 7. Finally, disconnect the USB and try to power up the radio first then the XRACER. Toggle the flight mode-switch, the green LED should blink momentarily when moving through the modes. Toggle the arm-switch and the green LED will turn on when armed.
-
Page 15: Low Battery Warning
Calibrating the accelerometer and gyro is easily done using a bubble/spirit level on a flat surface. Calibrate in BetaFlight: 1. Open BetaFlight and hit “Connect” 2. Put a spirit level on a surface and make it level, place the XRACER on the level surface 3. In the first tab, click “Calibrate Accelerometer” Using radio sticks: 1. -
Page 16: Status Led
Status LED The LEDs on the main controller board shows the state of the system, according the following table. The red LED is located on the front while the blue and green is located on either side of the micro-USB connector. LED Color Description Red slow flashing... -
Page 17: Advanced Configuration
Advanced configuration Flight controller configuration The XRACER comes preconfigured with tuned BetaFlight settings. Changing the essential flight controller settings such as PID, rates, filters, general settings and accelerometer calibration can be done in the BetaFlight configurator interface. If required, download and install the ... -
Page 18: Settings Dump
2. Open the “PID”-tab and change the PID and rates values to the following and hit “Save”: Settings dump Complete list of the BetaFlight FC settings for Spektrum XRacer (V1.0). # version # BetaFlight/NAZE 2.6.1 Apr 8 2016 / 22:44:36 (bdaf8ec) - Page 19 feature -ONESHOT125 feature -BLACKBOX feature -CHANNEL_FORWARDING feature -TRANSPONDER feature VBAT feature INFLIGHT_ACC_CAL feature RX_SERIAL feature FAILSAFE # beeper beeper GYRO_CALIBRATED beeper RX_LOST beeper RX_LOST_LANDING beeper DISARMING beeper ARMING beeper ARMING_GPS_FIX beeper BAT_CRIT_LOW beeper BAT_LOW beeper GPS_STATUS beeper RX_SET beeper ACC_CALIBRATION beeper ACC_CALIBRATION_FAIL beeper READY_BEEP beeper MULTI_BEEPS...
- Page 20 color 15 0,0,0 # aux aux 0 0 0 900 1300 aux 1 1 1 900 1300 aux 2 2 1 1300 1700 aux 3 0 0 900 900 aux 4 0 0 900 900 aux 5 0 0 900 900 aux 6 0 0 900 900 aux 7 0 0 900 900 aux 8 0 0 900 900...
- Page 21 set telemetry_inversion = OFF set frsky_default_lattitude = 0.000 set frsky_default_longitude = 0.000 set frsky_coordinates_format = 0 set frsky_unit = IMPERIAL set frsky_vfas_precision = 0 set frsky_vfas_cell_voltage = OFF set hott_alarm_sound_interval = 5 set battery_capacity = 0 set vbat_scale = 110 set vbat_max_cell_voltage = 43 set vbat_min_cell_voltage = 33 set vbat_warning_cell_voltage = 35...
- Page 22 = 60 set yaw_rate = 50 set tpa_rate = 0 set tpa_breakpoint = 1500 Complete list of BetaFlight settings for TBS XRacer V1.1 FrSky: # version # BetaFlight/BEEBRAIN 3.0.1 Oct 27 2016 / 23:13:02 (11090a4) # name name -...
- Page 23 feature -RX_PPM feature -VBAT feature -INFLIGHT_ACC_CAL feature -RX_SERIAL feature -MOTOR_STOP feature -SERVO_TILT feature -SOFTSERIAL feature -GPS feature -FAILSAFE feature -SONAR feature -TELEMETRY feature -CURRENT_METER feature -3D feature -RX_PARALLEL_PWM feature -RX_MSP feature -RSSI_ADC feature -LED_STRIP feature -DISPLAY feature -OSD feature -BLACKBOX feature -CHANNEL_FORWARDING feature -TRANSPONDER feature -AIRMODE...
- Page 24 color 3 30,0,255 color 4 60,0,255 color 5 90,0,255 color 6 120,0,255 color 7 150,0,255 color 8 180,0,255 color 9 210,0,255 color 10 240,0,255 color 11 270,0,255 color 12 300,0,255 color 13 330,0,255 color 14 0,0,0 color 15 0,0,0 # mode_color mode_color 0 0 1 mode_color 0 1 11 mode_color 0 2 2...
- Page 25 adjrange 5 0 0 900 900 0 0 adjrange 6 0 0 900 900 0 0 adjrange 7 0 0 900 900 0 0 adjrange 8 0 0 900 900 0 0 adjrange 9 0 0 900 900 0 0 adjrange 10 0 0 900 900 0 0 adjrange 11 0 0 900 900 0 0 adjrange 12 0 0 900 900 0 0...
- Page 26 set current_meter_type = ADC set align_gyro = DEFAULT set align_acc = DEFAULT set align_mag = DEFAULT set align_board_roll = 0 set align_board_pitch = 0 set align_board_yaw = 0 set max_angle_inclination = 700 set gyro_lpf = 188HZ set gyro_sync_denom = 1 set gyro_lowpass_type = PT1 set gyro_lowpass = 100 set gyro_notch1_hz = 0...
- Page 27 = 30 set pitch_srate = 30 set yaw_srate = 30 set tpa_rate = 10 set tpa_breakpoint = 1650 TBS XRacer V1.1 Futaba & Spektrum DSM2/DSMX # version # BetaFlight/BEEBRAIN 3.0.1 Oct 27 2016 / 23:13:02 (11090a4) # name name -...
- Page 28 beeper GPS_STATUS beeper RX_SET beeper ACC_CALIBRATION beeper ACC_CALIBRATION_FAIL beeper READY_BEEP beeper MULTI_BEEPS beeper DISARM_REPEAT beeper ARMED beeper SYSTEM_INIT beeper ON_USB # map map AETR1234 # serial serial 0 1 115200 57600 0 115200 serial 1 64 115200 57600 0 115200 # led led 0 0,0::C:0 led 1 0,0::C:0...
- Page 29 mode_color 3 2 4 mode_color 3 3 13 mode_color 3 4 10 mode_color 3 5 3 mode_color 4 0 7 mode_color 4 1 11 mode_color 4 2 3 mode_color 4 3 13 mode_color 4 4 10 mode_color 4 5 3 mode_color 5 0 9 mode_color 5 1 11 mode_color 5 2 2...
- Page 30 rxfail 17 h # master set mid_rc = 1500 set min_check = 1100 set max_check = 1900 set rssi_channel = 0 set rssi_scale = 30 set rc_interpolation = AUTO set rc_interpolation_interval = 19 set rssi_ppm_invert = OFF set input_filtering_mode = OFF set roll_yaw_cam_mix_degrees = 0 set max_aux_channels = 6 set debug_mode = NONE...
- Page 31 set failsafe_throttle_low_delay = 100 set failsafe_procedure = DROP set rx_min_usec = 885 set rx_max_usec = 2115 set gimbal_mode = NORMAL set acc_hardware = AUTO set acc_lpf_hz = 10.000 set accxy_deadband = 40 set accz_deadband = 40 set acc_unarmedcal = ON set acc_trim_pitch = 0 set acc_trim_roll = 0 set pid_process_denom = 1...
-
Page 32: Maintenance
Maintenance Replacing propellers The propellers on a quadcopter have two rotational profiles, counterclockwise and clockwise. Getting these right is important for proper flight. Take note, or use the picture below, to find out which way the leading edge of the propeller should turn. The kit comes with two sets of propellers. 1. -
Page 33: Replacing Motors
Replacing motors If you have a damaged motor or a bent shaft, you can replace it with one of the two extras supplied in the kit. There are two brushed motor types, counterclockwise and clockwise rotation. Motor rotation and correct polarity is indicated by the wire color: Counterclockwise motor: ... - Page 34 4. Replace the motor and solder the wires in place and put on the propeller as shown in the following picture.
-
Page 35: Firmware Upgrade
Firmware upgrade Updating the firmware to the latest CleanFlight or BetaFlight is possible via the USB interface, as long as the board is in bootloader mode. Bootloader mode For this you need a soldering iron, solder and a piece of wire. 1. - Page 36 Troubleshooting If the motors spin up when the battery is plugged in, connect the XRacer to CleanFlight. O pen the ● “CLI”-tab and type the following to enable brushed motors and press enter: “set motor_pwm_rate=32000” “save” If you see lines on the video coming from the XRacer, the battery voltage is low and you need to ●...
-
Page 37: Good Practices
Good practices We have compiled a list of all of practices which have been tried and tested in countless environments and situations by the TBS crew and other experienced FPV pilots. Follow these simple rules, even if rumors on the internet suggest otherwise, and you will have success in FPV. ●... - Page 38 ● Improving the antenna gain on the receiver end is better than increasing the output power (except in RF-noisy areas). More tx power causes more issues with RF noise on your plane. 500mW is plenty of power! ● Try to achieve as much separation of the VTx and R/C receiver as possible to lower the RF noise floor and EMI interference.
Need help?
Do you have a question about the XRACER and is the answer not in the manual?
Questions and answers