
Related Manuals for HTS VRS N50


Summary of Contents for HTS VRS N50
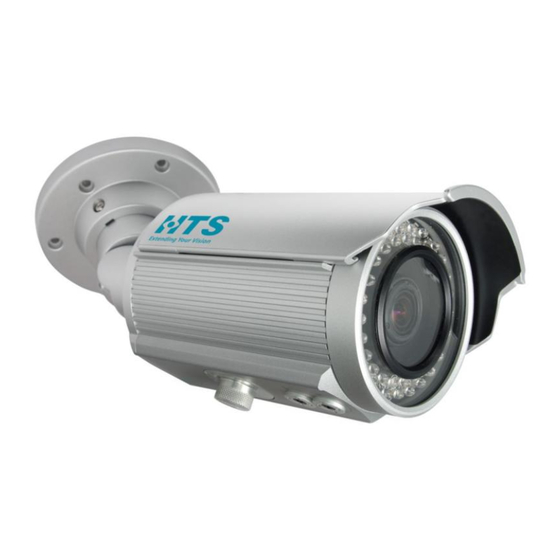
- Page 1 VRS N50 Imaging Unit 3Megapixel Network Bullet Camera Series Quick Installation Guide...
-
Page 2: Table Of Contents
System Requirements ......................13 IP Configuration ..........................14 Default IP address ......................... 14 Operating the "IP configurator" utility from your LC (Lane Controller) ........14 Installing the "IP configurator" utility from HTS web site ............14 Installing new IP address....................... 14... -
Page 3: Warning
N50 Imaging Unit Series│ Quick Installation Guide NOTICE Please read this guide thoroughly and save it for 1future use before attempting to connect or operate this unit. WARNING This unit operates at AC 24V/ PoE. Installation and service should be performed only by qualified and experienced technicians and comply ... -
Page 4: Fcc Compliance Statement
N50 Imaging Unit Series│ Quick Installation Guide FCC Compliance Statement Information to the user: This unit has been tested and found to comply with the limits for a Class B digital device pursuant to Part 15B of the FCC Rules. Operation is subject to the following two conditions: (1) this device may not cause harmful interference, and (2) this device must accept any interference received, including interference that may cause undesired operation. -
Page 5: Product Overview
N50 Imaging Unit Series│ Quick Installation Guide 1. Product Overview 1.1 Physical Characteristics Unit: ㎜ 1-1: P & P IGURE HYSICAL DIMENSION ICTORIAL NDEX *Refer to table 1-1 for definitions... - Page 6 N50 Imaging Unit Series│ Quick Installation Guide 1-1: P ABLE ICTORIAL NDEX EFINITION Index # Name Description I/O Connector To connect Input/ Output devices Power Connector Connects to the external power source at AC 24V only To insert the RJ-45 cable for network connection as well RJ-45 Ethernet Connector/ PoE as PoE (Power over Ethernet) Mount bracket...
-
Page 7: Preparation For Installation
N50 Imaging Unit Series│ Quick Installation Guide 2. Preparation for Installation 2.1 Unpack Everything Check everything in the packing box matches to the order form and the packing slip. In addition to this guide, items below are included in the packing box. One Network Bullet Camera N50 Imaging Unit ... -
Page 8: Installation
N50 Imaging Unit Series│ Quick Installation Guide 3. Installation 3.1 Mounting the camera onto the ceiling/wall Affix the mounting template to the desired location, knock in 6 plastic anchors after hole drilling and then lock in 6 self-tapping screws to fasten the camera. 3-1: M IGURE OUNTING THE... -
Page 9: Mount The Unit Onto A Pole
N50 Imaging Unit Series│ Quick Installation Guide 3.2 Mount the unit onto a pole Fasten two M4 screws into the pole mount adaptor. On the other side of the 2" bracket, screw two spring washers and two Nuts. FIGURE 3-3: MOUNTING THE CAMERA ON A POLE Warning Depending on the material of mounting surface, different screws and anchors than those supplied may be required. -
Page 10: Connecting The Wires
N50 Imaging Unit Series│ Quick Installation Guide 3.3 Connecting the Wires 1. To attach the camera to the fixed place. FIGURE 3-4: CONNECTING THE WIRES 2. Pass all the signal cables through the mounting bracket as the sample photo shown. 3. Connect the power cable to the power plugs with one of the following options. AC 24V: Connect 24V (~) cables to terminals ~AC 24V ... -
Page 11: Adjusting The Camera Position
N50 Imaging Unit Series│ Quick Installation Guide 3.4 Adjusting the Camera Position 1. Use the cross screwdriver to untie the cross screw on one side of the mount bracket in a way that you can tilt the camera. 2. Release the screw on the retaining ring to adjust the camera angle. 3. -
Page 12: Adjusting The Sun Shield Hood
N50 Imaging Unit Series│ Quick Installation Guide 3.6 Adjusting the Sun shield hood 1. Move the sunshield hood forward and backward to adjust the position of sunshade. Caution Be sure to adjust the sunshield hood in coordination with lens in case of sunshade problems. -
Page 13: System Requirements
N50 Imaging Unit Series│ Quick Installation Guide 3.8 System Requirements Below table lists the minimum requirement to implement and operate an Imaging Unit of N50. 3-1: S ABLE YSTEM EQUIREMENTS System Hardware Lane controller LC-1000 Ruggedized controller Lane controller LC-2000 (*) 19"... -
Page 14: Ip Configuration
The utility icon is displayed in the following image: 4-1: IP CONFIGURATOR ICON IGURE 4.3 Installing the "IP configurator" utility from HTS web site In addition, the utility is available on our Web site: http://htsol.com/Support Select in Download: Tools and Utilities the "IP configurator utility ". - Page 15 N50 Imaging Unit Series│ Quick Installation Guide 4-3: IGURE LIST OF CAMERAS ON THE NETWORK The following Information appears in the camera configuration window. 4-4: CONFIGURE NEW IP ADRESS IGURE 1. Configure the new IP address, type your new setting for IP address in the connectivity section 2.
Need help?
Do you have a question about the VRS N50 and is the answer not in the manual?
Questions and answers