
Related Manuals for Sony MP-CL1A


Summary of Contents for Sony MP-CL1A
- Page 1 Help Guide MP-CL1A 3.45 m 2.3 m inches 1.15 m inches inches 3-MP0-107-02 © 2016 Sony Corporation...
-
Page 2: Parts And Controls
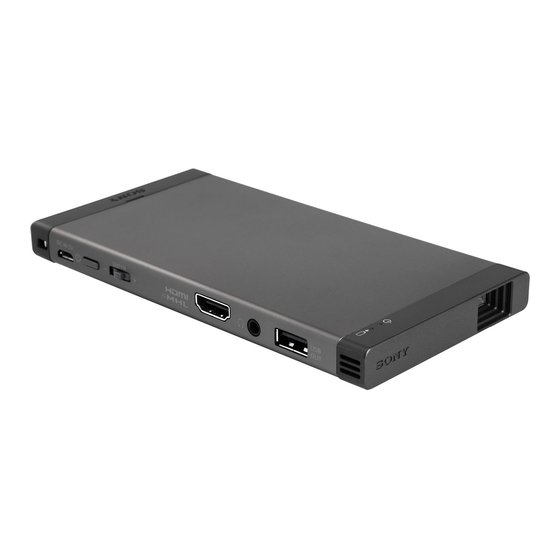
Parts and Controls CAUTION Do not point the laser light directly at eyes or people, nor look into it. Doing so may cause serious injuries such as loss of eyesight. Strap hole Micro USB jack Use an AC power adaptor with a 1.5 A or greater output to charge the projector. - Page 3 Jog lever (−/ENTER/+) Press the jog lever while at the ENTER position to display the menu. Slide it to + or − to move to next or previous menu item, then press while at the ENTER position to select the highlighted item. ...
-
Page 4: Adjusting The Volume
Adjusting the volume Slide the Jog Lever to + or − while the menu is not displayed to adjust the volume. Checking the remaining battery power Press and quickly release the button (within 1 second). The lamp blinks in orange, showing the battery status. -
Page 5: Using The Menu
Using the Menu Navigating the Menu Learn how to navigate through the menu here. Press the jog lever while at the ENTER position. The menu is projected. Slide the jog lever to + or − to move to the next or previous menu item. Press the jog lever while at the ENTER position with the desired menu item highlighted. - Page 6 Values to choose from Slide the jog lever to + or − to move to the next or previous value, then press the lever while at the ENTER position with the desired value highlighted. Submenu Slide the jog lever to + or − to move to the next or previous submenu item, then press the lever while at the ENTER position with the desired item highlighted.
- Page 7 Adjustment bar Slide the jog lever to + or − to change the value shown in the bar, then press the lever while at the ENTER position to confirm. To exit the menu Press and hold the jog lever for about 2 seconds while at the ENTER position.
-
Page 8: Description Of The Menu Items
Description of the Menu Items Close Exits the menu. Input change Selects an input source from HDMI/MHL and screen mirroring according to the connection method. Keystone When using the lens cover stand (supplied) on a flat surface, Keystone select [ Keystone Preset 1] or [ Keystone Preset 2] according to Preset 1/... - Page 9 V keystone Corrects vertical distortion. The value set here overwrites the selected preset value. H keystone Corrects horizontal distortion. The value set here overwrites the selected preset value. Flips the image horizontally. Use Flip (left-right) this mode for rear projection. To flip the image back to normal, select this menu again.
- Page 10 Picture setting Dynamic Enhances picture contrast and sharpness. mode * Other items of the Picture setting are not available while [ Dynamic mode] is selected. Contrast Adjusts the contrast of the projected image. Adjusts the color tones. Saturation Adjusts the color intensity. Bluetooth function Bluetooth Turns on/off the Bluetooth function.
- Page 11 Lip sync Syncs with sound. When sound synchronization problems occur, ON/OFF use the lip-sync function. Depending on the specifications of your speaker, headphones, or device, a sound synchronization problem may occur even if the lip-sync function is ON. * You cannot change the [ Lip sync ON/OFF] setting when the Bluetooth function is OFF or while the Bluetooth device is connected.
- Page 12 Software Updates the software of the projector when there is a software update update available. Visit the website at http://www.sony.net/ SonyInfo/Support/ for details. Information Displays the Help guide (this document) and other important information.
-
Page 13: On-Screen Keyboard
On-Screen Keyboard abcd Close Change Key The keyboard is displayed on the screen when the Change Key text box is selected in the [Device name] screen or the password entry screen. Slide the jog lever to + or – to move through the keys, then press the lever with space the desired key highlighted. - Page 14 Clears the text field. <--/--> Moves the cursor left or right. Deletes characters to the left of the cursor. Deletes characters to the right of the cursor. Done Saves the input text and closes the on-screen keyboard.
-
Page 15: Connecting Via Screen Mirroring
Input change] - [ Screen mirroring] in the menu of the projector. With your device capable of screen mirroring search for connectable devices. A list of connectable devices is displayed. Tap the Device name of the projector (MP-CL1A) in the list. - Page 16 Select [ Return] - [ ] to exit the menu. The screen of the device capable of screen mirroring is projected. Operate the device to select the content that you want to project. Note • The operation for searching for the projector using the screen mirroring function differs depending on the device.
-
Page 17: Connecting Via Hdmi Cable
Connecting via HDMI Cable Connect the projector with an HDMI-compatible device such as a computer, PlayStation or video device, then project its content. Connect the projector and the HDMI- compatible device using an HDMI cable (sold separately). Select [ Input change] - [ HDMI/MHL] in the menu of the projector. - Page 18 Connecting via MHL Connect the projector with an MHL-compatible device such as a smartphone or tablet, then project its content. Connect the projector and the MHL- compatible device using an MHL cable (sold separately). Select [ Input change] - [ HDMI/MHL] in the menu of the projector.
- Page 19 Note • To supply power to the connected device during an MHL connection, connect the projector to a wall outlet to charge with the USB cable (supplied) and a USB power adapter (sold separately). Note, however, that the remaining battery power of the projector may decrease even while charging depending on the connected device.
-
Page 20: Alignment Settings
Alignment Settings Optical Alignment Adjust the horizontal/vertical alignment of the color items to obtain a clear image. If colored lines are seen beside the crossed lines in the [Optical alignment] screen, the color items corresponding to those colors need to be adjusted. Select [ Setup] - [ Optical alignment]. - Page 21 Select the adjustment item ( Select [Adjust All], to adjust all colors. Select [Adjust Red], [Adjust Green], [Adjust R & G], or [Adjust R & B] to adjust colors individually. Adjust the horizontal/vertical position of the selected color item. Slide the jog lever to + or −...
- Page 22 To revert to the most recently saved values Select [Cancel] ( To revert to the default values Select [Initialize] (...
- Page 23 Biphase Alignment Adjust the synchronization timing of the input signals if the projected image is flickering or blurred. If the three white vertical lines at the center of the [Biphase alignment] screen look blurred, you need to perform the following procedures. Select [ Setup] - [ Biphase alignment].
- Page 24 Select [Close] ( The [Biphase alignment] screen closes. To revert to the most recently saved value Select [Cancel] ( To revert to the default values Select [Initialize] (...
-
Page 25: Troubleshooting
Troubleshooting Operation The projector does not charge. • The USB OUT jack can only be used to supply power to other devices, and it cannot be used to charge the projector. Be sure to use the Micro USB jack to charge the projector. - Page 26 lamp blinks in red while charging another device via the USB OUT jack. • The USB cable (supplied) may not be connected correctly. Disconnect it and reconnect. • The specifications of the connected device may not meet the requirements. Check the charging specifications of the device. Picture The image is flickering or blurred.
- Page 27 The projected image is unclear. • Go to the [ Optical alignment] and/or [ Biphase alignment] menu and perform adjustment. The image is too dark. • Adjust [ Contrast] and [ Saturation] in the [ Picture setting] menu. The color does not look appropriate. •...
- Page 28 • The Wi-Fi function of the device capable of screen mirroring may need to be turned off when using the screen mirroring function. Refer to the manual of your device for details. If the problem still persists after performing the suggested remedies, contact your nearest Sony dealer.
- Page 29 Important Information Notes on use • The USB OUT jack of the projector is for output only. Do not connect the projector to a USB jack of a computer or other device. Doing so may cause malfunction. • If the lens is not clean, wipe it with a soft cloth such as eyeglass cleaner cloth. •...
Need help?
Do you have a question about the MP-CL1A and is the answer not in the manual?
Questions and answers