Table of Contents
Advertisement
Advertisement
Table of Contents

Related Manuals for REMOVU S1

Summary of Contents for REMOVU S1
- Page 1 USER MANUAL V 1.0 Smartest Gimbal Stabilizer for GoPro ®...
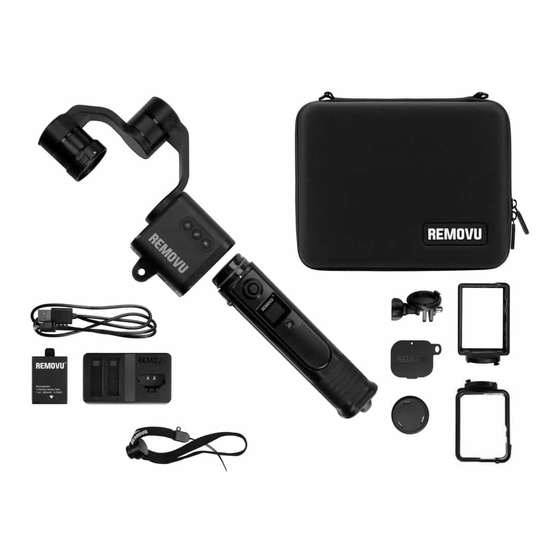
- Page 2 ENGLISH 1. Contents Please make sure your package includes all of the following items. S1 Gimbal × 1 S1 Handle + Frame Housing × 1 Remote Control × 1 (for HERO3, 3+, 4) Rainproof Housing × 1 Rainproof Extension Mount for Session × 1 (for HERO3, 3+, 4) Backdoor ×...
-
Page 3: Part Names
2. Parts Part Names Power Button OLED Display Status Indicator 5-way Directional Keys OLED Display Roll Motor Handle Detachable Switch Mode Button Pan Motor Tilt Motor Remote Control Pairing Button Power Button Camera Detachable Switch Micro USB Port Ring for writst strap Battery Cover Battery Cover Switch Joint Cradle... - Page 4 While pushing down on the handle’s detach- the handle. Align the white dot on the handle able switch, turn the handle counter-clockwise. with the white dot on the S1 and then turn the handle clockwise until the handle is locked. How to remove the Remote Control Firmly press on the bottom of the remote control until the remote control pops up from the handle.
-
Page 5: How To Use The Charger
- Green LED: Battery is Fully Charged - Red LED: Battery is charging Battery Chambers Micro USB Port (DC-IN) Note: Recommended use with a 5V/2A adaptor. If you use adaptor that is less than 5V/2A, please charge only one S1 battery. -
Page 6: Getting Started
There are white dots located on the S1 gimbal and the housing. Align the white dot on the housing with the white dot on the S1 gimbal and then turn the housing clockwise until it is locked into place. Frame Housing... -
Page 7: Step 4. Powering On And Off
Step 3. Insert Battery into S1 Slide the Lock switch to the open position and open the lid. After inserting the battery, close the lid and slide the Lock switch to the close position. Step 4. Powering On and Off... -
Page 8: Lock Mode
4. Gimbal Mode Tilt axis Pan Mode Pan axis Tilt and Roll are fixed and camera is permitted to pan left or right. Tilt axis Follow Mode Camera is permitted to pan left or right and tilt up Pan axis and down, while Roll is fixed. - Page 9 2. In order to get the best performance, please attach the balance weight cap on the tilt motor. Note: If using S1 without the weight balance cap, it have effect on operating and usage time. Please check that weight balance cap is firmly attached to the S1 before oper- ating the gimbal.
-
Page 10: How To Use The Remote Control
The remote control can now be used with the gimbal. Note: You only need to follow the steps above once. Afterwards, the S1 and remote control will connect automatically. - Page 11 6. Calibration of Gimbal Please do calibration when the S1 is not working as horizontal by unbalanced of roll and tilt while using the S1. 1. Detach the joint-cradle from the gimbal. 2. Place the GoPro camera into frame housing and attach frame housing to the gimbal.
- Page 12 7. How to use Low Angle When using Pan Mode: When using Follow Mode: In Pan Mode, the camera will automatically In follow mode, the camera will automatically position left and right. The Tilt and Roll posi- adjust its position as it is inverted. tions are fixed, therefore the camera will be pointing at the gimbal’s motor.
-
Page 13: Firmware Upgrade
8. Firmware Upgrade Please visit our website at www.removu.com/s1_firmware. The detailed upgrade instructions can also be found on the page. 9. Technical Specs Gimbal Operating Voltage (DC) 6.4V ~ 8.4V Weight 380g (housing and battery excluded) Vertical Tilt Angle 292°... -
Page 14: Warranty Information
- Replacement can be requested within 14 days of delivery date (subject to actual date the product was received) Please contact REMOVU Support Team or the authorized distributor of REMOVU from whom you purchased your product for more details. If you request refund or replacement to Essel-T directly, you will be required to fill out a Repair Form which should be sent to us with the defective unit. - Page 15 Warranty Service Essel-T Co., LTD. ("Essel-T") warrants that Essel-T’s devices and accessories ("Products") are free from defects in materi- al and workmanship under normal use and service for the period commencing upon the date of purchase by the first consumer purchaser and continuing for 1 year period of time after that date. If the problem is not covered under the Essel-T Warranty Service, you may have to pay for the cost of return delivery and testing the product.
- Page 16 Made for GoPro HERO Cameras ® Copyright 2016 Essel-T Co., Ltd. All rights reserved. REMOVU is a trademark of Essel-T Co., Ltd. registered in the U.S. and other countries. ® GoPro is a trademark of GoPro Inc. registered in the U.S. and other countries.
Need help?
Do you have a question about the S1 and is the answer not in the manual?
Questions and answers