Table of Contents
Advertisement
Quick Links
Advertisement
Table of Contents

Related Manuals for PAE T6M

Summary of Contents for PAE T6M
-
Page 1: User Guide
T6M Mobile Transceiver User Guide Handbook Part Number: 31-36000TRM... - Page 2 Handbook Title: T6M Mobile Transceiver User Guide Handbook Part Number: 31-36000TRM Issue Number: Date of Issue: February 2001 Published By: Park Air Electronics Northfields Market Deeping Peterborough England Telephone: From UK, 01778 345434 From outside UK, 44 1778 345434 Fax:...
-
Page 3: Safety
If you experience ringing in your ears, reduce the volume level, or discontinue use. The Power Amplifier Module used in the T6M mobile transceiver contains beryllium oxide, which is extremely toxic. No instructions within this user guide remove any of the transceiver's covers so users are not exposed to a potential beryllium hazard. -
Page 4: Federal Communications Commission (Fcc) Regulations
The mobile transceiver's frequency and parameters should be checked by authorized service personnel before use, and at least yearly thereafter. Changes or modifications to the T6M transceiver that are not expressly approved by Park Air Electronics could void your authority to operate the transceiver. -
Page 5: Foreword
Foreword This user guide describes the purpose, installation, and operation of the Park Air Electronics (PAE) T6M mobile transceiver. Read all instructions given in this user guide before operating the transceiver. Trademarks The following trademarks are used in this user guide. -
Page 6: Table Of Contents
CONTENTS SAFETY Federal Communications Commission (FCC) Regulations Foreword Trademarks Section 1 - Overview About this User Guide Introduction to the T6M Mobile Transceiver Operating Modes Normal Mode Priority Mode Scan Mode Programming the Transceiver's Personality Section 2 - Specification General... - Page 7 Switching and Adjusting the Squelch Facility Operating the Radio in Priority Mode Selecting Priority Mode Selecting a Priority Channel Frequency Transmitting and Receiving Operating the Radio in Scan Mode Selecting Scan Mode Selecting a Scan Group Transmitting and Receiving T6M User Guide Page 7...
- Page 8 Creating a New Personality Saving a Personality Opening a Saved Personality Loading a Personality into the Radio Reading a Personality from the Radio Printing a Personality Report Section 6 - Spares Introduction List of Spares T6M User Guide Page 8...
-
Page 9: Section 1 - Overview
About this User Guide This user guide describes the purpose, installation, and operation of the Park Air Electronics (PAE) T6M mobile transceiver. How to programme the required channel frequencies and operating modes using the optional programming kit is also fully described. -
Page 10: Priority Mode
VHF aeronautical frequency band. No frequencies are allocated to the Priority list, and no scan groups are set. A programming kit is available from PAE. This allows a new personality to be programmed into the radio at any time. -
Page 11: Section 2 - Specification
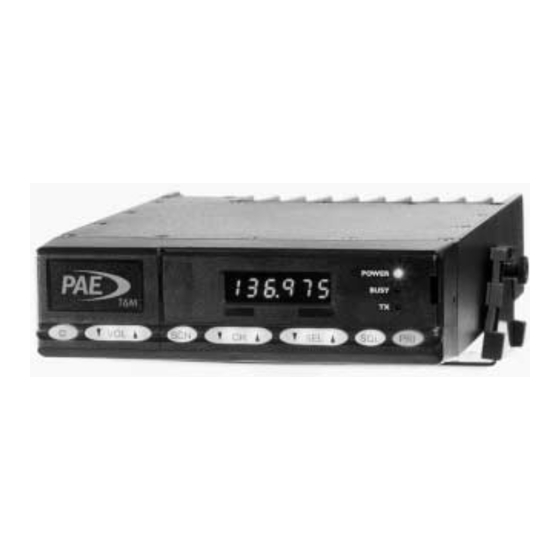
Section 2 - Specification Section 2 gives the specification of the T6M mobile transceiver. General The general parameters of the T6M mobile transceiver are listed below. Operation Simplex VHF AM transmit and receive. Operating modes Normal, priority, and scan. Channel bandwidth 25 kHz and 8.33 kHz. -
Page 12: Dimensions And Weight
Nominal RF output power Adjustable between 5 and 12 W. Normally set at 8 W. Spurious <-46 dBm when more than 1 MHz from the carrier. Harmonic outputs <-36 dBm. Distortion <5% THD. RF load impedance 50 ohms. T6M User Guide Page 12... -
Page 13: Section 3 - Installation
Section 3 - Installation Section 3 gives the instructions necessary to install the T6M mobile transceiver into your vehicle. Introduction The mobile transceiver is designed to operate from a 13.2 V dc (12 V nominal) negative ground electrical system. This type of electrical system has the negative battery terminal connected directly to the vehicle chassis. -
Page 14: Unpacking
Unpacking Unpack the consignment and check the contents. The following items should be included: (1) T6M mobile transceiver (quantity 1). (2) Installation kit comprising, Mounting bracket for the transceiver (quantity 1). Loudspeaker (quantity 1). Microphone (quantity 1). Microphone rest (quantity 1). -
Page 15: Installing The Transceiver
This is illustrated on the next page. Note the orientation of the rubber grips that are fitted at each side of the radio. T6M User Guide Page 15... -
Page 16: Installing The Microphone
Installing the Loudspeaker Install the loudspeaker where it can be easily heard, using the mounting bracket and screws provided. The loudspeaker is connected after the power lead has been installed. T6M User Guide Page 16... -
Page 17: Power Cable Installation
The fuse holder is fitted as shown in the illustration on the next page, and as follows: T6M User Guide Page 17... - Page 18 When the vehicle's ignition is switched off, the radio remains on for two hours before switching itself off. The radio can, however, be manually switched off during the two hour period by pressing the PWR button. T6M User Guide Page 18...
-
Page 19: Installing The Antenna
Mounting at the front of a sunroof can cause annoyance due to wind noise from the antenna when the sunroof is opened. T6M User Guide Page 19... -
Page 20: Fitting The Antenna To Fibreglass Vehicles
Alternatively two ‘crossed’ aluminum strips can be used. Again the distance from the antenna mounting point to the end of each strip must be at least a quarter of a wavelength. T6M User Guide Page 20... -
Page 21: Serviceability Check
Other electronic devices fitted to the vehicle, such as radio/cassette player or cellular telephone, should also be checked. Check that these systems still operate correctly when the radio is transmitting. T6M User Guide Page 21... - Page 22 Intentionally Blank T6M User Guide Page 22...
-
Page 23: Section 4 - Operating Instructions
Section 4 - Operating Instructions This section gives the instructions for operating the T6M mobile transceiver after it has been correctly installed. Users should note that the facilities available to an operator depend on how the radio's personality has been configured. -
Page 24: Programmable Options
Key Beeps This option, when programmed, produces a single beep whenever a button is pressed on the radio's front panel. The volume of the beep is the same as the Warning beep. T6M User Guide Page 24... -
Page 25: Transmit Inhibit
The display conforms to ICAO convention for 8.33 kHz operation. Note that operation using 8.33 kHz channel spacing within the USA is not currently allowed under FCC regulations. T6M User Guide Page 25... - Page 26 118.1583 MHz 8.33 kHz 118.160 MHz 118.1666 MHz 8.33 kHz 118.165 MHz 118.1750 MHz 25 kHz 118.175 MHz 118.1750 MHz 8.33 kHz 118.180 MHz 118.1833 MHz 8.33 kHz 118.185 MHz 118.1916 MHz 8.33 kHz 118.190 MHz T6M User Guide Page 26...
-
Page 27: Fault And Error Codes
If the fault persists, the failure transceiver should be replaced with a serviceable spare. The faulty unit should be returned to PAE, or your authorized agent. An internal fault on the power amplifier has been detected. -
Page 28: Switching On And Off (Ignition Sense Not Connected)
The radio can, however, be manually switched off during the two hour period by pressing the PWR button until the display reads ‘Off’. Before operating the transceiver, users must be conversant with the safety warnings given on page 3. T6M User Guide Page 28... -
Page 29: Operating The Radio In Normal Mode
During normal use of the radio the squelch facility should be switched on. After initially setting the squelch level, there should be no reason to adjust it unless a problem is evident. The symptoms of an incorrectly adjusted squelch level are: T6M User Guide Page 29... - Page 30 (4) After the required setting is selected, press no more buttons and check that after a few seconds the display changes to show the currently selected channel frequency. The squelch facility is now set. T6M User Guide Page 30...
-
Page 31: Operating The Radio In Priority Mode
Reception is heard through the loudspeaker. The volume is adjusted using the VOLs and VOLt buttons. When a signal is received, the radio's busy indicator lights. If the squelch facility requires adjusting, refer to ‘To Adjust the Squelch Level’ on page 30. T6M User Guide Page 31... -
Page 32: Operating The Radio In Scan Mode
VOLt buttons. When a signal is received, the radio's busy indicator lights. If the squelch facility requires adjusting, refer to ‘To Adjust the Squelch Level’ on page 30. The squelch cannot be switched off in scan mode. T6M User Guide Page 32... -
Page 33: Section 5 - Programming The Radio
This section describes how a personality is compiled and then downloaded into the radio's internal memory. Introduction During manufacture, the T6M transceiver is programmed with a default personality, or with a personality as per the user's requirements. Note … A personality is the programme that defines the radio's channel frequencies, operating modes, and other options. - Page 34 760 to 400. Squelch must be open for this time before a Busy on time 0.1 to 5 seconds 0.5 seconds channel is considered to be busy. T6M User Guide Page 34...
- Page 35 Inhibit if busy particular channel frequency. 46 character A free format text string Identification alphanumeric Empty string that describes the string string channel frequency. Must disabled Enabled or Base Disabled correct operation of the disabled transceiver. T6M User Guide Page 35...
-
Page 36: Programmable Options
Key Beeps This option, when enabled, produces a single beep whenever a button is pressed on the radio's front panel. The volume of the beep is the same as the Warning beep. T6M User Guide Page 36... -
Page 37: Hold On Scan
(or PC) to the radio using the programming lead. To create a new personality: (1) At the laptop (or PC) run the PAE programmer software. Check that the General page (see page 38) is displayed. If the Frequencies page is displayed, select the General tab. - Page 38 If the Use Channel Strings facility is selected, the maximum number of channel frequencies that can be stored is reduced from 760 to 400. Descriptive text is shown on the frequency list within this programme; it is not displayed at the radio. T6M User Guide Page 38...
- Page 39 (maximum of 46 characters). (16) When all fields on the General page are correctly configured, use the mouse and click on the Frequencies tab. Check that the Frequencies page is shown (see next page). T6M User Guide Page 39...
- Page 40 (between 1 and 15) in the scan group column. If the frequency is to be included in more that one scan group, enter the group numbers, separating each with a comma. Note that up to 15 frequencies can be included in each scan group. T6M User Guide Page 40...
- Page 41 (23) As an alternative to manually entering frequency channels, and when many channels must be entered, a range of frequencies can be entered. To do this, click on the Fill table box and check that the Add channels sub-page is displayed. Add Channels Sub-Page T6M User Guide Page 41...
-
Page 42: Saving A Personality
(4) If the save is successful, the file name appears at the top of the programming window. At any time, the personality can be edited and saved using the same filename. T6M User Guide Page 42... -
Page 43: Opening A Saved Personality
(3) Connect the other end of the programming lead to the laptop's (or PC's) Com port 1 or Com port 2. Note that the appropriate port is set in the personality. The connected port must match that stated in the personality. Check, and amend if necessary. T6M User Guide Page 43... -
Page 44: Printing A Personality Report
(3) A textual representation of the personality is displayed using the Windows Notepad programme. When Notepad displays the personality it can be saved as a text file, or printed. Previously saved Notepad files containing personalities can be retrieved by selecting Report, then Open from the menu-bar. T6M User Guide Page 44... -
Page 45: Section 6 - Spares
List of Spares The following spares are available from PAE. When ordering, the part number should always be quoted. Programming kit (includes CD-ROM, or floppy disk,and programming lead) Part No.
Need help?
Do you have a question about the T6M and is the answer not in the manual?
Questions and answers