
Related Manuals for SupaScoota HD-02

Summary of Contents for SupaScoota HD-02
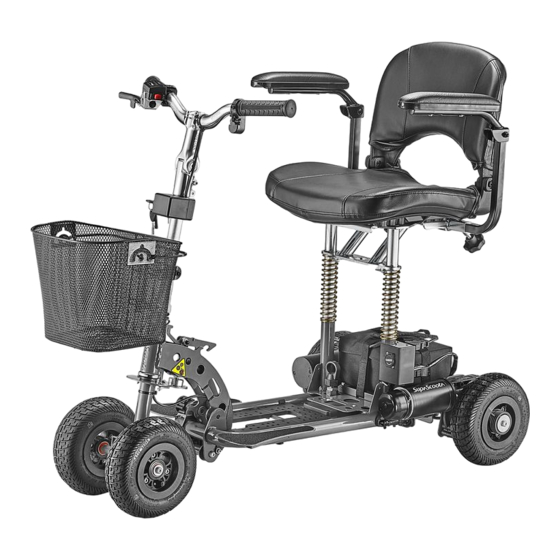
- Page 1 Motorized vehicle Heavy Duty (HD-02) MDSS GmbH Schiffgraben 41 30175 Hannover, Germany Distributor: User Manual You must read this manual before using your SupaScoota P/N: 903441HD02 Rev. 04/15...
-
Page 2: Table Of Contents
Folding the SupaScoota - - - - - - - - - - - - - - - - - - - - - - - - - -- -27 Battery and Charging- - - - - - - - - - - - - - - - - - - - - - - - - - - - - - 32... -
Page 3: Safety Symbols, Words And Labels
What You Need to Know About Safety Instructions ● Please read this manual before using your SupaScoota. ● Check the frame lock and all clamps before using your SupaScoota. Warning and Important Safety Instructions appearing in this manual ● Do not turn your Scooter “On” before you are seated ready to go. - Page 4 D. MOTOR VEHICLE SAFETY i. Never sit in this scooter while in a moving vehicle. In an accident or sudden stop you may be thrown from the scooter. A. ENVIRONMENTAL CONDITIONS WARNING: The scooter is not ii. Always move to an approved vehicle seat. You must be secured designed for use in a heavy rain storm, or in snowy or icy conditions.
-
Page 5: Electromagnetic Interference
ELECTROMAGNETIC INTERFERENCE i. Move your scooter as close as you can to the object you wish to reach. ii. Turn off all power to your scooter. If you fail to do so, you may I t i s v e r y i m p o r ta n t t h a t y o u r e a d t h i s touch the throttle control lever and cause your scooter to move i n f o r m a t i o n r e g a r d i n g t h e p o s s i b l e e f f e c ts o f when you do not expect it. - Page 6 ● Important Information Do not operate hand-held personal communication 1) 20 Volts per meter (V/m) is a generally achievable and useful immunity level against interference from radio wave sources (as of devices such as citizens band (CB) radios, or turn ON personal May 1994) (the higher the level, the greater the protection);...
-
Page 7: Assembling The Seat
(C) and turn it clockwise. Continue lifting the tiller until you hear the “click” of it locking into position. The armrests on your SupaScoota are not designed to be load bearing. DO NOT PUT EXCESSIVE WEIGHT ON THE ARMRESTS... - Page 8 Frame Assembly Assembly and disassembly is best carried out by pulling the locking ● Fit the seat on to the frame, inserting the seat frame tubes into the pin C and allowing the tiller assembly to fold forward until it corresponding holes on the main frame.
- Page 9 ● Tighten the screws ● Install the battery into the tray and fasten it securely. ● Fit the front basket ● Insert arm rest as per the illustration. - 15 – - 16 –...
-
Page 10: Anti-Tip Wheel
ANTI-TIP WHEEL Ensure that the anti-tip wheels are extended and locked in either position “Q” or “R” when driving on sloping ground. (As per illustration below) To change the lock position, just pull the knob “Q” and slide the tube to the preferred position. -
Page 11: Drive Wheel Release Mechanism
DRIVE WHEEL RELEASE MECHANISM LIGHTS AND SWITCHES ● This scooter is equipped with drive wheel release mechanism. Your SupaScoota can be moved manually after the drive wheels are released. Do not operate this device while on slope. To disengage the drive wheels Pull the drive collar (part “A”) out and... -
Page 12: Auto Switch Off Electronic System
● The electronic system of this scooter is protected by a digital over Keep fingers and clothing current cut-off system. If your SupaScoota stops, you will need to away from the Electronic Stability turn the main key switch to the “Off” position, and then switch to “On”... -
Page 13: Swivel Seat (Optional)
SWIVEL SEAT (OPTIONAL) SPARE BATTERY TRAY (OPTIONAL) When removing the seat, do not lift the turning release handle as this could cause the seat support frame to disconnect from the seat and Assemble the battery tray as illustrated. Insert the screws and tighten fall. -
Page 14: Front Wheel Removal (Optional)
Reassemble in the reverse order. ● Keep the shipping carton in dry place after unpacking your SupaScoota in case it needs to be shipped for service. ● This appliance is not intended for use by persons (including children) NOTE: Double check that the shaft "K" is locked in position with reduced physical, sensory or mental capabilities, or lack of before unfolding the frame and using the scooter. -
Page 15: Folding The Supascoota
● Remove front and rear baskets from scooter. FOLDING THE SUPASCOOTA ● Release screws and then remove the arm rests from scooter. ● Unplug the battery connector, undo the strap and remove the battery. 27 - - 28 -... - Page 16 Frame Disassembly Assembly and disassembly is best carried out by pulling the locking pin C and allowing the tiller assembly to fold forward until it rests on the ground. ● Remove the seat. ● Unplug all connectors. ● Pull the lock pin knob (V) and turn it to the “unlock” position, pull lock ●...
-
Page 17: Battery And Charging
BATTERY AND CHARGING ● When you get your new battery put it on charge for at least 24 hours. ● When recharging your battery, always charge for at least 12 hours or until the light on the charger turns green. It is best to charge for at least another hour after the light turns green. -
Page 18: Battery Charger (Sla Battery)
Travel distance from battery indicator & Cycles life Or remove the battery from scooter, and use the connection adaptor. Green Yellow Cycle life Items (Optional accessory) light light light (battery’s) Battery Type Do not place the battery on a concrete floor for charging. Raise the 12 Km 3.5 Km 24V SLA Battery... -
Page 19: Battery Care & Maintenance
Specifications BATTERY CARE & MAINTENANCE Number of Wheels Front Wheel Size 200mm (8”) Rear Wheel Size 200mm (8”) Important notes to help prolong the life of the battery: 60mm (2.4”) Ground Clearance (tiller) • Before the first use of your battery, put it on charge for 24 hours. Length 1010mm (40”) •... - Page 20 SupaScoota Warranty I / we acknowledge that the SupaScoota has been delivered in good order and operating condition and that I / we have been instructed in the care and maintenance, safe operation and proper use of the unit. Your SupaScoota is fully guaranteed against faults arising due to...
Need help?
Do you have a question about the HD-02 and is the answer not in the manual?
Questions and answers
What is code ESC L1