Table of Contents
Advertisement
Advertisement
Table of Contents

Related Manuals for Excito B3


Summary of Contents for Excito B3
- Page 1 Usermanual...
-
Page 2: Table Of Contents
Congratulations 6 Consider the Environment 6 Safety Precautions Network Setup Options Router + Firewall + Server mode Server mode 7 Scenario 1 Scenario 2 Scenario 3 Scenario 4 Scenario 5 Scenario 6 Scenario 7 Features Getting to know your B3 Front side Back side 18 Inside Installation 19 A few tips! Setup wizard DHCP setup on your PC 23 Administration 26 Administrator log in 26 Status Users Services 32 Email Network 35 Disk 4 2... - Page 3 Filemanager 52 Music Photo album 54 Downloads Webmail 55 User settings 56 B3 as router and firewall NAT 58 Firewall 58 Allow external (WAN) access to B3 services Port forward 59 B3 as wireless accesspoint 60 Configure the wireless access point 61 WiFi Glossary 63 Download manager 65 Using the download manager 65 How to download 65 File server 67 Windows Explorer (Samba) Mac OS X 10.6 68 Web based file manager 70 Using the FTP server 73 AFP 73 Media servers...
- Page 4 Where do I find my pictures? RAID 96 Create RAID array RAID status Recover RAID array 100 Remove RAID 103 LVM - Extended disk 104 LVM Status Remove Extended disk (LVM) 106 Backup Backup your B3 Restore files from a backup job 112 Backup from your PC to B3 PIM 126 External storage 127 Connecting Format an external disk 128 Unplugging Reaching B3 from outside 131 Using B3 as Router + Firewall + Server Easyfind - personal domain name External IP address 132 Using another firewall / gateway than B3 133 Software update 134 Hotfixes 135 Installing & reinstalling software 137...
- Page 5 Contents Standard installation Rescue system 139 Front LED information Customizing B3 - SW & HW 141 SSH - with root login 1 41 Installing other applications Installing a disk Technical data Support GPL Statement 147 Limited warranty...
-
Page 6: Congratulations
Congratulations ongratulations Congratulations on your purchase of B3. All you want from a full-size PC you get from our mini-sized B3, designed to fit your home better than an always running PC. With B3 you get a product in a small form factor but still fully featured. B3 protects our network for a safer home network. onsider the nvironment Do you really need to print this manual? afety reCautions Please read the following information before continuing. • To prevent loss of data or malfunction, always shut down B3 properly. To shut down, keep the button pressed for five seconds. The front light will blink while shutting down, and turn off when B3 is ready to be disconnect- • Never remove the power cord while the LED on front is lit or blinking! • Do not drop your B3 or expose it to other kinds of sudden mechanical shocks as this may result in data loss and damage to the hard drive. • Keep liquids away from your B3. • Do not use your B3 in a dusty environment. • Do not use your B3 in ambient temperatures out of the range 10°C and 30°C. • If your B3 is moved from a cool environment to a warmer environment, please allow the drive to acclimatize to the ambient temperature before operating the device. • Only use the power adapter that was supplied with your B3. Rev 1.2... -
Page 7: Network Setup Options
NetworkSetupOptions etwork etuP Ptions A Local Area Network (LAN) can look very different from place to place. To make it smooth and simple for you to get an idea of how to connect your B3 into your home LAN, take a look at the following scenario pictures. You might not have the exact same setup as in the scenarios below but feel free to combine and configure to make it fit your needs and requirements. outer irewall erver mode In this connection setup B3 is placed as the first device in your home network (LAN). Note that B3 does not include a DSL modem. If your old router has a built in DSL modem you can not replace that router with B3. If this is the case, connect B3 as a server in your network. If you have a separate DSL modem, connect a LAN cable from the DSL modem and the other end to the WAN port on B3. If you have a Ethernet wall outlet (RJ45), connect this directly to the WAN port on B3. erver mode Use this connection setup if you have another router that you wish to use. Connect B3s LAN port to your already existing LAN. -
Page 8: Scenario
NetworkSetupOptions Cenario B3 serves as router + firewall + server. Only one computer in your LAN, con- nected via cable. -
Page 9: Scenario 2
NetworkSetupOptions Cenario B3 serves as router + firewall + server. One or more computers in your LAN, connected wireless via WiFi. This scenario requires you to have the wireless B3. -
Page 10: Scenario
NetworkSetupOptions Cenario You prefer using your old firewall and router. B3 serves only as server. Connect B3’s LAN port to one of your router LAN ports. Leave B3’s WAN port unconnect-... -
Page 11: Scenario
NetworkSetupOptions Cenario B3 serves as router + firewall + server. You want to connect more than one network device in your LAN via cable or WiFi. Use a switch to split up your LAN connection. This scenario requires you to have the wireless B3. -
Page 12: Scenario
NetworkSetupOptions Cenario B3 serves as router + firewall + server. You want to connect more than one net- work device in your LAN via cable or WiFi and you have an old router with wire- less access point. Connect B3’s LAN port to one of your router LAN ports. You may also use your old router as an switch, connecting network devices (such as computers or media players) to its other LAN ports. Remember to disable an existing DHCP server in your OLD router. -
Page 13: Scenario
NetworkSetupOptions Cenario B3 serves as router + firewall + server. Almost same configuration as in sce- nario 5 but using a switch for your network devices with cable. Remember to disable an existing DHCP server in your OLD router. -
Page 14: Scenario
NetworkSetupOptions Cenario B3 serves as router + firewall + server. You have only one computer using a ca- ble in your LAN and several wireless devices. This scenario requires you to have the wireless B3. -
Page 15: Features
Features eatures B3 is a miniature server, primarily for use at home or in a small business. None- theless, B3 is loaded with functionality, which makes it very versatile: • Just store your photos on B3 and make them available for others with a few clicks. • Torrent downloader: Turn off your computer and relax! Let B3 download your large files instead of leaving your PC on all the time. B3 also handles HTTP and FTP downloads. • File server: Allows you to access all your files from work or school at all times. Time to live life smarter and forget about USB memories and other portable media. • Streaming media servers: Put your MP3 collection in the ‘music’ folder on B3, and all your music will instantly be available to all iTunes compatible (DAAP), or DLNA compatible players. Squeezebox Server for streaming to Logitech Squeezebox. • Router: Use B3 as a router and firewall for maximum security. • Wireless access point: High wireless speed in B3 with 802.11n makes your wireless clients perform their best. • Web, eMail and FTP server: Fully featured server functionality allows you to turn off your PC. • Central eMail server: B3 can retrieve your eMail from various accounts, col- lecting them in one place. Check all your eMail at one place, via B3’s web- mail or IMAP server. • PIM: With calendar, address book, notes and webmail. • Print server: Plug your USB printer in to B3, and share it to all your home computers. • Easy to use: All pre-installed functionality is controlled with a very easy to use web interface. You do not need to install anything on your host compu- ter. - Page 16 Features is essentially a standard Linux computer, but with the advantages of being silent and small. Choose from 10000+ Linux Debian applications and config- ure B3 to do whatever you want. SSH access with full system access is pro- vided. • Integrated backup solution: B3 has an integrated backup function that ena- bles you to make backup of your important files stored on B3. • Tiny case: A small, easily placed aluminium case, measuring only 11.5 x 4.5 x 18.5 cm (4.5 x 1.8 x 7 in), small as a pocket book. Painted with a thin layer of black rubber and with a dim blue LED, the design easily blends in with any environment. • Silent cooling: An innovative solid aluminium case cools the hard drive ef- ficiently, without the need for fans. Combined with the low power electron- ics, fully passive cooling is possible - without compromising the server’s longevity. • Environmentally friendly: Compared to a always-on standard server PC, B3 uses 90-95% less energy. This also means that you save money, actually, B3 saves you about 100 Euro every year just on the electricity bill, compared to having an always-on standard PC.
-
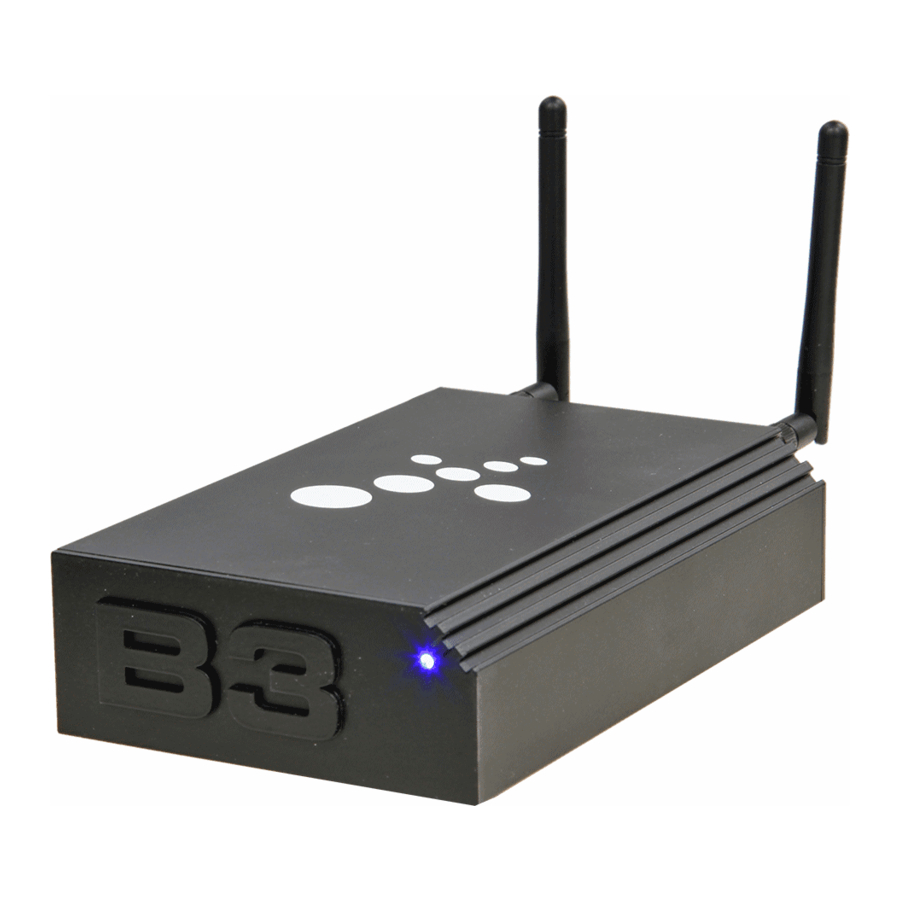
Page 17: Getting To Know Your B3
GettingtoknowyourB3 etting to know your ront side The front LED indicates B3’s status: Steady blue light - B3 is up and running. No light - B3 is powered off. Purple - B3 is booting up or shutting down. Green - system installation in progress. Red - system message, broken RAID for example. -
Page 18: Back Side
GettingtoknowyourB3 aCk side 1. Power on / off button. 2. WAN and LAN ethernet connectors. The green LEDs to the right on respec- tive connector indicates a 1GBit connection, the yellow LEDs to the left indi- cates a 100MBit connection. 3. 2 x USB host port type A. 4. 1 x eSATA. 5. Slot for Kensington lock. 6. 12 V (@3A) power jack. nside Your B3’s hard drive has 3 partitions: System partition, Data partition and Swap partition. It is totally normal that you do not see the total disk size (i.e. 40GB, 500GB, 1TB or 2TB) available in the web interface as the System partition and the Swap partition takes some of the space. -
Page 19: Installation
Installation nstallation There are two ways of using your B3. • Router + Firewall + Server mode (recommended) • Server mode Your B3 has an auto detect function on the LAN port. This means that B3 will search the LAN for an DHCP server. If a DHCP server is found, B3 will configure itself to obtain an IP address on the LAN port. If no DHCP server is found, B3 will fall back to the static IP address 192.168.10.1. B3 will obtain an IP address automatically on the WAN port. 1. Decide whether you want B3 to be lying down or standing upright. Assem- ble the rubber feet accordingly. 2. Use the enclosed network cable and connect it between B3’s LAN port and your network, either directly to your computer or to a switch or router. Also if using B3 as a router connect B3’s WAN port to your Internet connection or DSL modem. Router + firewall + server Server mode mode Media player Media player Router DSL modem or other DSL modem or other Internet connection Internet connection 3. Connect the power brick to a wall outlet and to B3. 4. After about 1 minute when the blue lamp on B3’s front is constantly lit blue B3 is powered up. 5. Start an Internet browser on your computer and type http://b3 in the ad- dress field. If you are using Mac or Linux type http://b3.local instead. -
Page 20: A Few Tips
Installation 6. A dialogue box where you are prompted for password will pop up. Log in using the password admin. 7. Follow the Setup wizard. It is recommended to create a user for every per- son who will use B3. Your B3 is now ready for use! few tiPs • It is strongly suggested that the admin password is changed. Read about how to change the password in chapter “Users” on page 30. • Perform a software update to ensure that your B3 runs the latest software: Click ‘Settings’ and ‘Software update’ , then press ‘Update system’ . • You should not use the admin account as your personal account. • If you need support on activating “Obtain an IP address automatically” (DHCP) on your PC read the section “DHCP setup on your PC”. -
Page 21: Setup Wizard
Setupwizard etuP wizard Use the integrated Setup wizard to make the very first important settings on your B3 such as language, time and date, add users and make network set- tings. You can run the wizard at any time later on as well to do this setup. 1. Step 1 - Select default language. B3s user interface will be shown in the cho- sen language. Click ‘Next’ to continue. 2. Step 2 - Date and time. Choose time zone and the date and time. You also have the possibility to use an Internet time server. By doing this the date and time is automatically set and updated and you do not have to do any manual time settings. Click ‘Next’ to continue. - Page 22 Setupwizard 3. Step 3 - Create a user, or as many as you desire. Click ‘Add user’ after filling in the user information. Click ‘Next’ to continue. 4. Step 4 - Network setup. If you would like to register for an free personal Easyfind name, activate it here. You will reach your B3 browsing Internet to http://<your-Easyfind-name>.myownb3.com. Read about Easy find in chap- ter “Easyfind - personal domain name” on page 131. Click ‘Next’ to continue. Setup complete. Click ‘Finish setup’ to exit the wizard.
-
Page 23: Dhcp Setup On Your Pc
Setupwizard dhCP setuP on your 7, v , XP, 2000, me iCrosoft indows ista Change your PC to obtain an IP address automatically by following these in- structions: 1. Open Windows Start menu. 2. Open Control Panel. 3. Classic view: Open Network Connections. Category view: Select Network and Internet Connections, and then Network Connections. 4. Double-click on your active LAN or Internet connection. 5. Click Properties. This opens the Local Area Connections Properties window. 6. In the General tab, highlight the Internet Protocol (TCP/IP) item, and click Properties. This opens the Internet Protocol (TCP/IP) Properties window. 7. In the General tab, write down your old IP address, Subnet mask and default gateway. - Page 24 Setupwizard 8. Click “Obtain an IP address automatically” 9. Click OK. 10. Click OK to close each window 11. Restart your computer if asked for.
- Page 25 Setupwizard Change your Mac to obtain an IP address automatically by following these instructions: MacOS8.6or9.x 1. From the Apple menu: select Control Panels then TCP/IP. 2. From the “Connect via” box, select your Macs ethernet interface. 3. From the “Configure” box, select “Using DHCP Server”. Leave the DHCP Client ID box empty. 4. Close the TCP/IP Control Panel. MacOSX 1. From the Apple menu: choose System Preferences then Network. 2. If not already selected: select Built-in Ethernet in the Configure list. 3. If not already selected: select Using DHCP in the TCP/IP tab. 4. Save your changes. inuX To change your Linux PC to obtain an IP address automatically is done differ- ently depending on what Linux distribution you have; please consult the ap- propriate documentation on how to do this.
-
Page 26: Administration
Administration dministration Logging in as the administrator you get certain privileges and access to the B3 settings. You should only use the administrator account when setting up your B3 and managing disks and backup jobs. Only admin can change B3’s settings and add new users. Also note that admin can not be removed. Admin do not have access to a download manager. Daily use should be with another added user. Please notice that administrator log in is by default disabled on the WAN port. To enable this change the Admin account settings by clicking ‘Edit user’ next to admin under the menu ‘Users’ . Read about it here in chapter “Specific adminis- trator setting” on page 31. The default username and password for the administrator account is: Username:admin Password:admin As a security measure, it is strongly recommended to change the admin pass- word. dministrator log in 1. Start an Internet browser on your computer and type http://b3 (http:// b3.local if using Mac). 2. Click the gear wheel in the upper right corner 3. Fill in the administrator log in name ‘admin’ and password ‘admin’ . 4. To change the administrator password, click ‘Users’ 5. Click ‘Edit‘ to the right of the administrator row. 6. Fill in a new password and press Update. -
Page 27: Status
Administration tatus This is the start page when logged in as administrator. Here you find information about the installed hard drive size and remaining disk space, B3 uptime and the installed software revision number. Clicking Software update will take you to the update page. Clicking the Power down button shuts down B3 in the same way as pressing the button on the backside of the unit. To start up again, press the button on the backside. The Restart button restarts B3. You will be able to reach the user interface and B3s services within about 2 minutes. When the front LED is solid blue B3 is ready to be used again. ile manager The page contains three folders: ‘Browse’ , ‘Backup’ and ‘Restore’ . Read more about using the filemanager in the chapter “File server” on page 67. rowse The Browse page shows files stored on B3. Here you are able to reach your files on B3 if you are away from home. Click files or folders and use the icons in the file function bar to perform different actions. The functions from left to right are:... - Page 28 Administration • Create folder • Upload file • Download as zip • Move files • Copy files • Rename • Change permissions • Add to album • Delete A friendly reminder, do not use the administrator login to manage your files. Log in with a standard user!
- Page 29 Administration aCkuP B3 has a integrated backup function. Backing up your important files with this feature gives you the security to always feel safe about not loosing anything that means a lot to you. Read more about using the backup feature in the chapter “Backup” on page 107. • Backup jobs - The backup jobs you have created. • Timeline - shows all executed backups. You are able to restore files from any of these.
-
Page 30: Users
Administration sers Clicking on Users in the top menu, you will see the following page. Read more about users in the chapter “Users” on page 51. Here you find all the registered users on your B3. dd new user Click to add a new user click “Add new user“. - Page 31 Administration dit user Click on ‘Edit’ to change user information. • Username - Changing the user name (login name) is not possible. To achieve this you will have to delete the user via the administrator login and add a new user with the correct name. • Real name - To add the user’s ‘Real name’; fill in the information here. • New password - The administrator can change every users password. Every user has the possibility to change their own password via their own log in. It is strongly suggested that the admin password is changed from the default password. • User language - Change the user interface language for the selected user. PeCifiC administrator setting Click “Edit” next to Administrator. Allow remote access to system settings - The default setting is to block remote access (from the WAN port) for the ‘admin’ account. To be able to administrate your B3 from outside (Internet) your network check this box.
-
Page 32: Services
Administration erviCes A Linux service is an application (or set of applications) that runs in the back- ground waiting to be used, or carrying out essential tasks. The Services menu provides menu items that let you administer certain serv- ices with either enable (the checkbox marked) or disable (the checkbox un- marked). • File sharing - Read more in chapter “File server” on page 67. ◦ FTP - The B3 FTP server. ◦ Anonymous FTP access - Allow users to log in to FTP server without a pass- word. ◦ AFP - The Apple Filing Protocol (AFP) is a network protocol that offers file services for Mac OS X and original Mac OS. ◦ Windows file share - Windows file share (Samba) is used to share files and printers in a Windows network. • Streaming - Read more in chapter “Media servers” on page 74. ◦ DLNA streaming - MiniDLNA server. The server shares/streams media data like audio/video/picture/files to DLNA-clients on the network. -
Page 33: Email
Administration ◦ DAAP streaming - Digital Audio Access Protocol (DAAP) server. Media serv- er for the Roku SoundBridge and iTunes. ◦ Squeezebox Server - is a streaming audio server supported by Logitech that streams music to the Squeezebox product line. • Email - Read more in chapter “Email server” on page 83. ◦ Send and receive - This is for postfix the SMTP server: Sending and receiv- ing eMails. ◦ Imap (Required for webmail access) - This is for dovecot the IMAP server. This service is required for the webmail access to be functional. ◦ Email retrieval - This is for fetchmail, a daemon that collects eMails to B3 • Other ◦ Printing - B3 print server. ◦ Up and downloads - possibility to up / download files on B3, i.e. fileman- ager and torrents. mail Read about the email configuration in chapter “Email server” on page 83 The Email page contains two folders: ‘Retrieve email’ and ‘Server settings’ . etrieve email If you set up B3 to fetch your Email from other external Email accounts you may have, they will be stored on B3 and available via IMAP or web email, wher- ever you are. Logged in as administrator you must select to which user the retrieved email should be directed, this must be done for every retrieved email account added. Prior to this you must have added a user. - Page 34 Administration Retrieve email from individual accounts - Shows your current accounts for email retrieval. “Add new email account” - Fill in the information given to you by your email ac- count provider. “Edit” - Change the account settings. erver settings Emailserver Outgoing email server (SMTP) - Leave fields empty to let B3 handle your out- going eMails. If your Internet Service Provider (ISP) blocks outgoing traffic on...
-
Page 35: Network
Administration port 25 you must use an alternative SMTP server than B3. Fill in the information provided to you by your ISP. Emaildomain If you have your own domain name it is possible to let B3 handle your incom- ing and outgoing Email. Enter your domain name here. You also have to direct the MX pointers of your domain to your external IP ad- dress. MX pointers specifies how email should be routed on Internet. Consult the name server provider of your domain regarding MX pointers. Now all mail sent to ‘your-B3-username@<your-domain>’ will end up on b3. etwork The network page contains five folders: ‘Profile’ , ‘WAN’ , ‘LAN’ , “Wireless” and ‘Fire- wall’ . rofile By running the Setup wizard (described in chapter “ Installation” on page 19) you choose a Network profile. To change profile later on you make your choice here. • Automatic network settings - B3 will by default automatically identify your network structure. First B3 tires to locate a DHCP server in your LAN. If no DHCP server is found B3 will use a fixed IP address (192.168.10.1) on the LAN... - Page 36 Administration port and start a DHCP server to provide other computers in the LAN with network information. If a DHCP server is found in the LAN, B3 will obtain IP- address automatically on the LAN port. B3 will also try to retrieve network settings on WAN port (Internet). Editing the WAN and LAN sections is not possible in this profile. • Router + Firewall + Server mode - B3 will use a fixed IP address (192.168.10.1) on the LAN port and start a DHCP server to provide other computers in the LAN with network information. B3 will also try to retrieve network settings on WAN port (Internet). It is possible to manually edit the network settings in this profile. • Server only - B3 will automatically try to retrieve network settings on LAN. The WAN port should be left unconnected. It is possible to manually edit the network settings in this profile. After editing the network settings you might need to reboot your computers and other network devices in your LAN. Update saves your changes. Here you configure how your B3 will handle your Wide Area Network (WAN) port. The default setting is to Obtain an IP address. • Obtain IP-address automatically (DHCP) - The Dynamic Host Configuration Protocol (DHCP) automates the assignment of IP address, Netmask, Default...
- Page 37 Administration gateway, and other IP parameters. Use this option if your Internet provider requires you to use DHCP. This is the default and most common option. • Use static IP address settings - Static IP address, Netmask, Default gateway and Primary DNS are manually assigned to B3 by the administrator. Use this option if your Internet provider requires you to manually enter the values. Please notice that the WAN settings are not editable in the profile ‘Automatic network settings’ , shown for information only. Update saves your changes. Here you configure how you reach your B3 from computers in your Local Area Network (LAN). Your B3 has an auto detect function on the LAN port. This means that when connected, B3 will search the LAN for an DHCP server. If a DHCP server is found, B3 will configure itself to obtain an IP address on the LAN port. If no DHCP server is found, B3 will fall back to the static IP address 192.168.10.1. • Obtain IP-address automatically - Use this option if you use another DHCP server than B3 in your LAN, for example a router or gateway. B3 will obtain an IP address automatically. • Use static IP address settings - Your B3 will be reached on this static IP ad-...
- Page 38 Administration dress in your LAN. The default fall back IP is : 192.168.10.1. ◦ Enable DNS service - The Domain Name System (DNS) translates domain names into IP addresses. When you type in a domain name, the DNS server translates the name into the corresponding IP address. ◦ Enable DHCP server - The DHCP server gives out IP addresses when a de- vice, connected into B3’s LAN port, is starting up and requests an IP ad- dress. The device must be set as a DHCP client to “Obtain IP address auto- matically”. ◦ Lease range - The DHCP address pool (Lease range) contains the range of the IP address that will automatically be assigned to the clients (for exam- ple computers, media players) on the network. • Enable Jumbo frames - This option enables transmissions of larger data chunks on the LAN interface. WARNING - this requires that all equipment on the LAN works in this environment. Use with caution. That said, this feature can improve performance on file transfers between B3 and Gigabit capable devices. • DHCP leases - Shows the current network devices in your LAN when having B3 as your router. If several network devices has the same hostname the last connected will be shown as a *. Please notice that the LAN settings are not editable in the profile ‘Automatic network settings’ , shown for information only. Update saves your changes.
- Page 39 Administration ireless B3 can act as your access point, both in ‘Router + Firewall + Server mode’ or in ‘Server mode’ . Read more about setting up the access point in chapter “B3 as wireless accesspoint” on page 60. • Wireless ◦ Enable wireless - Select this box to enable the wireless access point in B3. ◦ Network name (SSID) - This is the name that identifies a particular wireless network. The default name is your B3s host name. The SSID can be up to 32 characters long. ◦ Password - The password (aka pass phrase) is a set of characters that must be entered exactly the same in both your B3 and your network clients. En- ter the password in ASCII characters. The length must be between 8 to 63 for WPA and 5 or 13 characters for WEP. • Advanced wireless settings ◦ Band - Choose what frequency band to use. 802.11n operates at two fre- quencies: 5 GHz and 2.4 GHz. Only devices which operate in the same frequency band can communicate with one another. ◦ Mode - Select which 802.11 mode to operate in. Modes are as follows: ‘Legacy mode (802.11a/g)’ - up to 54 Mbit/s and ‘Mixed mode (802.11n + 802.11a/g)’ - up to 300 Mbit/s.
- Page 40 Administration ◦ Channel width - Maximum transfer rate for 20 MHz is 130 Mbit/s. Maxi- mum transfer rate for 40 MHz is 270 Mbit/s. ◦ Encryption - Choose between WEP, WPA1 or WPA2. WEP is not recom- mended due to low security. ◦ Channel - Select the channel on your wireless access point in B3. In areas with several wireless networks, lower transfer speeds may be experienced. Then try a different channel. Channel availability is different for different countries due to regulations. ◦ Broadcast SSID - Uncheck this box to hide B3s SSID. By default the SSID is broadcasted. Update saves your changes. irewall B3 has an built in firewall to protect your internal network and B3 itself. Read more about the firewall in chapter “B3 as router and firewall” on page 58. Allowexternal(WAN)accesstoB3services • SSH (Port 22) - Enables Secure Shell (SSH) to B3 from WAN. • Email server (Port 25) - Enables access from WWW to B3’s port 25. This is the...
- Page 41 Administration default email server port for sending and receiving email. • WWW (HTTP / HTTPS Ports 80 / 443) - Enables WWW traffic to B3 from WAN. • Email (IMAP / IMAPS Ports 143 / 993) - Enables access from WWW to B3’s ports 143 and 993. These ports are used for sending and receiving email. • FTP (Port 21) - Enables FTP connections from WAN to B3’s port 21. • Downloader (Ports 10000-14000) - Enables faster torrent download. This rule opens the ports 10000-14000. • Respond to ping (ICMP type 8) - Enables ping from WAN. The default set- ting disables computers on the Internet to get a reply back from B3 when it is being “pinged”. This increases the security. Openport/Addportforward Choose ‘Port forward to internal network ’ or ‘ Open B3 port ’ with the radio buttons. With ‘Portforward’ you open a port from a network device in your internal LAN to the Internet (WAN). ‘B3 public port’ opens a port from B3 to the Internet (WAN) • Source IP - The source IP on the WAN side that the port forward will be di- rected to. Enter ‘all’ if all the port forward are not directed to a specific IP address. • Public port - The port number on the WAN side. You can input a single port or a range of ports (ex. 4001:4005) • Private port - The port number on the LAN side. Enter a single start port if range is used in Public port (ex. 4001). • Private IP - The destination IP on the LAN side network that will be providing the virtual services (desired port forward). • Protocol - The protocol used for the virtual service: TCP or UDP. Userdefinedopen/forwardedports-showstheenabledportforwards. Press the pen symbol to the right of the rule to edit the port forward. Press the red X to the right of the rule to delete the port forward. Update saves your changes.
-
Page 42: Disk 4
Administration The disk page contains three folders: ‘Disk information’ , ‘LVM’ and ‘RAID’ . nformation Here you find the status of internal and external disks and storage devices. When a new device is attached you must press ‘Connect’ to be able to use the device. • Disk information - Shows disk name, size, disk type and a graphical overview of the partitions. • Partition information - Description of the partitions on the disks. Pressing the ‘Connect’ when a new device is inserted means you will have ac- cess to the files in your ‘storage/extern’ catalogue. When you want to unplug the external disk drive / USB memory you must click ‘Disconnect’ first to ensure that it is safe to unplug the device. Read more about managing disks in chapter “External storage” on page 127. Extend your home partition with an attached external disk. This will create a single logical volume of the internal home partition and a attached disk. In other words, you will experience one big disk instead of two smaller. The total... - Page 43 Administration disk size will be the external disk size added to home partition size. Read more about LVM in chapter “LVM - Extended disk” on page 104. raid Here you create a RAID 1 array and find information about your RAID setup. Read more about RAID in the chapter “RAID” on page 96.
-
Page 44: Printing
Administration rinting The printing page shows status of the connected printers. Read more about connecting printers in the chapter “Printer server” on page 88. -
Page 45: Settings
Administration ettings The settings page contains seven folders: ‘Setup wizard’ , ‘Identity’ , ‘Torrent throttle’ , ‘Time and language’ , ‘System backup’ , ‘Software update’ and ‘Logs’ . etuP wizard Use the Setup wizard to make the very first important settings on your B3. Read more about the Setup wizard in chapter “Setup wizard” on page 21. dentity • Hostname - is the unique name by which a network-attached device is... - Page 46 Administration known on a network. • Workgroup - Devices in the same Workgroup may allow each other access to their files, printers, or Internet connection. Use the same workgroup name on B3 as on your computer. • Easyfind location service - Using our free service Easyfind you will be able to reach your B3 wherever you are. You will be able to find your B3 wherever you are typing http://<your-Easyfind-name>.myownb3.com. • Easyfind name - Choose a name for your B3 on the Easyfind network. Update saves your changes. orrent throttle You might want to set the maximum upload / download speed on your tor- rents. For example if you have a limited broadband connection you do not want to fill your uplink completely. Then set the “Max upload speed” to a preferred value. Use “Max download speed” in the same manner. Using -1 as value = no speed limit. Update saves your changes.
- Page 47 Administration ime and language • Timezone ◦ Current timezone is - Shows the selected timezon. ◦ Select timezone - Select your timezone in the drop down list. • Date and time ◦ Auto adjust date and time - This enables B3 to set the date and time auto- matically via an Internet server. ◦ Date - Set the system date manually. ◦ Time - Set the system time manually. • Default system language ◦ System language - Select language for the user interface. Update saves your changes.
- Page 48 Administration ystem BaCkuP This feature will backup all your B3 settings for you in case you reinstall B3 or need to move the settings to another B3 unit. The following settings will be saved: • User accounts (including admin login via WAN setting, passwords) but no user data • Backup jobs • Services settings • Email account settings • Network setup (all settings ie profile, hostname, wireless settings, firewall rules etc) • Printers MakeaSystembackup 1. Insert a external storage device (USB memory or USB disk) into B3. 2. Choose the Source/Destination and press Backup. 3. All settings are now saved on a file on the chosen external storage device.
- Page 49 Administration RestoreaSystembackup 1. Insert the storage device containing the backup file into B3. 2. Observe that the current users on B3 will be removed and the users stored in the backup file will be restored. Although the user data from current user on B3 will be left intact in the /home/[user] catalogue. 3. Press restore. 4. You might need to reconnect your B3 depending on how your restored net- work settings are configured (for example restoring static IP settings on B3). For backup of user data and the storage catalogue, please read chapter “Back- up” on page 107. oftware uPdate B3’s software can be easily updated to gain new functionality. Press ‘Update system’ , and the software update is automatically performed. The ‘Include hot- fixes’ feature is used to collect status information and give you the most appro- priate updates for your B3. Read about hotfixes and software update in chap- ter “Software update” on page 134.
- Page 50 Administration To fault trace on your B3 without logging in with SSH use the Logs function. Select the desired log file in the drop down menu and click ‘Show’ .
-
Page 51: Users
Users sers Most of B3’s services are available on a per-user basis. It is recommended that you add one user for every person using B3. All users get their own... • ...home folder. All users can read content stored there, but only write con- tent in their own folder. • ...private folder. No other users are allowed to read content stored here. • ...download folder. Files downloaded by the download manager ends up here. • ...Email account. • ...FTP account. • ...download manager. However, some services are available to all users, without restrictions: • All users have full access to the storage and music folders. • All users have full access to installed printers. • Creating and editing photo albums. Examples on the folder structure: \\B3\ - Root. \\B3\storage\ - Public file area, accessible to all users. \\B3\home\web\ - Public web area, same for all users. This folder is the public web area share. \\B3\home\user1\ - User file area. \\B3\home\user1\private\ - Private file area, readable only by user1. -
Page 52: Start Page
Users tart Page This is the default start page. Find it by browsing to http://b3 (http://b3.local if using Mac) or by browsing to http://<your-Easyfind-name>.myownb3.com or http://www.<your-domain> from outside your network. Refer to chapter “Reaching B3 from outside” on page 131 for more information. Log in with your B3 user (not the administrator). Here you find links to the most important features of B3. Clicking on the round icons will take you to each feature. Below you find all icons described! ilemanager The filemanager page shows files stored on B3. Read more about using the filemanager in the chapter “File server” on page 67. -
Page 53: Music
Users usiC All your music will be available to you over the Internet, wherever you are. Store music in /storage/music and it will be available to the integrated music player Fireplay. Credits for Fireplay goes to Bo Mellberg! -
Page 54: Photo Album
Users hoto alBum Share your digital photos with friends and family! With B3 you get easy to use, out of the box photo album! All you need is your digital pictures! All B3 users share the photo album feature and may add and edit photo al- bums. Add album users for viewing the albums. Album users do not have anything in common with regular B3 users. Read more about the photo album in the chapter “Photo album” on page 89. ownloads Download files directly to your B3, even when you are away from home. Note that the administrator does not have access to the Download manager. Read more about the Download manager in chapter “Download manager” on page... -
Page 55: Webmail
Users • Downloads - Here you find your active downloads. • Add new download - Paste a link to the file / torrent you want to download in the Location field. eBmail Use the B3s webmail feature to read you mail wherever you are. Click the mail icon and log in with your B3 username. Read about the email configuration in chapter “Email server” on page 83 If you set up B3 to fetch your Email from other external Email accounts you may have, they will be stored on B3 and available via IMAP or web email, wher- ever you are. -
Page 56: User Settings
Users ser settings Here every user can change the personal information, such as ‘Real name’ , password and language settings for the specific user. Changing the user name (login name) is not possible. To achieve this you will have to delete the user via the administrator login and add a new user with the correct name. - Page 57 Users ser information mail Add new email account - To start fetching email from an external account, click here. Fill in the information given to you by your email account provider. Active email accounts will be shown here.
-
Page 58: B3 As Router And Firewall
B3asrouterandfirewall as router and firewall Replace your old router with B3! Using B3 as your router and firewall is the best and simplest way for you to reach your content on B3 from the Internet. The firewall is pre-configured to fit most peoples needs, but is easy reconfigured. Note that B3 does not include a DSL modem. If your old router has a built in DSL modem you can not replace that router with B3. If this is the case, connect B3 as a server in your network. Se chapter “Server mode” on page 7 outer The router functionality in B3 determines the next network point to which a packet should be forwarded toward. Network devices on the LAN side of B3 will be given IP-addresses from the built in DHCP server. Connect a switch in B3s LAN port to be able to connect several computers or other network de- vices via cable. A description about the router settings is found in chapter “Net- work” on page 35. Network Address Translation (NAT) is the process of modifying network ad- dress information while the traffic is passing through the router. The purpose is to remap a given address space into another. By doing this the internal net- work devices (LAN) are hidden from the external network (WAN). irewall A firewall protects your home computers from attacks from the outside, by blocking traffic that is not directly requested from the inside. B3 has this func- tionality. You find a description of B3’s firewall features in chapter “Firewall” on page 40. (wan) llow eXternal aCCess to serviCes By enabling and disabling these settings in the firewall, you are able to open standard ports in an convenient way. -
Page 59: Port Forward
B3asrouterandfirewall ort forward A device connected on the Internet has at least one IP address. The IP address is a unique number that is used to identify a device. Every IP address is divided up into many ports. When one device (for example a computer on the Internet) sends data to an- other device (for example your computer at home), it sends the data from a port on the external computers IP address to a port on your local computers IP address. Computers on the Internet can not see the IP address on your local computer at home, they only see your routers external IP address (that is B3’s external IP address). Some programs run on your local computer needs to have an “gate” exposed to the Internet to function correctly: you need to use the function Port forward in your firewall. The Port forward tells your router in B3 which computer on the LAN to send the data to. When you have set up the port forwarding rules, your rout- er takes the data from the external IP-address:port number (for example 93.122.158.30:551, where 93.122.158.30 is the IP address and 551 is the port number) and sends that data to an internal IP-address:port number (for exam- ple 192.168.10.10:551). In B3 Port forwarding rules are created per port or per a range of ports. A rule set up for port 551 will only work for port 551. Rules set up for the port range 550-552 will open the three ports 550, 551, 552. -
Page 60: B3 As Wireless Accesspoint
B3aswirelessaccesspoint as wireless aCCessPoint Weather you use B3 in “Router + Firewall + Server mode” or in “Server mode” you can use B3 as your wireless access point. The wireless access point is an optional module and is not included in all B3s. Features • Faster Wireless Networking - provides up to 300Mbps* wireless connection with other 802.11n wireless clients. This capability allows you to participate in real-time activities online, such as high quality video streaming, online gaming, and real-time audio. • Fully compatible with older 802.11a/b/g devices. • Strong encryption with WPA 1 or WPA 2 pre shared key. *Maximum wireless signal rate derived from IEEE standard 802.11g and draft 802.11n specifications. 802.11n speeds obtainable when operating exclusively among other N products. Actual data throughput will vary. Network conditions and environmental factors, including volume of network traffic, building ma- terials and construction, and network overhead, lower actual data throughput rate. Environmental factors will adversely affect the wireless signal range. Actual data throughput will vary. Network conditions and environmental fac- tors, including volume of network traffic, building materials and construction, and network overhead, lower actual data throughput rate. Environmental fac- tors will adversely affect the wireless signal range. For more information about the terminology, read the section “WiFi Glossary” on page 63 below. -
Page 61: Configure The Wireless Access Point
B3aswirelessaccesspoint onfigure the wireless aCCess Point 1. Browse to http://b3 (http://b3.local if using Mac). 2. Log on as administrator. 3. Click Network -> Wireless 4. Use the default ‘Network name’ or change to one of your own choice. The default name is your B3s host name. The name can be up to 32 characters long. The SSID is case-sensitive. 5. It is recommended to change the ‘Password’ (aka pass phrase). The required length of the password varies depending on encryption method. A WPA key need to be between 8 and 63 characters of length. A WEP key need to be 5 or 13 characters of length. 6. Select the box ‘Enable wireless’ to activate the access point. Update saves your changes. - Page 62 B3aswirelessaccesspoint 7. Click the ‘Advanced wireless settings’ tab to reach the advanced settings. 8. Select frequency band, 2.4GHz or 5GHz, depending on your other network clients. All clients that shall communicate must be on the same frequency. 9. Choose what mode to use in your wireless network. ◦ Legacy mode (802.11a/g) - Select this if all of your wireless clients are 802.11a/g. ◦ Mixed mode (802.11n + 802.11a/g) - Select this if you are using 802.11n or/and 802.11a/g wireless clients. 10. Choose the channel width. Choosing 40MHz in a 802.11n network might improve the transfer rate. ◦ Select 20MHz if you are not using any 802.11n wireless clients. ◦ Select 40MHz if you are using 802.11n wireless clients only. 11. Choose preferred encryption. WEP2 is recommended. All your network clients need to have the selected encryption method as your AP (B3) avail- able to be able to connect to your wireless network. Choose between ◦ None ◦ WEP ◦ WPA1...
-
Page 63: Wifi Glossary
B3aswirelessaccesspoint ◦ WPA2 ◦ WPA1 or WPA2 12. Select the channel on your wireless access point in B3. In areas with several wireless networks, lower transfer speeds may be experienced. Then try a dif- ferent channel. 13. B3s SSID will be visible to all other wireless clients by default. If you want to hide your SSID, unselect this box. You will then manually have to fill in the SSID in your clients to connect to your wireless network. 14. Update saves your changes. lossary 802.11a 802.11a uses the 5 GHz band. 802.11b 802.11b uses the 2.4 GHz band. 802.11g 802.11g uses the 2.4 GHz band. 802.11n 802.11n uses the 2.4 GHz and 5 GHz bands. This is the latest gen- eration of Wi-Fi described by the IEEE standard. 802.11n has the capability to transfer data up to five times faster than its predecessors. AES AES is an encryption protocol introduced in WPA2 to make communica- tions over a Wi-Fi network private. Access point (AP) A device which serves as a central wireless connection point for a wireless network. Channel 802.11 divides each of the bands into channels. Availability of chan- nels is regulated by in which country the access point is operating. Channel width In the 802.11n standard there is an option to run in the double channel width, 40MHz. Maximum transfer rate for 20 MHz is 130 Mbit/s. Maximum transfer rate for 40 MHz is 270 Mbit/s. Client A device (computer, phone, media player etc.) in your network,... - Page 64 B3aswirelessaccesspoint Dual-band The capability of a product to communicate in either / both the 2.4MHz or 5MHz frequency bands. Encryption Encryption is the process of transforming information using an algorithm to make it unreadable to unauthorized persons. A key specifies the particular transformation of data. Frequency band Only devices which operate in the same frequency band can communicate with one another. Better or worse performance with higher or lower frequencies may be realized, depending on the environment. Network name (SSID) This name identifies a particular wireless network. Pass phrase / Password This is the key that is used when encrypting. The required length of the key varies depending on encryption method. The same key is entered in the access point as well as in the clients on the wireless net- work. PSK (Pre-shared key) The pre-shared key is the same as the pass phrase (pass- word) in a WPA encrypted network. Region Availability of channels is regulated by in which country the access point is operating. Also maximum permitted transmit power varies by region. The region for Wi-Fi in B3 is read from the Time zone setting. TKIP TKIP is an encryption protocol introduced in WPA to make communica- tions over a Wi-Fi network private. WEP An early security standard used in wireless networks to encrypt network traffic. WEP should not be used for any sensitive data transmission, as there are well-known vulnerabilities in this very old form of security. If any devices on a wireless network only support WEP, the entire network is vulnerable. WEP is not supported by the 802.11n standard. WPA1 & WPA2 These encryption protocols was created in response to several serious weaknesses found in the WEP standard. WPA2 is the latest and most secure. Use this if possible, all your wireless devices must support it.
-
Page 65: Download Manager
Downloadmanager ownload manager sing the download manager Use the B3 download manager to download files directly to your B3, wherever you are. The only thing you need is a Internet connection and to browse your way home to your B3: http://<your-Easyfind-name>.myownb3.com, http:// www.<your-domain> or http://<your-ip-address>. Of course if you already are in your home network browse to http://b3 (http:// b3.local if using Mac). Large, time consuming downloads are handled by B3 while your computer is turned off. When you initiate your first download a catalogue is created in your /home/ [username] directory: /home/[username]/downloads. ow to download 1. At home browse to http://b3 (http://b3.local if using Mac) or if you are away from home http://<your-Easyfind-name>.myownb3.com, http:// www.<your-domain> or http://<your-ip-address>. 2. Click the “Downloads” icon. 3. Log in as your standard user. 4. To initiate a download you need to copy* the URL to the file (or torrent) you desire to download and paste it into the “Location” field on your B3 and click “Add”. 5. When the progress bar reaches 100% your download is completed. When downloading BitTorrents, note that the download manager will continue to share the file until you press Cancel or Clear. - Page 66 Downloadmanager *To copy the URL simply right click on the file (or torrent). Depending on which browser you use and what type of file you desire to download select the ap- propriate in the right click menu: “Copy Shortcut”, “Copy Link Location”, “Copy Image Location” As you ad files for download, B3 allocates disk space for the files. If you look in the /home/[username]/downloads/ catalogue it seems if the files exist but as long as the progress bar still not has reached 100% the files are not complete. Currently the download manager support the standards HTTP, FTP and BitTor- rent downloads. You don’t need to open any ports in your firewall when using the download manager, but for torrent downloads it is recommended to open the ports 10000-14000 in the firewall under “Allow external (WAN) access to B3 services”. B3 downloading large files while the user is at work...
-
Page 67: File Server
Fileserver ile server The file server functionality allows you to reach your files anywhere. It is rec- ommended to use B3 as your storage central, to allow you to reach your files even if you are not at home. indows XPlorer amBa From your local network (LAN), you can reach your files simply by browsing to B3 using Windows Explorer. 1. Open Windows explorer, click Network and then B3. Alternatively type \\b3 in the location field. 2. Click home to reach your private content, or storage to reach general, non- private content. -
Page 68: Mac Os
Fileserver os X 10.6 Using Finder in Mac you easily find your B3. 1. In Finder, click Network 2. You now see all your connected network devices. Click B3... - Page 69 Fileserver 3. You will be able to enter B3s Public share. To reach your private folder click ‘Connect As... ’ . 4. Enter your B3 username and password (not adminitrator) and click Connect.
-
Page 70: Web Based File Manager
Fileserver 5. Now you can enter your home folder, in this case lars. 6. This is the Public share eB Based file manager When you are away from home, the simplest way to reach your files on B3 is using the web based file manager. Please note that the web based filemanager has a limit in handling files that together has a size greater than 2GB, instead use Samba or FTP. 1. Browse to: http://<your-Easyfind-name>.myownb3.com, http://www.<your- domain> or http://<your-ip-address>. For instance: http://82.214.205.104. If... - Page 71 Fileserver you do not know your IP address, read chapter “Reaching B3 from outside” on page 131. From the inside of your network, just browse to http://b3 (http:// b3.local if using Mac). 2. Click the “Filemanager” icon. 3. Log in using your standard user. User browsing files on B3. You will see your location in the folder structure on the top left side; in the pic- ture above you are located in /home/lars catalogue. • To move up in the folder structure, click the desired folder name (circle 1), or click the left arrow (circle 2). • To move into a folder, double click it (circle 3). • To download a file from your B3 to your PC, double click on the filename.
- Page 72 Fileserver Click files or folders and use the icons in the file function bar to perform differ- ent actions. The functions from left to right are: • Create folder - To create a folder on your B3, click the Create folder button and follow the instructions. • Upload files - To upload files from your PC to B3, click the Upload files but- ton and follow the instructions. If nothing happens, disable your browsers pop-up blocker. • Download as zip - To download multiple files or folders, mark the items you wish to download and choose Download as zip. To download a single file from B3 to your PC, the easiest is to double click on the file name. • Move files - To move files or folders on B3. Select the files to move. Then browse to the desired target position. Finally click the Move button. • Copy files - To copy files or folders on B3. Select the files to copy. Then browse to the desired target position. Finally click the Copy button. • Rename - Mark the file or folder and click Rename. • Change permissions - File permissions are a way that the system controls who can do what with each file or folder. To change permissions on files or folders select the items you want to change permission on, and click...
-
Page 73: Using The Ftp Server
Fileserver Change permission. • Add to album - Please notice that this menu option only is available when browsing in the ‘/home/storage/pictures’ catalogue. Mark the files you want to add to the photo album and click ‘Add to album’ . • Delete - To delete files or folders select the items you want to delete, and click Delete. Uploadingfiles Select files from your PC to upload to B3. sing the server Every user on B3 gets an FTP account created automatically. ConnectingtotheB3FTP In your FTP client, type B3 as server name, and your user name and password. If you want to reach the FTP server from outside use your external IP or do- main name (<your-domain> or <your-ip-address>) as server name in your FTP client. Open required ports in your firewall, described in chapter “Firewall” on page 40 or in chapter “Reaching B3 from outside” on page 131. The Apple Filing Protocol (AFP) is a network protocol that offers file services for Mac OS X and original Mac OS. -
Page 74: Media Servers
Mediaservers edia servers B3 has three media server technologies: Squeezebox Server, DAAP and DLNA. Squeezebox Server is used for streaming to Logitech Squeezebox, DAAP is used for music only, while DLNA can be used for music, video and pictures (photos). Some media players such as Popcorn Hour are able to find the media content on B3, without the need for a media server. Simply browse your network (from example Popcorn Hour) and connect to B3 via SMB or NFS (NFS will be avail- able in B3 in a nearby software update). usiC All music placed in the \storage\music folder will automatically be visible by Squeezebox Server, DAAP (iTunes) or DLNA compatible music players on your network when the respective services are enabled. Examplesonmusicplayers: • Logitech Squeezebox product line • iTunes PC application • Roku/Pinnacle Soundbridge hardware music player • Olive Musica hardware music player • Dlink DSM 320/520 • Nokia 770 and 800 Tablet PC • PS3 The Roku Soundbridge audio player... -
Page 75: Squeezebox Server
Mediaservers ideo and PiCtures All video and picture files stored in \storage\video and \storage\pictures will automatically be available through the DLNA server for playback by any DLNA compatible devices when the DLNA service is enabled. Examples on video players: • Popcorn Hour • PS3 • Dlink DSM 320/520 • Nokia 770 and 800 Tablet PC queezeBoX erver Media server for the Logitech Squeezebox product line. Before you can start using your Squeeze product with Squeezebox Server you have to do an initial setup. And preferably set up a automatic rescan of your music library. Do like this: 1. Start by logging in as administrator. Activate ‘Squeezebox Server’ under ‘Services’ . It will take a few minutes for ‘Squeezebox Server’ to start. Be pa- tient before continuing with step two below. - Page 76 Mediaservers 2. Access Squeezebox Server by browsing to http://B3:9000. Click “Skip” to proceed to the setup. 3. Locate music folder. Verify that the catalogue home/storage/music is select- ed and click ‘Next’ .
- Page 77 Mediaservers 4. Locate playlist folder. Verify that the catalogue home/storage/music is se- lected and click ‘Next’ . 5. Click ‘Finish’ to complete the setup.
- Page 78 Mediaservers Mediaservers 6. To setup a frequent library scan for new music click ‘Setting’ , down to the right. 7. The Squeezebox server settings page. Click ‘Rescan’ to initiate a music library scan. This can also be done via the remote control directly on your Squeeze unit. The scan will take quite some time if your music library is large.
- Page 79 Mediaservers Mediaservers 8. To setup a frequent library scan for new music click the ‘Advanced’ tab and click the drop down list to the left on the screen. Click ‘Rescan music Library’ . 9. Select preferred settings and click ‘Apply’ . 10. The settings are now done. After a complete scan of your music library you are ready to start listening to music through your player.
-
Page 80: Firefly Media Server
Mediaservers irefly media server Media server for the Roku SoundBridge and iTunes. It serves your music files using Roku Server Protocol (RSP) and Digital Audio Access Protocol (DAAP). You can access the Firefly Media Server by browsing to: http://b3:3689 User: admin Password: excito... -
Page 81: Dlna Media Server
Mediaservers dlna media server DLNA server for DLNA compatible devices. MiniDLNA is server software with the aim of being fully compliant with DLNA/UPnP-AV clients. -
Page 82: Web Server
Webserver eB server dding your own Content Use a file browser and go to ‘\\b3\home\web\’ and replace the ‘index.html’ file with your own web content. Your web content will be visible by browsing to http://b3 (http://b3.local if using Mac) from inside your home network, or by browsing to http://<your-Easyfind-name>.myownb3.com or http:// www.<your-domain> from outside your network. Refer to chapter “Reaching B3 from outside” on page 131 for more information. To reach B3s user interface, browse to http://b3/admin (http://b3.local/ad- min if using Mac). From outside your network the administrator interface is reached here: http://<your-Easyfind-name>.myownb3.com/admin or http:// www.<your-domain>/admin. B3’s default web page nCryPtion If you browse to https instead of http (i.e. https://<your-Easyfind-name>.my- ownb3.com or https://www.<your-domain>), the data transfer over Internet will be encrypted. -
Page 83: Email Server
There are several ways to read Email these days. It is also common to have sev- eral Email accounts on several different places. B3 provides a simple solution to this, by collecting all your Email at one place. Rememberto: • Enable the email services, described in chapter “Services” on page 32. • Open required ports in your firewall, described in chapter “Firewall” on page 40 or in chapter “Reaching B3 from outside” on page 131. You will find an overview of the email settings in chapter “Email” on page 33. etrieve email the fetChmail serviCe Fetchmail is a very convenient way to collect all your Email at one place. If you set up B3 to fetch your Email from other external Email accounts you may have, they will be stored on B3 and available via IMAP or web email, wherever you are. Set up this service by adding a fetchmail account under the ‘Email’ button in the administration interface. When using retrieve email (whether you choose IMAP or POP) B3 will erase the eMails from the server and store them locally on your computer. Usageexample-retrieveemail To fetch email from your external account (i.e. ‘user1extern@yahoo.com’): 1. Log on to B3 web admin interface using as ‘user1’ . 2. Click ‘Email’ -> ‘Retrieve email’ . Click ‘Add new email account’ . Fill in your email information provided to you by your external Email provider. It is ac- tually the same information you use when setting up your Email client (i.e. Microsoft Outlook’) to read email from there. Now, email to ‘user1extern@yahoo.com’ are also received by B3, and made available to user1. This Email is available either using the webmail function (http://b3/mail or http://b3.local/mail if using Mac) or if you want to read the Email using your favourite Email client (se section READING EMAIL below). Done! -
Page 84: Send Email - Sending Emails
When sending Email B3 will acts as SMTP (Simple Email Transfer Protocol) serv- er. In your mail cliend (Outlook, Thunderbird etc) fill in your B3s hostname as out- going SMTP server. Port25blocked It is not uncommon that your ISP (Internet Service Provider) blocks outgoing traffic on port 25, to prevent potential viruses in your PC to send Email. If this is the case B3 can’t be used as SMTP server. Your ISP probably provides an alter- native SMTP server. Check with your ISP, and update the ‘Outgoing email server (SMTP)’ field in the web administration interface accordingly. To do this log in as administrator, click “Email” and “Server settings”. eCeive email handling inComing emails If you have your own domain name it is possible to let B3 handle your incom- ing and outgoing Email, instead of paying for this service. When adding a user, you automatically get an Email account set up on your B3. Follow these steps to get the Email service running: 1. Browse to http://b3 (http://b3.local if using Mac). 2. Log on as administrator. 3. Click ‘Email’ and then ‘Server settings’ . 4. Enter your domain name (i.e. ‘<your-domain>’) in the field ‘Handle email for domain’ . 5. Click update. In order for this to work you also need to open the appropriate ports in your firewall (open appropriate ports in ‘Integrated B3 services’ , read chapter “B3 as router and firewall” on page 58 and “Reaching B3 from outside” on page 131) After this has been done, Email sent to users @ your domain will be received by... -
Page 85: Reading Email
Emailserver B3. The recipient will have the emails stored in the ‘Email’ folder. For instance, Email sent to ‘user1@<your-domain>’ will be made available to user1, and Email sent to ‘user2@<your-domain>’ will be made available to user2. There are two ways to access your Email, either from the web email service or using IMAP to make the Email available in your favourite Email client. Usageexample-yourowndomain You own the domain name ‘<your-domain>’ , and want to be able to receive Email to ‘user1@<your-domain>’ and ‘user2@<your-domain>’ . 1. Set up B3 to receive Email to ‘<your-domain>’ , by following the instructions under ‘Handling Incoming eMails’ above. 2. Create the users user1 and user2 on B3. 3. Open port 25 in your firewall, described in chapter “Firewall” on page 40 or in chapter “Reaching B3 from outside” on page 131 Now, Email to ‘user1@<your-domain>’ and ‘user2@<your-domain>’ are re- ceived by B3, and made available to the respective users. Handlemorethanonedomain It is possible to receive Email from more than one domain. Just type the do- main names in the ‘Handle email for domain’ field (space separated). Note that B3 can’t separate these domains; Email to user1@<your-domain1>. com and to user1@<your-domain2>.com will end up in the same mailbox (the one belonging to user1). The Email routing is done only on user basis. eading email eB email Browse to http://b3/mail (http://b3.local/mail if using Mac), and log in using your private user name and password. This service will also be available from the outside by browsing to your Easyfind name http://www.<your-Easyfind- name>.com/mail or ‘http://<your-domain>/mail’ . Log in using your personal... -
Page 86: Horde - The Web Email Client
Emailserver PC e mail Client To be able to read your Email from home or from work, add B3 as an account in your Email client (i.e. Microsoft Outlook). Simply type ‘B3’ (your B3’s hostname) as incoming (IMAP) server. If you use the IMAP server from the outside your network (i.e. from work), type your home Easyfind name, IP address or domain name. Use your personal B3 user name and password. It is common in high-end mobile phones to have built-in IMAP Email clients. With these type of mobile phones you can connect to B3 and in a convenient way access all your Email where ever you are. As a security measure B3 uses IMAP via SSL (port 993). Activate this in your Email client to be able to connect to your B3. SSLsettingsinThunderbird In the “Tools” menu choose “Account Settings... ” . Choose your Email account and click “Server Settings”. Under “Security Settings” choose SSL. To confirm click OK. SSLsettingsinOutlook2007 In the “Tools” menu choose “Account Settings... ” . Choose your Email account and click “Change”. Click the button “More Settings” and then the “Advanced” tab. In the drop down list to the right of IMAP choose SSL. To confirm click “OK”, “Next” and “Finish”. orde the weB email Client Use Horde to read your Email via a web browser, for example Firefox or Inter- net explorer. Simply browse to http://www.<your-Easyfind-name>.com/mail, http://www.<your-domain>/mail or http://<your-ip-address>/mail. Initialsetup Before starting to use the web email client you have to set up a “default iden- tity” (i.e. your name and email address) and “Locale and time”. 1. Browse to horde as described above. - Page 87 Emailserver 3. Click “Options” in the left menu. 4. Choose “Email” in the drop down list to the right of “Edit options for:”. 5. Click on “Personal Information”. 6. Fill in at least the information “Identity’s name:”, “Your full name:” and “Your From: address:”. Click “Save options”. 7. Choose “Global Options” in the drop down list to the right of “Edit options for:”. 8. Click on “Local and time”. 9. Choose your settings and click “Save Options”...
-
Page 88: Printer Server
Printerserver rinter server With the Print Server you will get easy and comfortable printer access. B3 gives you a more efficient way of using your printer in your home- or in your office- networks. The print server allows multiple users to share a printer from any- where on the network without sharing one PC. All you need is a USB printer and its drivers. nstallation 1. Connect your USB printer to B3’s USB connector. 2. In a web browser, browse to http://b3 (http://b3.local if using Mac). 3. Log on as administrator. 4. Click the Printing button. 5. Press Add new printer. 6. The printer name shows, add this printer and fill out the requested informa- tion. 7. Browse the network to \\B3\. 8. The printer will now show up next to the home and storage folders. Double click the printer icon. 9. You will be prompted for the printer driver, follow the instructions and in- stall the printer. When this is done, the printer is ready to be used. Repeat steps 7-9 for all work stations using the printer. -
Page 89: Photo Album
Photoalbum hoto alBum Share your digital photos with friends and family! With B3 you get easy to use, out of the box photo album! All you need is your digital pictures! Features: • Automatic thumbnail creation - fast and convenient album viewing for those with limited bandwidth. • Add captions for each photo or album in your collection. • Slide show function. • Your images are safe on your own B3 instead of hosted somewhere else. • Public or password protected albums. • Easy to use. reate an alBum 1. Store your photos in storage/pictures. 2. In a web browser, browse to http://b3 (http://b3.local if using Mac). - Page 90 Photoalbum 3. Click the Photos icon to go to the photo album. 4. Log in with a B3 user (not administrator). 5. Click the wrench icon to enter Manage mode. 6. Click the icon Create album to start the album wizard • Set an album name and description. Click Next.
- Page 91 Photoalbum • Set the user access rights for the album: ◦ For public albums - activate ‘Allow anonymous access’ . ◦ For private albums - click ‘Manage users’ to create album users. Click the plus icon. Fill in user information and click the ok icon. Close the Manage album user window. Click ‘Access allowed’ for the user. Click Next. • Select pictures or folders to add and click Create album. 7. Click the wrench icon to exit Manage mode. 8. Now you see all albums you have access rights to. Remember to log in with your album user to see private pictures.
-
Page 92: Edit An Album
Photoalbum dit an alBum 1. In a web browser, browse to http://b3 (http://b3.local if using Mac). 2. Click the Photos icon to go to the photo album. 3. Log in with a B3 user (not administrator). 4. Click the wrench icon to enter Manage mode. 5. Select the album you wish to edit. 6. Use the menu item from the tool bar to edit the album. You have the following edit options: - Add images - Move images - Rename - Permissions - Manage users - Delete 7. Click the wrench icon again to exit Manage mode. dd alBum users 1. In a web browser, browse to http://b3 (http://b3.local if using Mac). 2. Click the Photos icon to go to the photo album. 3. Log in with a B3 user (not administrator). 4. Click the wrench icon to enter Manage mode. 5. Click the Manage user icon 6. Follow the on screen guide. -
Page 93: Permissions
Photoalbum 7. Click the wrench icon again to exit Manage mode. ermissions To view an album one of these two requirements needs to be met: • The album is public • You are logged in with a album user that has access rights to the album. dit aCCess rights on an alBum 1. In a web browser, browse to http://b3 (http://b3.local if using Mac). 2. Click the Photos icon to go to the photo album. 3. Log in with a B3 user (not administrator). 4. Click the wrench icon to enter Manage mode. 5. Select (highlight) the album you wish to edit. 6. Click on the Permissions icon:... - Page 94 Photoalbum 7. Now you can edit the access rights of the album: - To make the album open for anyone to view, select ‘Allow anonymous ac- cess‘ . - To make the album viewable to a specific user, disable anonymous access and enable the user. - If there is subalbums in the selected album and you which the access rights to apply to all subalbum, select ‘Apply changes recursively‘ before clicking ‘Update‘ . 8. Click the wrench icon again to exit Manage mode.
-
Page 95: Where Do I Find My Pictures
Photoalbum here do find my PiCtures To view your pictures when you are at home, in your local network, simply open a web browser and type http://b3 (http://b3.local if using Mac). If you are away from home, open a web browser and browse to your Easyfind name http://www.<your-Easyfind-name>.com or ‘http://<your-domain> Then click the Photos icon to go to the photo album. Enjoy the public albums or log in using the album user you have created! -
Page 96: Raid
RAID raid The RAID function in B3 combines the /home partition and one external hard disk into a single logical unit. B3 supports RAID 1 that duplicates data across the internal disk and one eSATA disk, providing full redundancy. The /home partition and the external hard disk each store exactly the same data, at the same time, and at all times. Data is not lost as long as one disk survives a disk failure. Notice that a RAID system does not save unintentionally deleted files. If this is the type of security you are look- ing for, please use the integrated backup function instead: read chapter “Back- up” on page 107. For maximum security: combine RAID and a frequent backup job! At any given moment, the contents of /home partition on B3 and the external hard disk in the array are identical to the content of the other disk in the array. Important • To get out the most of your disks, use an external disk in the same size as your internal disk in B3. • Total capacity of the array equals the capacity of the smallest disk in the ar- ray. • It will take some time to create or restore a RAID array. For a 1TB disk it will take about 4 hours. This is handheld in the background of the B3 system and will not be indicated to the user. • To reuse your B3 standalone without the RAID setup you have to reinstall your B3 system. Warning An old RAID disk will automatically be connected and included into the B3 system upon boot, even though you have not set up your B3 for a RAID exten- sion. It is impossible to remove the extension without reinstallation. To format an old external RAID extended disk, connect the disk to a already running B3. Then choose ‘Format’ in the ‘Disk -> Information’ menu. -
Page 97: Create Raid Array
RAID raid reate array Warning! The process will destroy all user data - both on the internal and exter- nal disk. 1. Attach an eSATA disk. Please notice that the disk should be pre formatted, without old RAID or LVM systems. 2. Browse to http://b3 (http://b3.local if using Mac). 3. Log in as administrator. 4. Click Disk -> RAID. 5. Click “Create RAID array”. 6. Select which external disk to include in the array. - Page 98 RAID 7. Warning! All data on both disks will be erased. Click ‘Create RAID’ . 8. Wait for the progress bar to complete. Be patient, it will take some time to create a RAID array if you are using large disks.
-
Page 99: Raid Status
RAID 9. When finished, your external disk has been included in your RAID array. raid status Log in as administrator, click Disk -> RAID. Here you will find information about current RAID status. • List of RAID arrays - shows the total disk space, i.e. the smallest available disk (the B3 /home partition or the external eSATA disk) in the array. • List of RAID disks - shows the disks attached to the RAID system. In the Disk -> Information menu you also find information about your RAID setup. -
Page 100: Recover Raid Array
RAID raid eCover array There might be different reasons for you wanting to perform a ‘Recover RAID’ operation: • Disc failure; internal or external. • Changing to a new disc; internal or external. • Disconnecting the external RAID disk by mistake. eCover the internal disk Please note that all user data on the new hard drive will be destroyed during this operation. 1. If you have a disk failure on your internal disk in B3 you have to start by ex- changing the disk. Read chapter “Customizing B3 - SW & HW” on page 141 to learn how to make a disk change. 2. You need to reinstall the B3 software according to chapter “Installing & rein- stalling software” on page 137. 3. Update the B3 according to chapter “Software update” on page 134 to utilize the latest possible software and reboot the B3 4. Log in as administrator. 5. Click Disk -> RAID and the button ‘Recover RAID array’... - Page 101 RAID 6. Select which external disk that contains RAID data. Click ‘Recover internal disk’ . 7. Warning! All data will be erased from the internal disk. Click ‘Create array’ . 8. When finished, your internal disk has been added to your RAID array. 9. Re create the users the previously had accounts on your B3 (before the in- ternal disk crash) via the Users menu. Now all the users has access to their old files. eCover the eXternal disk 1. Log in as administrator. 2. Acknowledge the RAID failure notification on the status page. 3. Click Disk -> RAID. 4. A disc failure or if you have by mistake disconnected the external disk will be shown as below 5. Delete the external disc from the ‘List of RAID disks’ by clicking ‘Remove’: 6. Disconnect the external disk from the backside of B3. 7. Attach a new external disk.
- Page 102 RAID 8. Click “Recover RAID array”. 9. Select which external disk to add to RAID array. Click ‘Add disk to RAID array‘ . 10. Warning! All data will be erased from the external disk. Click ‘Add disk to RAID array‘ .
-
Page 103: Remove Raid
RAID 11. Press ‘Close’ to continue working with B3. The synchronization is in progress. 12. The synchronization progress is shown in the Disk page. When finished, your disks has been synchronized into your RAID array. raid emove To remove RAID from your system you need to reinstall the whole system. Read about reinstalling in chapter “ Installing & reinstalling software” on page 137. -
Page 104: Lvm - Extended Disk
LVM-Extendeddisk lvm - e Xtended disk Extend your home partition with an attached external disk. This will create a single logical volume of the internal home partition and a attached disk. In other words, you will experience one big disk instead of two smaller. The total disk size will be the external disk size added to home partition size. Warning • Please notice that this is an non reversible operation. After your system has been extended together with the external drive, your system will always need to be connected to the external drive - and will not function without it. To be able to use your B3 standalone again, you will need to reinstall the whole system. • An old LVM disk will automatically be connected and included into the B3 system upon boot, even though you have not set up your B3 for an LVM extension. It is impossible to remove the extension without reinstallation. To format an old external LVM extended disk, connect the disk to a already run- ning B3. Then choose ‘Format’ in the ‘Disk -> Information’ menu. (lvm) reate Xtended disk 1. Attach a external disk, USB or eSATA. Please notice that the disk should be pre formatted, without old RAID or LVM systems. 2. Browse to http://b3 (http://b3.local if using Mac). 3. Log in as administrator. 4. Click Disk -> Extend disk (LVM). - Page 105 LVM-Extendeddisk 5. Select the ‘Home partition’ and the partition from the external disk (for ex- ample /dev/sdb). Click ‘‘Extend. 6. Click ‘Create LVM’ . 7. Wait for the progress bar to complete...
-
Page 106: Lvm Status
LVM-Extendeddisk 8. When finished, your system has been extended together with the external drive. lvm s tatus Log in as administrator, click Disk -> Information. Here you will find informa- tion about current disk status. The total storage area is now extended to both disk. (lvm) emove Xtended disk To remove Extended disk (LVM) from your system you need to reinstall the whole system. Read about reinstalling in chapter “Installing & reinstalling soft- ware” on page 137. -
Page 107: Backup
Backup aCkuP It is always recommended to backup your critical data. Always make sure you have a fresh copy of your critical files on a separate hard drive. B3 has an inte- grated backup function that enables you to make backup of your important files stored on B3. For backing up data from your PC to B3, read chapter “Backup from your PC to B3” on page 114. For backing up B3 user accounts, email accounts and all other important set- tings, read chapter “System backup” on page 48. aCkuP your Features: • Incremental backup • Schedule backup jobs as you like • Store backup jobs locally (USB, eSATA) or remote (SSH, FTP) • Encrypt your backup files automatically You find the backup function, logged in as administrator, in the menu “Backup”. The backup function will perform a full backup the first time a job is run. The next time (the same job is run) it will perform a incremental backup and will only save the files that has been added or changed. Tips • Perform a backup of B3 settings (described here: Administrator section Set- tings) to save your backup job settings. • For maximum security: combine RAID (chapter “RAID” on page 96) and a fre- quent backup job! reate a BaCkuP joB 1. Browse to http://b3 (http://b3.local if using Mac). 2. Click the gear wheel in the upper right corner and log in as administrator. - Page 108 Backup 3. Click Backup. 4. Click ‘Add ned backup job’ and type a new backup job name in the text box. Then click Next.
- Page 109 Backup 5. Select what type of files you desire to backup. Select a predefined backup type or select ‘Custom selection’ to choose specific files or folder. Then click Next. 6. Choose a destination for your backup. You may store the backup locally on a USB or eSATA drive or you may select a FTP or SSH target (locally or remote).
- Page 110 Backup 7. If choosing FTP or SSH you need to fill in information about the target serv- er. ‘Target directory’ (i.e. home\remoteftpuser) or leave it blank for saving backup in the remote root directory. If the destination directory will be cre- ated if it does not exist already. Then click Next. 8. Set the backup schedule for the backup job. How often and for how long to save the time line. Then click Next.
- Page 111 Backup 9. To increase security you have the option to encrypt the backup job. Click ‘Encrypt the backup... ’ and select a password. Then click ‘Complete’ to save the backup job. The saved backup job will now run according to your sched- ule. 10. You will se your backup job in the list: To run the job immediately, click ‘Run now’ .
-
Page 112: Restore Files From A Backup Job
Backup 11. After the backup has run you will be able to se information about the backup job by clicking the backup job (blue in picture). The timeline is shown and you are able to restore files from any given point in the timeline. estore files from a BaCkuP joB 1. Browse to http://b3 (http://b3.local if using Mac). 2. Click the gear wheel in the upper right corner and log in as administrator. 3. Click Backup. Then click ‘Restore’ at the date and time you desire to restore the backup from. - Page 113 Backup 4. Select the files in the backup you need to restore. Also select where to re- store the files: in its original place or to a new folder in the admin home folder. Then click ‘Restore selected files and directories‘ . 5. You need to confirm the operation. Click Yes. Your files will now be restored!
-
Page 114: Backup From Your Pc To B3
Backup aCkuP from your B3 is a perfect medium for backup whether it is your data, email, photogra- phy’s or your music you need to be extra careful about. One simple solution is to create a shortcut on your desktop, pointing directly to your private B3 fold- er. Just drag and drop all important documents there, regularly. Now, a disk crash on your PC won’t be fatal. A more sophisticated way of doing backup from your PC is to use the integrat- ed backup function in Windows. indows Backup your important files from your PC to B3 via Windows 7 Backup and Re- store function. 1. Start Backup and Restore: Open the Control Panel, under ‘System and Secu- rity‘ click ‘Backup your computer‘... - Page 115 Backup 2. Click ‘Set up backup ‘ 3. To find your B3, click ‘Save on network...‘...
- Page 116 Backup 4. Fill in your B3s user information (not B3s administrator) and click ‘Browse’ . 5. Decide where to save your backup on B3.
- Page 117 Backup 6. Fill in your user name and password to B3 if asked for. 7. Decide where to save your backup on B3...
- Page 118 Backup 8. Click ‘Ok’ . 9. Select the newly added backup destination and click ‘Next’ .
- Page 119 Backup 10. Choose what to backup from your computer. 11. Verify the backup target. Edit the backup schedule if needed. Click ‘Save settings and run backup‘ .
- Page 120 Backup indows Backup your important files from your PC to B3 via Windows XP Backup Man- ager. If you are a Windows XP Professional user, Windows integrated backup man- ager is pre installed. If you are a Windows XP Home user the Windows backup manager has to be installed from the original Windows Home CD. Insert the CD in your computer. Click “Perform Additional Tasks” and then “Browse this CD”. After that in Win- dows Explorer, double-click the ValueAdd folder, then Msft, and then Ntback- up. To install the Backup utility Double-click the Ntbackup.msi. 1. Start the Backup and Restore Center (Start -> Programs -> Accessories -> System Tools -> Backup). Click Next.
- Page 121 Backup 2. Select Backup and click Next: 3. Specify what you want to backup, click Next and follow the instructions:...
- Page 122 Backup 4. Specify your B3 as destination, click Next: 5. Click Finish to perform a standard backup or Advanced to change the back- up settings to fit your needs:...
- Page 123 Backup 6. In the advanced tab you may change the backup method: 7. The backup progress window: If you would like to do backup your data automatically you have to set up Scheduled Task in Windows. To do this click “Start -> Programs -> Accessories -> System Tools -> Scheduled Tasks” and create a new scheduled task. To restore your files, select Restore in step two above and select your backup file stored on your B3.
- Page 124 Backup indows ista Backup your important files from your PC to B3 via Windows Vista Backup and Restore Center. 1. Start the Backup and Restore Center (Start -> Control Panel -> Backup & Restore). Click “Change settings” and select how you would like to use the backup utility: daily, weekly or monthly backups. Specify where to save the files (\\B3\ in the picture below).
- Page 125 Backup 2. Backup status: To restore your files, select “Restore Files” in step one above and select your backup file stored on your B3.
-
Page 126: Pim
A Personal Information Manager (PIM) is a set of applications that functions as a personal organizer. Horde is your PIM application in B3. Horde handles the most important details for you to keep you up to date, where ever you are. • Email • Personal notes • Address book • Calendar PIM from inside your network: http://b3/pim (http://b3.local if using Mac). PIM from outside your network: http://<your-Easyfind-name>.myownb3.com/ pim, http://www.<your-domain>/pim or http://<your-ip-address>/pim. If you do not know your external IP address, read chapter “Reaching B3 from outside” on page 131. As you use PIM to reach your webmail read about it in chapter “Email server” on page 83. -
Page 127: External Storage
Externalstorage Xternal storage Information about connected external drives is visible in the Disk -> Informa- tion section when logged in as Administrator. Warning DonotattachyouroldexternalRAIDorLVMextendeddisksbeforeyour B3isupandrunning.ToformatexternaldiskswithapreviousRAIDorLVM system:StartyourB3withouttheexternaldiskconnected.Connectthedisk afterthebootiscompletedandperformadiskformat. onneCting 1. To obtain more disk space with an external USB or eSATA drive, plug in your drive into one of B3s back side connectors. 2. Log in as administrator. 3. Press ‘Connect’ next to the newly attached disk in the Disk -> Information menu. -
Page 128: Format An External Disk
Externalstorage 4. No you find your external hard drive under the folder /storage/extern. Click the link in the B3s web user interface. In Windows Explorer or Finder in Mac, type \\.b3\storage\extern. ormat an eXternal disk Warning! All data on the external disk will be erased. The disk will be formatted with the file system EXT3. 1. Click the ‘Format’ button next to the disk name. - Page 129 Externalstorage 2. Choose a disk label. Click ‘Format disk’ 3. Click ‘Format disk’ 4. Progress bar indicating the format.
-
Page 130: Unplugging
Externalstorage 5. Click ‘Close’ to complete the operation. nPlugging To unplug a disk from B3 you first must make sure the drive is ready to be dis- connected. Click ‘Disconnect’ next to the disk under ‘Partition information’ . -
Page 131: Reaching B3 From Outside
ReachingB3fromoutside eaChing from outside sing outer irewall erver This is the simplest way of connecting to B3 from the Internet! The firewall in B3 protects your home computers from attacks from the out- side, by blocking traffic that is not directly requested from the inside. B3 has this functionality. In chapter “ Firewall” on page 58 you find information about the firewall settings. You can easily enable access for certain services such as email access from WWW etc or choose to open standard ports in an convenient way. Use Easyfind described in section Easyfind below to to let you or your friends to easy find your B3 on the Internet. asyfind Personal domain name Easyfind is a free DNS hosting service provided by Excito to make it simple for you to reach your B3 - anywhere, anytime. To be able to use Easyfind you have to have B3 as router in your LAN. Log in as administrator, click ‘Settings’ -> ‘Identity’ and activate ‘Easyfind loca- tion service’ . Select an Easyfind name and click update. Now you will be able to find your B3 wherever you are typing http://<your-Easyfind-name>.myownb3. com. If you have a dynamic IP address, you need an additional service that keeps track of your current IP address. You will get that using our service Easyfind and you will be able to reach your B3 wherever you are. If you change your easyfind name, the old name will immediately be released for others to use. Excito holds the right to terminate the service or remove in- appropriate names without notice. -
Page 132: External Ip Address
ReachingB3fromoutside Xternal address If you need to find out what your external IP address is, browse to http://check- ip.dyndns.org or any similar site. You may or may not have a fixed IP address, consult your Internet service provider to find out. If you do not have a fixed IP address, it may change without notice. -
Page 133: Using Another Firewall / Gateway Than B3
ReachingB3fromoutside sing another firewall gateway than assing traffiC through your firewall If you have a hardware firewall (commonly called Internet router or gateway) installed between B3 and your Internet connection, you have to make the firewall let certain traffic through in order to get the B3 functionality available from the outside. This is commonly referred to as ‘port forwarding’ . Consult your firewall or gateway manual on how to do this on your specific device. The following ports are required to be forwarded in order to get the corresponding service to work: Port number Service name Explanation 20 (TCP) To make B3’s FTP server available from the outside 21 (TCP) To make B3’s FTP server available from the outside 22 (TCP/UDP) Remote login protocol only for advanced users 25 (TCP/UDP) SMTP Email, incoming and outgoing 80 (TCP) HTTP WWW traffic, including web email, B3 ad- ministration interface and your personal web content 143 (TCP/UDP) IMAP To make B3’s IMAP server reachable from... -
Page 134: Software Update
Softwareupdate oftware uPdate B3’s software can easily be updated to gain new functionality. 1. Browse to http://b3 (http://b3.local if using Mac). 2. Click the gearwheel and log in as administrator. 3. Click ‘Settings’ and ‘Software update’ . 4. Press ‘Update’ system, and the update is automatically performed. Please have patient, it might take a while to perform an update. 5. When the update is complete status information will be shown. If a ‘+‘ sign is shown, more information is available by pressing it. -
Page 135: Hotfixes
Softwareupdate Information about installed software versions is shown under ‘Current package versions’ . otfiXes This feature collects status information from your B3 and sends to Excito for automated analysis. The update server can then take appropriate actions if your system has problems. The system information is sent to Excito via an en- crypted connection, and server responses are GPG signed to ensure the secu- rity and that the content is distributed by Excito. By default this feature is enabled. To disable it uncheck the box. If doing so you might not get the most important updates to your B3. AnyinformationcollectedbyExcitowillneverbeexposedtoanyother partythanExcito.Theinformationwillonlybeusedtopinpointerrorsand performthebestmatchedupdatesforyourB3. All information that is collected is listed below. • MAC address • IP addresses • Serial number and key • RAM memory size... - Page 136 Softwareupdate • CPU model • Status for the installed B3 specific packages • The log file /tmp/B3-apt.log if existing • Current software release version • Current running kernel • Root disc partition usage • Disc partition setup (LVM/RAID)
-
Page 137: Installing & Reinstalling Software
Installing&reinstallingsoftware & nstalling reinstalling software It is possible to reinstall a B3. This is useful if you have unintentionally de- stroyed something, have had a disk crash or wish to exchange the disk drive. You will need a USB stick or external USB-hard drive to perform a software installation. Please notice that your memory stick must have a partition table. Unfortunately most available USB memories lack a partition table today. So if you experience install problems this is most likely the case, try another stick or a USB-hard drive. On http://www.excito.com you are able to buy a already prepared Excito USB stick with a partition table and the latest released software. Your B3’s hard drive has 3 partitions: System partition, Data partition and Swap partition. It is totally normal that you do not se the total disk size (i.e. 500GB , 1TB or 2TB) available in the web interface as the System partition and the Swap partition takes some of the space. tandard installation Note:Allyourpersonaldatawillbelostifdoingthisoperation.Acomplete harddriveformatwillbedone. 1. Download the recovery image at: http://update.excito.net/install/latest/b3 2. Insert the USB memory stick (minimum size 512 MByte) in to your PC and format it, select FAT32 as file system. The USB stick must have a partition table. - Page 138 Installing&reinstallingsoftware 3. Unzip the downloaded recovery image to the root catalogue on the USB stick. You will get one catalogue in the USB root called install: The install catalogue contains sub-folders: 4. Shut down B3. 5. Remove power to B3. 6. Place the USB memory in one of B3’s USB ports, which one doesn’t matter. 7. Hold the power button pressed, keeping it pressed, and plug in the power cord to B3 again. 8. Wait until the front LED is green. B3 will now automatically format the disk, and install the Linux file system on it. The installation will take about 15 min-...
-
Page 139: Rescue System
Installing&reinstallingsoftware utes to complete with a 1 TB disk, 20 minutes with a 2 TB disk. 9. The front LED will become purple and finally turn blue. The installation is now complete 10. You will find your B3 unit via a web browser on http://b3 (http://b3.local if using Mac). 11. Enter the web interface and perform a software update to ensure that your B3 runs the latest software: Click ‘Settings’ and ‘Software update’ , then press ‘Update system’ . 12. Reboot your B3. This is needed in case that the kernel was updated. All done! esCue system It is possible to boot up your B3 from a USB stick without formatting your hard drive. This could be useful if you by mistake have “locked” yourself out from your B3. In the ‘\install’ catalogue you will find the ‘bubba.cfg’ file. Edit the set- tings in this file to fit your needs. Please notice that editing the config file in Windows with Notepad or Wordpad will destroy the file. Use an editor like Notepad2 or ConTEXT. If choosing ‘rescue system’ a SSH connection will be available at the WAN port. You will need to have an DHCP server as B3 in this mode will obtain an IP ad- dress automatically. Important: • You need a DHCP server as B3 in this mode will obtain an IP address auto- matically. • Connect B3 WAN port to your DHCP server. • A SSH connection will be available on the WAN port using username: ‘root’ , password: ‘excito’ . -
Page 140: Front Led Information
Installing&reinstallingsoftware ront information • No light - power off • Blue - B3 active • Green - programming in progress • Purple - Booting or shutting down • Red - error indication (missing RAID disc etc) -
Page 141: Customizing B3 - Sw & Hw
CustomizingB3-SW&HW B3 - sw & hw ustomizing For advanced users, B3 is a perfect platform for experimenting or for configur- ing to fit your special needs. This requires some Linux skills, and is not officially supported by Excito. However, you will find some hints below. We have inten- tionally not made these instructions too detailed; if you don’t understand it, don’t try it. If you are curios anyway, you will find how-tos, hints and ideas in our web fo- rum: http://forum.excito.net/ and on our wiki: http://wiki.excito.org/wiki/. ssh - with root login In order to get shell access to your B3, use a SSH client (i.e. PuTTY for Windows). For security reasons, neither admin nor root have direct SSH access. Log on using your normal user name and password, and use su to get root access. The user must have ‘Shell login’ activated. Note that root access gives access to the entire Linux system, and using it with- out caution may erase your data and cause your B3 to malfunction. Therootpasswordisexcito. nstalling other aPPliCations Since B3 is based on a standard Linux Debian platform, all Debian packages are available for installation. Use apt (Advanced Package Tool) to install what- ever you find suitable. When doing update from the web interface, an ‘apt-get update’ and ‘apt-get dist-upgrade’ is done. -
Page 142: Installing A Disk
CustomizingB3-SW&HW nstalling a disk This instruction applies to users who wish to exchange their disk. B3’s interior is subject to ESD (Electro-Static Discharge) damage, and appropri- ate measures must be taken to prevent damage. Always make sure that you are electrically discharged before touching the B3’s circuit board or internal connectors. To get electrically discharged touch something in your home that is grounded, like an element, a sink or a water pipe. 1. Unscrew the three screws at the back of B3 using a Torx T10 (on older B3 use 2.0 hex) screwdriver. Remove the back panel and pull out the circuit board. 2. Cut loose two small pieces (10mm long) of heat pad and place on top of each other. Then place them on the front of the hard drive (the side facing from the hard drive connectors). 3. Looking into B3, attach one heat pad on the left hand side shown in picture. - Page 143 CustomizingB3-SW&HW 4. Looking into B3, attach one heat pad on the right hand side shown in pic- ture. 5. Mount the two metal sliders on each side of your hard drive with the four silver screws.
- Page 144 CustomizingB3-SW&HW 6. Slide the hard drive all the way into B3. 7. Slide the circuit board into B3 above the hard drive.
- Page 145 CustomizingB3-SW&HW 8. Close up showing circuit board insertion. 9. Mount the back side piece with the three screws. Be careful when inserting the screws, making sure that the threads are aligned correctly. 10. All done!
-
Page 146: Technical Data
Technicaldata eChniCal data Downloader (HTTP, FTP, TORRENT) iTunes music streaming (Firefly/DAAP/Soundbridge) DLNA media streaming (MiniDLNA) Squeezebox Streaming (Squeezebox server) File server (HTTP, Samba, FTP, SCP, AFP) Web server (Apache, PHP5 and MySql) Webmail client (Horde, with calendar and notes) Email Server (Dovecot, Postfix) Fetchmail Server (Fetchmail) Easyfind service Printer Server (Cups) SSH connection to internal Linux Linux 2.6 + Debian Squeeze Firewall (Iptables) Router Wireless access point (802.11 abgn, 2 x MIMO, dual band, fully open source) DNS server DHCP server RAID 1 support with eSATA disk Integrated backup solution (remote or local target) Web photo album... -
Page 147: Support
Support uPPort • In this manual, located on your B3 and on http://www.excito.com/, you will find all B3’s features explained. • Make sure that you are reading the latest version of the manual: do a soft- ware update in B3’s web interface as the manual located on B3 is a part of B3’s software distribution, and will be updated with software updates. • You will find the most common questions in our FAQ. Browse to http://www. excito.com/ and click ‘support’ . • We have a forum where you can communicate with other B3 users, http:// forum.excito.net/. Use the search function to find out if your problem al- ready has been solved! • We have a wiki with great how-tos, http://wiki.excito.org/wiki Take advan- tage of the information others has written to you! • If you do not find what you are looking for, send an Email to support@ex- cito.com with your questions. gPl s tatement This product uses GPL/LGPL software. For more information please read the GNU LICENSE document found here http://www.gnu.org/licenses/gpl.txt. imited warranty Subject to the terms and conditions set forth herein, Excito Elektronik i Skåne AB, (“Excito”) provide this Limited Warranty: Only to the person or entity that originally purchased the product from Excito or its authorized reseller or distributor Limited Warranty: Excito warrants that the hardware portion of the Excito product described below (“Hardware”) will be free from material defects in workmanship and materials under normal use from the date of original retail purchase of the product, for the period set forth below (“Warranty Period”), except as otherwise stated herein. - Page 148 Support Hardware: Two (2) Years The customer’s sole and exclusive remedy and the entire liability of Excito and its suppliers under this Limited Warranty will be, at Excito’s option, to repair or replace the defective Hardware during the Warranty Period at no charge to the original owner or to refund the actual purchase price paid. Any repair or replacement will be rendered by Excito at an Authorized Excito Service Office. The replacement hardware need not be new or have an identical make, model or part. Excito may, at its option, replace the defective Hardware or any part thereof with any reconditioned product that Excito reasonably determines is substantially equivalent (or superior) in all material respects to the defec- tive Hardware. Repaired or replacement hardware will be warranted for the remainder of the original Warranty Period or ninety (90) days, whichever is longer, and is subject to the same limitations and exclusions. If a material de- fect is incapable of correction, or if Excito determines that it is not practical to repair or replace the defective Hardware, the actual price paid by the original purchaser for the defective Hardware will be refunded by Excito upon return to Excito of the defective Hardware. All Hardware or part thereof that is replaced by Excito, or for which the purchase price is refunded, shall become the prop- erty of Excito upon replacement or refund. Limited Software Warranty: Excito warrants that the software portion of the product (“Software”) will substantially conform to Excito’s then current func- tional specifications for the Software, as set forth in the applicable documen- tation, from the date of original retail purchase of the Software for a period of ninety (90) days (“Software Warranty Period”), provided that the Software is properly installed on approved hardware and operated as contemplated in its documentation. Excito further warrants that, during the Software Warranty Period, the magnetic media on which Excito delivers the Software will be free of physical defects. The customer’s sole and exclusive remedy and the entire liability of Excito and its suppliers under this Limited Warranty will be, at Excito’s option, to replace the non-conforming Software (or defective media) with software that sub- stantially conforms to Excito’s functional specifications for the Software or to refund the portion of the actual purchase price paid that is attributable to the Software. Except as otherwise agreed by Excito in writing, the replacement Software is provided only to the original licensee, and is subject to the terms...
- Page 149 Support and conditions of the license granted by Excito for the Software. Replacement Software will be warranted for the remainder of the original Warranty Period and is subject to the same limitations and exclusions. If a material non-con- formance is incapable of correction, or if Excito determines in its sole discre- tion that it is not practical to replace the non-conforming Software, the price paid by the original licensee for the non-conforming Software will be refunded by Excito; provided that the non-conforming Software (and all copies thereof ) is first returned to Excito. The license granted respecting any Software for which a refund is given automatically terminates. Non-Applicability of Warranty: The Limited Warranty provided hereunder for Hardware and Software portions of Excito’s products will not be applied to and does not cover any refurbished product and any product purchased through the inventory clearance or liquidation sale or other sales in which Excito, the sellers, or the liquidators expressly disclaim their warranty obligation pertain- ing to the product and in that case, the product is being sold “As-Is” without any warranty whatsoever including, without limitation, the Limited Warranty as described herein, notwithstanding anything stated herein to the contrary. Excito will not be held responsible for any packages that are lost in transit to Excito. The repaired or replaced packages will be shipped to the customer via any common carrier selected by Excito. Expedited shipping is available upon request and provided shipping charges are prepaid by the customer. Excito may reject or return any product that is not packaged and shipped in strict compliance with the foregoing requirements, or for which an RMA number is not visible from the outside of the package. The product owner agrees to pay Excito’s reasonable handling and return shipping charges for any product that is not packaged and shipped in accordance with the foregoing requirements, or that is determined by Excito not to be defective or non-conforming. What Is Not Covered: The Limited Warranty provided herein by Excito does not cover: Products that, in Excito’s judgment, have been subjected to abuse, ac- cident, alteration, modification, tampering, negligence, misuse, faulty instal- lation, lack of reasonable care, repair or service in any way that is not contem- plated in the documentation for the product, or if the model or serial number...
- Page 150 Support has been altered, tampered with, defaced or removed; Initial installation, installation and removal of the product for repair, and shipping costs; Opera- tional adjustments covered in the operating manual for the product, and nor- mal maintenance; Damage that occurs in shipment, due to act of God, failures due to power surge, and cosmetic damage; Any hardware, software, firmware or other products or services provided by anyone other than Excito; and Prod- ucts that have been purchased from inventory clearance or liquidation sales or other sales in which Excito, the sellers, or the liquidators expressly disclaim their warranty obligation pertaining to the product. We recommend that you use only an Authorized Excito Service Office for maintenance or repairs on your Product. Improper or incorrectly performed maintenance or repair voids this Limited Warranty. All modification or installation of applications by tampering with the shipped Linux installation will terminate the Limited Warranty. Disclaimer of Other Warranties: EXCEPT FOR THE LIMITED WARRANTY SPECI- FIED HEREIN, THE PRODUCT IS PROVIDED “AS-IS” WITHOUT ANY WARRANTY OF ANY KIND WHATSOEVER INCLUDING, WITHOUT LIMITATION, ANY WAR- RANTY OF MERCHANTABILITY, FITNESS FOR A ARTICULAR PURPOSE AND NON- INFRINGEMENT. IF ANY IMPLIED WARRANTY CANNOT BE DISCLAIMED IN ANY TERRITORY WHERE A PRODUCT IS SOLD, THE DURATION OF SUCH IMPLIED WARRANTY SHALL BE LIMITED TO THE DURATION OF THE APPLICABLE WAR- RANTY PERIOD SET FORTH ABOVE. EXCEPT AS EXPRESSLY COVERED UNDER THE LIMITED WARRANTY PROVIDED HEREIN, THE ENTIRE RISK AS TO THE QUAL- ITY, SELECTION AND PERFORMANCE OF THE PRODUCT IS WITH THE PURCHAS- ER OF THE PRODUCT. Limitation of Liability: TO THE MAXIMUM EXTENT PERMITTED BY LAW, EXCITO IS NOT LIABLE UNDER ANY CONTRACT, NEGLIGENCE, STRICT LIABILITY OR OTHER LEGAL OR EQUITABLE THEORY FOR ANY LOSS OF USE OF THE PROD- UCT, INCONVENIENCE OR DAMAGES OF ANY CHARACTER, WHETHER DIRECT, SPECIAL, INCIDENTAL OR CONSEQUENTIAL (INCLUDING, BUT NOT LIMITED TO, DAMAGES FOR LOSS OF GOODWILL, LOSS OF REVENUE OR PROFIT, WORK STOPPAGE, COMPUTER FAILURE OR MALFUNCTION, FAILURE OF OTHER EQUIP- MENT OR COMPUTER PROGRAMS TO WHICH EXCITO’S PRODUCT IS CON-...
- Page 151 Support NECTED WITH, LOSS OF INFORMATION OR DATA CONTAINED IN, STORED ON, OR INTEGRATED WITH ANY PRODUCT RETURNED TO EXCITO FOR WARRANTY SERVICE) RESULTING FROM THE USE OF THE PRODUCT, RELATING TO WARRAN- TY SERVICE, OR ARISING OUT OF ANY BREACH OF THIS LIMITED WARRANTY, EVEN IF EXCITO HAS BEEN ADVISED OF THE POSSIBILITY OF SUCH DAMAGES. THE SOLE REMEDY FOR A BREACH OF THE FOREGOING LIMITED WARRANTY IS REPAIR, REPLACEMENT OR REFUND OF THE DEFECTIVE OR NON-CONFORMING PRODUCT. THE MAXIMUM LIABILITY OF EXCITO UNDER THIS WARRANTY IS LIMITED TO THE PURCHASE PRICE OF THE PRODUCT COVERED BY THE WAR- RANTY. THE FOREGOING EXPRESS WRITTEN WARRANTIES AND REMEDIES ARE EXCLUSIVE AND ARE IN LIEU OF ANY OTHER WARRANTIES OR REMEDIES, EX- PRESS, IMPLIED OR STATUTORY. Copyright Statement: No part of this publication or documentation accompa- nying this product may be reproduced in any form or by any means or used to make any derivative such as translation, transformation, or adaptation without permission from Excito, as stipulated by the United States Copyright Act of 1976 and any amendments thereto. Contents are subject to change without prior notice. Copyright 2008 by Excito. All rights reserved. CE Mark Warning: This is a Class B product. In a domestic environment, this product may cause radio interference, in which case the user may be required to take adequate measures. Our products are Lead-Free Halogen-Free RoHS compliant...
- Page 152 ...
- Page 153 ...
- Page 154 DesignedbyExcitoSweden...
Need help?
Do you have a question about the B3 and is the answer not in the manual?
Questions and answers