Chapters
Table of Contents
Troubleshooting

Related Manuals for Phonocar VM 035


Summary of Contents for Phonocar VM 035
- Page 1 6,2" TFT-LCD - DVD RECEIVER BLUETOOTH -TV TUNER FUNCTION MANUALE ISTRUZIONI ITALIANO INSTRUCTIONS MANUAL ENGLISH NOTICE DE MONTAGE ET D’EMPLOI FRANÇAIS GEBRAUCHSANWEISUNGEN DEUTSCH VM 035...
- Page 3 MANUALE ISTRUZIONI INSTRUCTIONS MANUAL NOTICE DE MONTAGE ET D’EMPLOI GEBRAUCHSANWEISUNGEN VM 035...
- Page 4 6. All’insorgere di uno dei seguenti problemi, spe- gnere immediatamente l’apparecchio e contattare il Servizio Assistenza PHONOCAR oppure il Rivendi- tore presso il quale è stato acquistato: a) mancanza di Audio b) mancanza di Immagine c) acqua o oggetti all’interno dell’apparecchio...
- Page 5 Precauzioni 1. L’apertura e la riparazione dell’apparecchio va eseguita soltanto da personale Specializzato. 2. Per eliminare eventuali sporcizie sul frontalino e/o monitor, usare uno straccio pulito, con detergente neutro. Uno straccio ruvido e detergenti non neutri (esempio l’alcool), possono graffi are e/o scolorare le superfi...
-
Page 6: Table Of Contents
Indice Installazione ............5 Riproduzione disco VCD ........12 Caratterstiche Tecniche .........6 Telecomando ............7 Repeat Funzioni Selettore Brani Musicali Sostituzione batteria Riproduzione USB/SD ..........13 Operazioni di base ..........8 Modalità USB/SD Menu principale Riproduzione in USB/SD ........13 ON-OFF Play/Pausa Mute Repeat Volume Bluetooth ............14-15 Espulsione disco Scelta BT Open... -
Page 7: Installazione
Installazione Prima di effettuare l’installazione, posizionare l’apparecchio nell’apposito vano e stabilire i vari collegamenti elettrici, inclusi quelli verso gli altoparlanti. Dopo aver verifi cato che il sistema funziona correttamente, pro- cedere all’installazione defi nitiva del sistema. Istruzioni per l’Installazione 1. Installare l’angolare 2. -
Page 8: Caratteristiche Tecniche
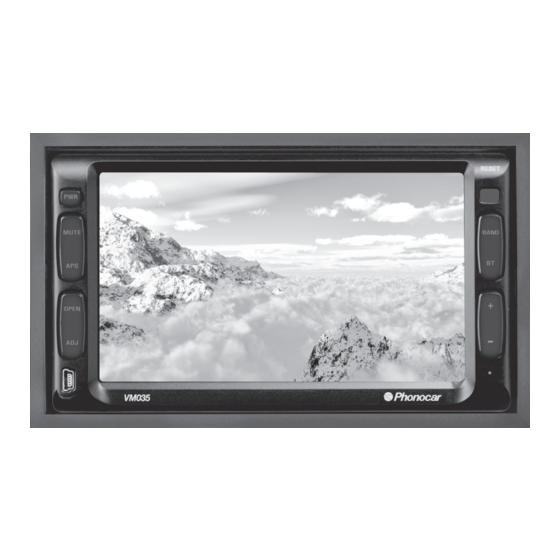
Caratteristiche tecniche RESET PW R MUT E BAN D • OP EN • AD J 1) Tasto PWR (Power) = Alimentazione 2) Tasto MUTE = senza Audio 3) Tasto APS = ricerca scannerizzata 4) Tasto OPEN = per fare scendere il Monitor 5) Tasto ADJ = aggiustamento posizione Monitor 6) USB = apertura per chiavetta USB 7) MIC = microfono... -
Page 9: Telecomando
Telecomando 1) Tasto (PWR) : Alimentazione Tasto (REC/Sub-T) : Memorizzazione/Lingua Mute Tasto (MUTE) : senza Audio Sub- T Tasto (SRC) : Selezione Sorgente Band 2) Tasto (BAND/RDM) : Selezione Banda/Riproduzione Language Angle Casuale Tasto (APS/PRG) : Scannerizzazione/Programma Tasto (ST/RPT) : Selezione Stereo/Ripetizione 3) Tasto ( ) : Play/Pausa Tasto ( ) : Stop Tasto (SETUP) : Regolazione Menù... -
Page 10: Operazioni Di Base
Operazioni di base MENU PRINCIPALE Selezionare le icone RADIO, MEDIA PLAYER, BACK VIEW, INPUT, SETUP, GPS, BLUETOOTH, TV dal Menù Principale, per scegliere la funzione desiderata. Nota: GPS NON DISPONIBILE. Nota: le icone Grigie non possono essere usate. ON.OFF Premere il bottone PWR brevemente per l'accensione e tenere premuto 2 secondi per lo spegnimento dell’apparecchio. -
Page 11: Operazioni Di Impostazione
Operazioni di impostazione IMPOSTAZIONI Entrare nel menù principale e premere il tasto SETUP. Si presenteranno le seguenti Modalità: Modalità Video: VIDE O Gestione Menù: BRIGH T1 Premere (+) / (+) per scegliere il Menù. CO LOR CONTRAS T Premere (+) / (-) per ritoccare il parametro MODE USE R Premere (... -
Page 12: Modalità Radio
Modalità radio Bande di frequenza •• •• •• • Premere (BAND) sul monitor e scegliere tra tre bande FM e due bande AM (FM1> FM2> FM3> •• • •• •• • AM1> AM2). •• •• •• •• •• •• • ••... -
Page 13: Riproduzione Disco Dvd
Riproduzione disco DVD ATTENZIONE: Il VM035 può non essere compatibile con alcuni supporti CD/DVD. Inserendo un disco DVD, sul Monitor apparirà il seguente menù: DV D-V TITL E DV D-V OF F 1/ 2 OF F 00:33:11 / 01:45: 44 00:33:11 /01:45: 44 RE P... -
Page 14: Riproduzione Disco Mp3
Riproduzione disco MP3 Inserendo un disco MP3, sul monitor apparirà il seguente menù: MUSI C MUSI C NON E 00 1 00 10 01 •• •• MP 3 PL AYIN G 00 20 02 •• •• MP 3 •••• 00 30 03 ••... -
Page 15: Riproduzione Usb/Sd
Riproduzione USB / SD RESET BAND MUTE AP S • OPEN AD J • US B Modalità USB/SD - Inserendo la chiave USB o la SD-card, l’apparecchio si commuta automaticamente in modalità USB/SD. Riproduzione in USB/SD PLAY/PAUSA - Premere il tasto ( ) per iniziare o interrompere la Riproduzione. -
Page 16: Bluetooth
Bluetooth Il sistema Bluetooth descrive la trasmissione, a breve distanza, senza cavi. La funzione Bluetooth permette al lettore DVD di entrare in comunicazione con apparecchiature Bluetooth. SELEZIONE BT Premere il tasto (BT), o toccare l’icona BT sul touch-screen, per entrare nella modalità telefonica BT. Funzionamento del sistema Bluetooth Il Bluetooth funziona come segue: A: Accoppiamento... -
Page 17: Telefono Cellulare
Bluetooth Telefono cellulare Una volta stabilito il contatto (accoppiamento), le telefonate possono essere eseguite a scelta, sul monitor Touch-screen o dall'archivio delle chiamate presenti sul display. A: Effettuare una chiamata dal telefonino Finito di comporre il numero telefonico, l’icona della chiamata ( ) s’illuminerà. -
Page 18: Funzionamento Tv
TV Tuner Funzionamento TV Per ricevere i programmi TV, occorre installare un’apposita antenna TV. (NON IN DOTAZIONE) Modalità TV: - Per entrare, toccare l’icona TV. La selezione delle funzioni nella modalità TV, deve essere effettuata premendo il TOUCH SCREEN in corris- pondenza dei tasti che compaiono in basso sul display. -
Page 19: Accessori
Accessori In dotatazione all’apparecchio, vengono forniti i seguenti accessori: • Utensili d’installazione 1 paio. • Cavo di collegamento USB 1 pezzo. • Cavo alimentazione + 4 altoparlanti >ISO. • Cavo uscite preamplifi cate. • Telecomando. Attenzione: l’utilizzo di accessori diversi da quelli forniti in dotazione può causare danni all’apparecchio. Per questo motivo, si raccomanda di utilizzare soltanto gli accessori sopra specifi... -
Page 20: Problemi Generali
Problemi - Cause e rimedi Problemi generali Sintomo Cause Rimedi Il fusibile dell’apparecchio è rotto Inserire un nuovo fusibile della giusta potenza L’apparecchio non si accende Il fusibile della batteria dell’auto è rotto Inserire un nuovo fusibile della giusta potenza Operazioni sbagliate ecc. -
Page 21: Monitor Tft
Problemi - Cause e rimedi Monitor TFT Sintomo Cause Rimedi Il monitor non riceve immagini Il cavo del freno a mano è collegato Rivedere i collegamenti seguendo lo schema e le informazioni di pericolo in modo sbagliato generale dei collegamenti elettrici rimangono sempre visibili I colori del DVD non sono compatibili Selezionare il sistema di colori... -
Page 22: Radio-Tuner
Problemi - Cause e rimedi Radio-Tuner Sintomo Cause Rimedi Rivedere i collegamenti seguendo lo schema L’antenna dell’auto non è uscita completamente generale dei collegamenti elettrici Le stazioni si ricevono L’antenna dell’auto non è fermamente Rivedere i collegamenti seguendo lo schema con diffi... -
Page 23: Lettore Dvd
Problemi - Cause e rimedi Lettore DVD Sintomo Cause Rimedi Il disco non si lascia inserire Un disco risulta già inserito Fare uscire il disco ed inserirne un altro Disco graffi ato Cambiare disco Disco sporco o bagnato Pulire disco Pulire il laser-lettore con apposito disco di pulizia Il laser-lettore è... -
Page 24: Dati Tecnici
Dati tecnici Eventuali modifi che potranno essere apportate senza preavviso. Sezione Monitor TFT screen size ...........6.2 Sezione Audio Dot distance ........0.107*0.370mm Largest power..........45WX4 Analysis ..........1440*234 dots Background illuminatio ........LED Audio Low ............100Hk 10db Sezione DVD Middle ............ -
Page 25: Schema Dei Collegamenti
Schema dei collegamenti... -
Page 26: Warnings And Precautions
Warnings and Precautions 1. Only connect the unit to a 12V power supply with negative grounding. 2. Never install the unit where the operation for safety driving is restrained. 3. Never use the video d isplay function in the front when driving to prevent the violation of laws regula- tions and also to reduce the risk of traffi... - Page 27 Warnings and Precautions 1. Never disassemble or adjust the unit without any professional guide. For details, please consult any pro- fessional car shop/dealer for inquiry. 2. If the front panel or the TFT monitor is squalid, please use a clean silicone cloth and neutral detergent to wipe off the spot.
- Page 28 Index Installation .............29 Play VCD disc ............36 General Features ..........30 Remolte control ............31 Repeat Functions Track switch Loading and Replacing the battery USB/SD operation ..........37 Basic operation .............32 USB/SD mode Main menu Play operation USB/SD ........37 ON-OFF Play/Pausa Mute Repeat mode Volume Bluetooth ............
-
Page 29: Installation
Installation Before installing the receiver, fi t it in the approximate place in your car and connect the equipment according to the speakers and electrical connections. When your system is operated properly, follow the instructions for permanent installation of your system. Mounting Instructions 1. -
Page 30: General Features
General Features RESET PW R MUT E BAN D • OP EN • AD J 1) PWR button: Power. 2) MUTE button: Mute. 3) APS button: Reception Scan. 4) OPEN button: Turn down button. 5) ADJ button: Display position Adjustment. 6) USB Port. -
Page 31: Loading And Replacing The Battery
Remote Control 1) [PWR] Button: Power [REC/Sub-T]Button: Transfer recording/Language switch Mute [MUTE] Button: Mute Sub- T [SRC] Button: Play source switch Band Language Angle 2) [BAND/RDM] Button: Band switch/Play randomly [APS/PRG] Button: Scan/Program [ST/RPT] Button: Stereo switch/Repeat 3) ( ) Button: Play/Pause ( ) Button: Stop [Setup] Button: Menu setting Enter... -
Page 32: Basic Operation
Basic Operation MAIN MENU Touch the RADIO, MEDIA PLAYER, BACK VIEW, INPUT, SETUP, GPS, BLUETOOTH and TV icon on main menu to choose the function. NOTE: GPS NOT AVAILABLE. NOTE: Gray icon can not use. ON.OFF Briefl y press PWR-key to switch-on. For the switch-off, keep PWR-key pressed for about 2 seconds. -
Page 33: Video Mode
Setup operation Setup Enter the main menu, touch the setup button will display: Video mode: VIDE O Menu operation: BRIGH T1 Touch (+) / (+) to choose menu. CO LOR CONTRAS T Touch (+) / (-) to adjust parameter. MODE USE R Touch ( ) to back main menu. -
Page 34: Radio Operation
Radio operation Bande di frequenza •• •• •• • Press [BAND] on the screen to select among three FM or two AM bands. (FM1> FM2> FM3> •• • •• •• • AM1> AM2). •• •• •• •• •• •• • ••... -
Page 35: Play Dvd Disc
Play DVD disc ATTENTION: The VM190 might not be compatible with certain CD/DVD-supports. Insert DVD disc, touchscreen will show menu as follows: DV D-V TITL E DV D-V OF F 1/ 2 OF F 00:33:11 / 01:45: 44 00:33:11 /01:45: 44 RE P BACK RE P... -
Page 36: Play Vcd Disc
Play MP3/VCD disc Insert MP3 disc, touchscreen will show menu as follows: MUSI C MUSI C NON E 00 1 00 10 01 •• •• MP 3 PL AYIN G 00 20 02 •• •• MP 3 •••• 00 30 03 ••... -
Page 37: Usb/Sd Operation
USB/SD operation RESET BAND MUTE AP S • OPEN AD J • US B USB/SD mode Inset USB/SD,the play will to the USB/SD playing mode antomaticly. USB/SD operation PLAY/PAUSA Press ( ) button to play or pause. Select: Under USB or SD play mode, press ( ) button to select. -
Page 38: Bluetooth
Bluetooth The Bluetooth is wireless mode of transmission in short distance.Through Bluetooth function, the DVD unit establishes connection with Bluetooth handset. BT Choose Press [BT] or touch BT icon, can enter BT mode when calling. Working mode of Bluetooth Bluetooth has the following functions: A: Paring Make DVD Bluetooth function as handset s facility through pairing. -
Page 39: Bluetooth
Bluetooth Mobile phone After connected, you can make phone call through, touch screen or phone record. A: Making mobile phone call After making phone call, the ( ) will shining. B: Making touch screen call Input the numbers on the screen, press ( ) icon can correct the numbers; Press ( ) icon to answer phone call;... -
Page 40: Tv Tuner
TV Tuner TV operation You need install TV antenna, when receive program. TV mode: Then press TV icon to enter. The selection of the TV-Functions is carried out on the TOUCH-SCREEN, by touching the keys shown on the low margin of the display. The selection is confi... -
Page 41: Troubleshooting
Accessories The included attachments of the unit are as below sheet: • Installed equipments ......one pair • USB connected wire ......one piece • Current-supply-cable plus 4 Speakers > ISO • Cable for preamplifi ed Exits • Remote Control Unit ATTENTION: The use of any accessories except of those provided might result in damage to the unit .Make sure only to use the accessories shipped with the unit ,as shown above. -
Page 42: General Problems
Troubleshooting General problems Symptoms Causes Remedies The fuse of the unit has been broken. Install a new fuse with correct rating The unit cannot be powered on The fuse of car battery has been broken. Install a new fuse with correct rating False operations and etc. -
Page 43: Tft Monitor
Troubleshooting TFT Monitor Symptoms Causes Remedies No image appears on the monitor and warning Correct the connection according to Incorrect connection of Breaking wire (Electrical Connections Overall Diagram) information is shown at all times Adjust the color system of the DVD disc The color system of DVD disc is not or the monitor suited with the monitor... -
Page 44: Radio-Tuner
Troubleshooting Radio-Tuner Symptoms Causes Remedies Correct the connection according to Auto antenna is not extended completely (Electrical Connections Overall Diagram) It's hard to receive Correct the connection according to Auto antenna is not connected with the unit fi rmly stations (Electrical Connections Overall Diagram) LOCAL function is on Close the LOCAL function... -
Page 45: Troubleshooting
Troubleshooting DVD player Symptoms Causes Remedies Disc cannot be inserted There is a disc in the unit already Eject the disc then insert another one. Disc is scratched Change the disc Disc is too dirty or wet Clean the disc The pickup is dirty Clean the pickup with cleaning disc Disc is not compatible with the unit... -
Page 46: Specifi Cations
Specifi cations Specifi cations subject to change without notice. Monitor sector TFT screen size ...........6.2 Audio sector Dot distance ........0.107*0.370mm Largest power..........45WX4 Analysis ..........1440*234 dots Background illuminatio ........LED Audio Low ............100Hk 10db DVD sector Middle ............1Hk 10db D/A convert ........... -
Page 47: Electric Connection
Electric Connection... - Page 48 6. A’ l’apparition des problèmes ci-dessous, éteindre immédiatement l’appareil et contacter le service d’assistance PHONOCAR ou le revendeur chez qui vous l’avez acheté : a) Pas d’audio b) Pas d’image c) Présence d’eau ou des objets à l’intérieur de l’appareil...
- Page 49 PRECAUTIONS 1. L’ouverture et la réparation de l’appareil doit être fait uniquement par du personnel spécialisé 2. Pour éliminer des éventuelles taches sur le frontal et/ou monitor, se servir d’un chiffon propre et d’un détergent neutre. Un chiffon rugueux et des détergents agressifs (non neutre comme par exemple l’alcool), peuvent gratter et/ou décolorer les superfi...
- Page 50 Indice Installation .............51 Reproduction d’un VCD ........58 Caractéristiques techniques .......52 Télécommande .............53 Repeat Fonctions Sélecteur des chansons Substitution batteries / piles Reproduction USB/SD .........59 Opérations de base ..........54 Modalité USB/SD Menu principal Reproduction en USB / SD ON – OFF Play / Pause Mute Repeat...
-
Page 51: Installation
INSTALLATION Avant l’installation, positionner l’appareil dans l’espace qui lui est réservé et fi xer les différents raccorde- ments électriques, inclus celles des hauts parleurs. Après avoir vérifi é le bon fonctionnement de l’appareil, faire son installation défi nitive. Instruction pour l’installation 1. -
Page 52: Caracteristiques Techniques
CARACTERISTIQUES TECHNIQUES RESET PW R MUT E BAN D • OP EN • AD J 1. Touche PWR (Power) = Alimentation 2. Touche MUTE = sans Audio 3. Touche APS = scanning de la recherche 4. Touche OPEN = pour faire baisser le monitor 5. -
Page 53: Télécommande
TELECOMMANDE 1) Touche (PWR): Alimentation Touche (REC/Sub-T): Mémorisation/Langue Mute Touche (MUTE): sans Audio Sub- T Touche (SRC): Sélection source Band 2) Touche (BAND/RDM): Sélection Bande /reproduction Language Angle Casuelle Touche (APS/PRG): Scanning / Programme Touche (ST/RPT): Sélection stéréo / répétition 3) Touche ( ): Play/Pause Touche ( ): Stop Touche (SETUP): Réglage Menu... -
Page 54: Opérations De Base
OPERATION DE BASE MENU PRINCIPALE - Sélectionner les icônes RADIO, MEDIA PLAYER, BACK VIEW, INPUT, SETUP, GPS, BLUETOOTH, TV du Menu Principale, pour choisir la fonction désirée. Note: GPS pas disponible. Note: les icônes grises ne peuvent pas être utilisées. ON/OFF - Presser brièvement le bouton PWR pour l’allumage et faire pression 2 secondes pour l’éteindre l’appareil. -
Page 55: Modalité Vidéo
OPERATION DE BASE REGLAGES Entrer dans le menu principal et appuyer la touche SETUP. Les modalités suivantes seront visionnés: Modalité Vidéo: VIDE O Gestion Menu: BRIGH T1 Appuyer la touche (+) / (+) pour choisir le Menu. CO LOR CONTRAS T Appuyer la touche (+) / (-) pour régler les valeurs (paramètre) MODE USE R... -
Page 56: Modalité Radio
MODALITE RADIO BANDE DE FREQUENCE •• •• •• • Appuyer (BAND) sur le monitor et choisir parmi trois bande FM et deux AM (FM1 – FM2 – FM3 •• • •• •• • – AM1 – AM2). •• •• •• ••... -
Page 57: Reproduction D'un Dvd
REPRODUCTION DVD ATTENTION: Le VM190 pourrait ne pas être compatible avec certains supports CD/DVD. Quand on introduit un DVD, le menu suivant apparaît sur le monitor: DV D-V TITL E DV D-V OF F 1/ 2 OF F 00:33:11 / 01:45: 44 00:33:11 /01:45: 44... -
Page 58: Repeat = Répétition
REPRODUCTION MP3 En introduisant un CD MP3, le menu suivant apparaît sur le monitor: MUSI C MUSI C NON E 00 1 00 10 01 •• •• MP 3 PL AYIN G 00 20 02 •• •• MP 3 •••• 00 30 03 ••... -
Page 59: Reproduction Usb/Sd
REPRODUCTION USB / SD RESET BAND MUTE AP S • OPEN AD J • US B Modalité USB / SD - En introduisant la clé USB ou la SD-card, l’appareil se commute automatiquement en modalité USB / SD. Reproduction en USB / SD PLAY / PAUSE - appuyer la touche( ) pour commencer ou interrompre la reproduction. -
Page 60: Bluetooth
BLUETOOTH Le système Bluetooth décrit la transmission sur des brèves distances sans nécessité de câbles. La fonction bluetooth permet au lecteur DVD de communiquer avec les appareils bluetooth. Selection BT Appuyer la touche (BT), ou toucher l’icône BT sur le touch screen, pour entrer dans la modalité téléphonique Fonctionnement du système Bluetooth Le fonctionnement du Bluetooth est le suivant: A: accouplement... -
Page 61: Répondre Aux Appels
BLUETOOTH Portable Une fois que le contact (accouplement) est établi, les appels peuvent être fait selon son propre choix: c’est à dire soit à partir du monitor touch screen que à partir du registre des appels qu’on trouve sur le display. A: effectuer un appel à... -
Page 62: Tuner Tv
Tuner TV Fonctionnement TV Pour recevoir les programmes TV, il faut installer une antenne TV. (PAS EN DOTATION) Modalité TV: En modalité TV, la sélection des fonctions doit être faite en pressant le TOUCH SCREEN en correspondance des touches qui apparaissent au bas du display. La sélection est confi... -
Page 63: Accessoires
ACCESSOIRES Les accessoires suivants sont fournis avec l’appareil: • Ustensiles d’installation ……………. 1 paire. • Câble de connexion USB …………... 1 pièce. • Câble a’alimentation + 4 haut-parleurs >ISO. • Câble sorties pré amplifi ées. • Télécommande. Attention: l’utilisation des accessoires différents de ceux qui vous sont fournis peut endommager l’appareil. Pour cette raison, nous conseillons d’utiliser uniquement les accessoires spécifi... -
Page 64: Problèmes Généraux
PROBLEMES – CAUSES ET SOLUTIONS Problèmes généraux Symptôme Cause Solution Le fusible de l’appareil a pété Insérer un nouveau fusible ayant la bonne puissance L’appareil ne s’allume pas Le fusible de la batterie du véhicule a pété Insérer un nouveau fusible ayant la bonne puissance Mauvaises opérations etc…... -
Page 65: Monitor Tft
PROBLEMES – CAUSES ET SOLUTIONS Monitor TFT Symptôme Cause Solution Le monitor ne reçoit pas les Le câble du frein à main est mal connecté Vérifi er les connexions en suivant le schéma images et les informations de général des connexions électriques danger reste toujours visibles Les couleurs du DVD ne sont pas compatibles Sélectionner le système des couleurs... -
Page 66: Radio Tuner
PROBLEMES – CAUSES ET SOLUTIONS Radio Tuner Symptôme Cause Solution Vérifi er les connexions en suivant le schéma L’antenne du véhicule n’est pas complètement sortie général des connexions électriques Les stations sont Vérifi er les connexions en suivant le schéma L’antenne du véhicule n’est pas fermement diffi... -
Page 67: Lecteur Dvd
PROBLEMES – CAUSES ET SOLUTIONS Lecteur DVD Symptôme Cause Solution Diffi culté à insérer le CD Présence d’un CD à l’intérieur du lecteur Faire sortir le CD et introduire un autre Présence d’égratignures sur le CD Changer le CD CD sale ou mouillé Nettoyer le CD Nettoyer le lecteur laser avec Le lecteur laser est sale... - Page 68 DONNEES TECHNIQUES Des probables variations pourront être appliquées sans préavis. Section Monitor TFT screen size ...........6.2 Section Audio Dot distance ........0.107*0.370mm Largest power..........45WX4 Analysis ..........1440*234 dots Background illuminatio ........LED Audio Low ............100Hk 10db Section DVD Middle ............
- Page 69 SCHEMA DE CONNEXIONS...
- Page 70 Falsche Sicherungen können das Gerät beschädigen oder Brände verursachen. 6. Gerät sofort ausschalten und bei Ihrem Phonocar-Händler einreichen, falls einer dieser Vorfälle auftaucht: a) Kein Audio am Ausgang b) Kein Bild am Ausgang c) Wasser oder Gegenstände ins Gerät eingedrungen d) Rauch e) Geruch.
- Page 71 Wichtige Hinweise 1. Das Gerät nur vom Fachmann öffnen oder reparieren lassen, daher immer Ihren Phonocar-Händler befra- gen. 2. Zum Säubern des Bildschirms oder des Bedienteils, ein sauberes Tuch, mit neutralem Reinigungsmittel, verwenden. Ein zu raues Tuch bzw. angreifende Reinigungsmittel (z.B. Alkohol) könnten das Gerät entweder verkratzen oder entfärben.
- Page 72 INHALTSVERZEICHNIS Installation .............73 VCD-Wiedergabe ..........80 Technische Daten ..........74 Fernbedienung ............75 Funktionen Musikstück-Wahl Einlegen der Batterie USB/SD-Wiedergabe ..........81 Basis-Funktionen..........76 USB/SD-Modus Haupt-Menü Wiedergabe in USB/SD On-Off Play/Pause Mute (Stummschaltung) Repeat Lautstärke Bluetooth ............82-83 CD Auswerfen BT-Wahl Open Bluetooth-Betrieb Koppelung Sichtwinkel einstellen Mobil-Telefon Einstellungs-Modalitäten ........77 Gespräch in Empfang nehmen...
-
Page 73: Installation
INSTALLATION Vor der endgültigen Installation, Gerät in den Schacht eingeben und alle notwendigen Elektro-Anschlüsse vornehmen, inbegriffen die Lautsprecher-Anschlüsse. Erst nachdem ausgetestet worden ist, dass das System korrekt funktioniert, das Gerät fest einbauen. Anweisungen zur Montage 1) Eckteil anbringen 2) Mittels Eckstück und Schrauben, Gerät im Schacht befestigen. Anweisungen zur Demontage 1) Befestigungsschrauben abnehmen 2) Eckteil abnehmen. -
Page 74: Technische Daten
TECHNISCHE DATEN RESET PW R MUT E BAN D • OP EN • AD J 1) Taste PWR (Power) = Ein-/Ausschalten 2) Taste MUTE = Stummschaltung 3) Taste APS = Scrolling 4) Taste OPEN = Monitor Ausfahren 5) Taste ADJ = Monitor-Ausrichtung 6) USB = USB-Eingabe 7) MIC = Microfon 8/9) Taste -/+ = Lautstärke reduzieren / erhöhen... -
Page 75: Fernbedienung
FERNBEDIENUNG 1) Taste (PWR) : Stromversorgung Taste (REC/Sub-T) : Einspeicherung / Sprache Mute Taste (MUTE) : Stummschaltung Sub- T Taste (SRC) : Wahl der Quellen Band Language Angle 2) Taste (BAND/RDM) : Frequenz-Band/Wahllose Wiedergabe Taste (APS/PRG) : Scrolling/Programm Taste (ST/RPT) : Stereo-Wiedergabe/Wiederholung 3) Taste ( ) : Play/Pause Taste ( ) : Stop Taste (SETUP) : Menü-Einstellung... -
Page 76: Basis-Funktionen
BASIS-FUNKTIONEN HAUPT-MENÜ - Aus dem Haupt-Menü, je nach der gewünschten Funktion, die entsprechende Ikone wählen: RADIO, MEDIA PLAYER, BACK VIEW, INPUT, SETUP, GPS, BLUETOOTH, TV. WICHTIG: GPS nicht verfügbar. Hinweis: die grauen Ikonen stehen nicht zur Verfügung. ON.OFF - Um das Gerät einzuschalten, PWR-Knopf ein Mal kurz drücken. -
Page 77: Einstellungs-Modalitäten
EINSTELLUNGS-MODALITÄTEN EINSTELLUNGEN Das Haupt-Menü betreten und SETUP-Taste drücken. Es erscheinen folgende Modalitäten: Video: VIDE O Menü-Einstellung: BRIGH T1 (+) / (+) drücken, um das Menü zu wählen. CO LOR CONTRAS T (+) / (-) drücken, um Einstellwert zu ändern. MODE USE R ) drücken, um zum Haupt-Menü... -
Page 78: Radio-Modalität
RADIO-MODALITÄT FREQUENZ-BÄNDER •• •• •• • Auf dem Bildschirm, die Funktion (BAND) drücken und unter folgenden Bändern wählen: •• • •• •• • FM1-FM2-FM3-AM1-AM2. •• •• •• •• •• •• • •• •• • SENDERSUCHE •••• •• Manuell •••• •• PT Y - ( ) drücken, um die Frequenz zu erhöhen ••... -
Page 79: Dvd-Wiedergabe
WIEDERGABE Wichtig: Der VM190 könnte, gegenüber bestimmter CDs/DVDs unkompatibel sein. Beim Einlegen einer DVD, erscheint folgendes Menü auf dem Monitor: DV D-V TITL E DV D-V OF F 1/ 2 OF F 00:33:11 / 01:45: 44 00:33:11 /01:45: 44 RE P BACK RE P BACK... -
Page 80: Mp3-Wiedergabe
MP3 WIEDERGABE Bei Eingabe einer MP3, erscheint folgendes Menü auf dem Monitor: MUSI C MUSI C NON E 00 1 00 10 01 •• •• MP 3 PL AYIN G 00 20 02 •• •• MP 3 •••• 00 30 03 ••... -
Page 81: Usb/Sd-Wiedergabe
USB / SD - WIEDERGABE RESET BAND MUTE AP S • OPEN AD J • US B USB / SD – MODUS - Bei Eingabe des USB-Stiftes oder der SD-Karte, schaltet das Gerät automatisch auf den diesbezüglichen USB/SD-Modus. Wiedergabe in SUB/SD PLAY/PAUSE - Taste ( ) drücken, um die Wiedergabe zu starten oder zu unterbrechen. -
Page 82: Bluetooth
Bluetooth Das Bluetooth-System sorgt für die drahtlose Daten-Übermittlung auf Kurz-Strecken. Die Bluetooth-Funk- tion ermöglicht dem DVD-Player, mit Bluetooth-Geräten in Verbindung zu treten. BT – WAHL Taste (BT) drücken, oder die BT-Ikone auf dem Bildschirm antippen, um den BT-Telefon-Modus zu betre- ten. -
Page 83: Mobil-Telefon
Bluetooth Mobil-Telefon Una volta stabilito il contatto (accoppiamento), le telefonate possono essere eseguite a scelta, sul monitor Touch-screen o dall'archivio delle chiamate presenti sul display. A: Telefongespräch auf dem Mobil-Telefon starten Nachdem die Telefonnummer gewählt worden ist, leuchtet die Ikone ( ) auf. -
Page 84: Tv-Tuner
TV-TUNER TV-Betrieb Um TV-Programme empfangen zu können, muss eine passende TV-Antenne installiert werden. TV-Modus - Um den TV-Modus zu betreten, die TV-Ikone antippen. Die TV-Funktionen müssen auf dem Touch-Screen angewählt werden. Hierzu dienen die, am unteren Rand des Displays, angelegten Funktions-Tasten. Die Wahl gilt als bestätigt, wenn die angewählte Taste eine andere Farbe annimmt. -
Page 85: Zubehör-Teile
ZUBEHÖR-TEILE Zum Lieferumfang des Geräts gehören folgende Zubehörteile: • Installations-Werkzeug………….1 Paar • USB-Anschlusskabel……………1 Stck. • Stromkabel + 4 Lautsprecher > ISO • Kabel der vorverstärkten Ausgänge • Fernbedienung Vorsicht: Durch die Verwendung andersartiger Zubehörteile, als die von uns mitgelieferten, könnte das Gerät beschädigt werden. - Page 86 PROBLEM-ERKENNUNG und ABHILFEN Allgemein Problem Ursache Abhilfe Sicherung des Geräts ist kaputt Eine neue leistungsgerechte Sicherung einsetzen Gerät schaltet sich nicht ein Sicherung der Auto-Batterie ist kaputt Eine neue leistungsgerechte Sicherung einsetzena Funktion falsch etc. Reset durchführen Die Batterie ist leer Batterie ersetzten Fernsteuerung funktioniert nicht Batterie ist nicht korrekt eingesetzt...
-
Page 87: Tft-Monitor
PROBLEM-ERKENNUNG und ABHILFEN TFT-Monitor Problem Ursache Abhilfe Kein Bild auf dem Monitor und Anschlüsse kontrollieren und entsprechend dem die Gefahren-Hinweise bleiben Anschluss-Schema in Ordnung bringen Handbrems-Kabel ist falsch angeschlossen ständig sichtbar Farb-System der DVD oder Die DVD-Farben sind mit dem Monitor nicht des Monitors wählen kompatibel Bei Piraterie-CDs entspricht das angegebene... -
Page 88: Radio-Tuner
PROBLEM-ERKENNUNG und ABHILFEN Radio-Tuner Problem Ursache Abhilfe Anschlüsse kontrollieren und entsprechend dem Auto-Antenne ist nicht vollständig herausgezogen Anschluss-Schema in Ordnung bringen Anschlüsse kontrollieren und entsprechend dem Programme sind nur Auto-Antenne ist nicht fest mit dem Gerät verbunden Anschluss-Schema in Ordnung bringen schwer zu empfangen Modalität steht auf LOKAL (LOCAL) LOKAL-Modus abbrechen... -
Page 89: Dvd-Player
PROBLEM-ERKENNUNG und ABHILFEN DVD-Player Problem Ursache Abhilfe CD geht nicht in den Schacht CD liegt bereits im Gerät CD auswerfen und eine andere eingeben CD verkratzt CD korrekt einlegen CD verschmutzt oder nass CD auswechseln Leser-Optik ist verschmutzt Lese-Laser mit spezifi scher Reinigungs-CD säubern CD nicht kompatibel mit dem Gerät CD wechseln CD spielt nicht ab... -
Page 90: Technische Daten
TECHNISCHE DATEN Etwaige Änderungen könnten, ohne vorherige Mitteilung, eingeführt werden. Monitor-Teil TFT screen size ...........6.2 Audio-Teil Dot distance ........0.107*0.370mm Largest power..........45WX4 Analysis ..........1440*234 dots Background illuminatio ........LED Audio Low ............100Hk 10db DVD-Teil Middle ............1Hk 10db D/A convert ........... -
Page 91: Anschluss-Schema
ANSCHLUSS-SCHEMA... - Page 92 Note • Notes • Anmerkungen...
- Page 93 Note • Notes • Anmerkungen...
- Page 94 Note • Notes • Anmerkungen...
- Page 96 S.p.A. - Via F.lli Cervi, 167/C - 42100 Reggio Emilia (Italy) - Tel. ++39 0522 941621 - Fax ++39 0522 942452 www.phonocar.com - e-mail:info@phonocar.it FRANCE Vente et Assistance assurées par le Fabricant italien Tél/Fax N° Vert 0800.90.43.99 www.phonocar.fr • e-mail:info@phonocar.fr DEUTSCHLAND 71711 - MURR - Rudolf Diesel Strasse, 13 - Tel.