Table of Contents
Advertisement
EN
G-Eye 700
TABLE OF CONTENTS
CAMERA OVERVIEW ........................................................ 2
FIRST STEPS .................................................................... 4
Charging the battery ......................................................................... 4
Inserting the micro SD card.............................................................. 4
USING THE CAMERA ....................................................... 4
On/off .................................................................................................. 4
Recording a video.............................................................................. 5
Taking photos .................................................................................... 5
Enabling/Disabling Wi-Fi .................................................................. 5
CONFIGURING THE CAMERA .......................................... 6
ACCESS SETTINGS ........................................................................... 6
Configuring video modes ................................................................. 6
Configuring photo modes ................................................................. 8
General settings ................................................................................ 8
Default settings ................................................................................ 10
VIEWING PHOTOS AND VIDEOS .................................... 11
Access viewing menus ................................................................... 11
Photo auto-playback ....................................................................... 12
Protect files ...................................................................................... 12
Delete files ........................................................................................ 12
TRANSFERRING FILES .................................................. 12
DISPLAYING PHOTOS / VIDEOS ON A TV ...................... 13
ATTACHING A STICKER PAD ......................................... 13
PRECAUTIONS FOR USE ................................................ 13
WARRANTIES, LEGAL NOTICES .................................... 14
Limited liability ................................................................................ 14
Warranty ........................................................................................... 14
Legal notices .................................................................................... 14
Advertisement
Table of Contents

Subscribe to Our Youtube Channel
Related Manuals for GEONAUTE G-Eye 700

Summary of Contents for GEONAUTE G-Eye 700
-
Page 1: Table Of Contents
G-Eye 700 TABLE OF CONTENTS CAMERA OVERVIEW ............2 FIRST STEPS ..............4 Charging the battery ................. 4 Inserting the micro SD card.............. 4 USING THE CAMERA ............4 On/off ....................4 Recording a video................5 Taking photos ..................5 Enabling/Disabling Wi-Fi .............. -
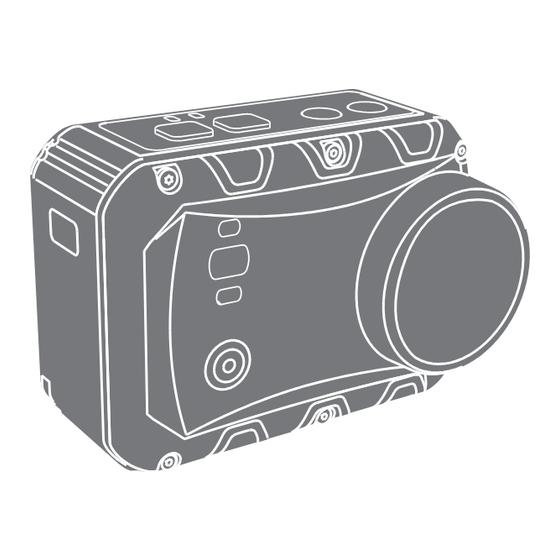
Page 3: Camera Overview
CAMERA OVERVIEW The GEONAUTE G-EYE 700 camera is waterproof up to 1 m without a waterproof case. When diving or if using the camera for more than 30 minutes underwater at one time, you must use a specific waterproof case (sold separately). - Page 4 TOUCHSCREEN The GEONAUTE G-EYE 700 camera features a touchscreen which allows you to access menus by tapping the centre of the screen lightly. 000:00:33 2H30 1080P/60 Icons Functions Video mode activated Photo mode activated Wi-Fi 00:00:01 Recording time Zoom Battery level...
-
Page 5: First Steps
FIRST STEPS CHARGING THE BATTERY INSERTING THE MICRO SD CARD Compatible cards: Class 10 MicroSD cards from 8Gb to 64Gb. USING THE CAMERA ON/OFF Press once Press and hold > 5 sec... -
Page 6: Recording A Video
2. STOP 1. START 2. STOP 1. START The GEONAUTE G-EYE 700 camera is equipped with 2 TV standards, PAL and NTSC, which you can choose between in the general settings (see page 9). TAKING PHOTOS ENABLING/DISABLING WI-FI 10 s 10 s This camera features Wi-Fi technology. -
Page 7: Configuring The Camera
Control your camera using the GEYE 2 REMOTE control, sold separately. Î Î Follow the instructions provided with the remote control. CONFIGURING THE CAMERA ACCESS SETTINGS Video settings Photo settings General settings View photos/videos Exit the settings menu CONFIGURING VIDEO MODES CAUTION To configure the various VIDEO modes you must first be on VIDEO... - Page 8 Settings Description/Options Video resolution 1920 x 1080 (16:9) 60 fps 1920 x 1080 (16:9) 48 fps 1920 x 1080 (16:9) 30 fps 1920 x 1080 (16:9) 24 fps 1280 x 960 (4:3) 60 fps 1280 x 960 (4:3) 48 fps 1280 x 720 (16:9 ) 120 fps 1280 x 720 (16:9 ) 60 fps Viewing angle...
-
Page 9: Configuring Photo Modes
CONFIGURING PHOTO MODES CAUTION To configure the various PHOTO modes you must first be on PHOTO mode. Return to the previous screen: Settings Description/Options Photo modes Single photo mode. Burst photo mode. Options: 3/6/8 photos per second. Time-lapse photo mode Options: 0.5/1/2/3/5/10/20 sec. - Page 10 Settings Description/Options Beep Enable/disable beep: OFF: no sound MIDDLE: 50% volume STANDARD: 100% volume LED indicators Enable/disable camera status indicators. Options: OFF/2/4. Display info Enable/disable display of contextual information on the screen when taking photos. Automatic Enable/Disable automatic standby. standby Options: OFF/2 min/5 min/10 min.
-
Page 11: Default Settings
Settings Description/Options Delete files Allows you to delete files or format the micro SD card. RESET Return to default settings (see page 10) Firmware version Camera software version number. In PAL format (50 Hz) the frame rate (images per second) will be 25/50/100 FPS depending on the chosen resolution. -
Page 12: Viewing Photos And Videos
VIEWING PHOTOS AND VIDEOS ACCESS VIEWING MENUS 6 7 8 1 View videos 2 View photos 3 View all file types 4 Return to the previous screen 5 Next/previous file 6 Delete a file 7 Protect a file 8 Photo auto-playback 000:00:40 000:00:40 100-0033... -
Page 13: Photo Auto-Playback
PHOTO AUTO-PLAYBACK When the first photo is displayed, tap the middle Pause. Î Î of the screen then press Return to the previous menu. Î Î PROTECT FILES Protect/unlock the selected file. Î Î Protect/unlock all files. Î Î DELETE FILES Delete the selected file. -
Page 14: Displaying Photos / Videos On A Tv
DISPLAYING PHOTOS / VIDEOS ON A TV HDMI Cable not provided ATTACHING A STICKER PAD The sticker pads are meant to be used to affix your camera to smooth, hard, rigid surface. 3MTM stickers provide highly resistant adhesion. However, the precautions for affixing the pad must be respected. -
Page 15: Warranties, Legal Notices
WARRANTIES, LEGAL NOTICES LIMITED LIABILITY • GEONAUTE is not responsible for accidents or injuries that result from handling or use of this product while participating in high-risk sports. Specifically, GEONAUTE wishes to inform the user about the possible risk of losing concentration due to handling the product in dangerous conditions. - Page 16 IMPORTADO PARA BRASIL POR IGUASPORT Ltda CNPJ : 02.314.041/0001-88 540-0011 大阪市中央区農人橋1-1-22 大江ビル10階 ナチュラムイーコマース株式会社 Импортер: ООО «Октоблу», 141031, Россия, Московская область, Мытищинский район, МКАД 84-й км., ТПЗ «Алтуфьево», владение 3, строение 3, +7(495)6414446 для занятий спортом 台灣迪卡儂有限公司 台灣台中市408南屯區大墩南路379號 諮詢電話: (04) 2471-3612 TURKSPORT Spor Urünleri Sanayi ve Ticaret Ltd.
Need help?
Do you have a question about the G-Eye 700 and is the answer not in the manual?
Questions and answers