Table of Contents
Advertisement
INSTALLATION AND OPERATING INSTRUCTIONS
1
COMPATIBILITY . . . . . . . . . . . . . . . . . . . . . . . . . . . . . . . . . . . . . . . . 2
2
FEATURES . . . . . . . . . . . . . . . . . . . . . . . . . . . . . . . . . . . . . . . . . . . . . . 2
3
ELECTRICAL RATINGS . . . . . . . . . . . . . . . . . . . . . . . . . . . . . . . . . 2
4
INSTALLATION . . . . . . . . . . . . . . . . . . . . . . . . . . . . . . . . . . . . . . . . . 2
4.1
TOOLS REQUIRED . . . . . . . . . . . . . . . . . . . . . . . . . . . . . . . . . . . . . . . . . 2
4.2
LOCATION . . . . . . . . . . . . . . . . . . . . . . . . . . . . . . . . . . . . . . . . . . . . . . . . 2
4.3
REMOVAL OF OLD UNIT . . . . . . . . . . . . . . . . . . . . . . . . . . . . . . . . . . . . 3
4.4
MOUNTING . . . . . . . . . . . . . . . . . . . . . . . . . . . . . . . . . . . . . . . . . . . . . . . 3
4.5
WIRING . . . . . . . . . . . . . . . . . . . . . . . . . . . . . . . . . . . . . . . . . . . . . . . . . . 3
4.5.1 TERMINAL DESCRIPTIONS . . . . . . . . . . . . . . . . . . . . . . . . . . . . . . . . . . . . . 3
4.5.2 CONNECTING THE WIRES . . . . . . . . . . . . . . . . . . . . . . . . . . . . . . . . . . . . . 3
4.6
COMPLETING YOUR INSTALLATION . . . . . . . . . . . . . . . . . . . . . . . . . . 3
5
OPERATING BASICS . . . . . . . . . . . . . . . . . . . . . . . . . . . . . . . . . . . . 4
5.1
UP/DOWN CHANGE KEYS . . . . . . . . . . . . . . . . . . . . . . . . . . . . . . . . . . . 4
5.2
SET DAY AND TIME . . . . . . . . . . . . . . . . . . . . . . . . . . . . . . . . . . . . . . . . 4
5.3
TEMPERATURE CONTROL MODES . . . . . . . . . . . . . . . . . . . . . . . . . . . 4
5.3.1 HEAT . . . . . . . . . . . . . . . . . . . . . . . . . . . . . . . . . . . . . . . . . . . . . . . . . . . . . 4
5.3.2 COOL . . . . . . . . . . . . . . . . . . . . . . . . . . . . . . . . . . . . . . . . . . . . . . . . . . . . . 4
5.3.3 AUTO CHANGE (AUTO) . . . . . . . . . . . . . . . . . . . . . . . . . . . . . . . . . . . . . . . . 4
5.3.4 OFF . . . . . . . . . . . . . . . . . . . . . . . . . . . . . . . . . . . . . . . . . . . . . . . . . . . . . . 4
5.4
DEFAULT PROGRAM . . . . . . . . . . . . . . . . . . . . . . . . . . . . . . . . . . . . . . . 4
5.5
HOLD . . . . . . . . . . . . . . . . . . . . . . . . . . . . . . . . . . . . . . . . . . . . . . . . . . . . 4
5.6
OVERRIDE . . . . . . . . . . . . . . . . . . . . . . . . . . . . . . . . . . . . . . . . . . . . . . . . 5
5.7
FAN MODES . . . . . . . . . . . . . . . . . . . . . . . . . . . . . . . . . . . . . . . . . . . . . . 5
5.7.1 AUTO . . . . . . . . . . . . . . . . . . . . . . . . . . . . . . . . . . . . . . . . . . . . . . . . . . . . . 5
5.7.2 ON . . . . . . . . . . . . . . . . . . . . . . . . . . . . . . . . . . . . . . . . . . . . . . . . . . . . . . . 5
5.7.3 CLEAN . . . . . . . . . . . . . . . . . . . . . . . . . . . . . . . . . . . . . . . . . . . . . . . . . . . . 5
5.8
DISPLAY ILLUMINATION . . . . . . . . . . . . . . . . . . . . . . . . . . . . . . . . . . . 5
5.9
AUDIBLE BEEP . . . . . . . . . . . . . . . . . . . . . . . . . . . . . . . . . . . . . . . . . . . . 5
6
PROGRAMMING . . . . . . . . . . . . . . . . . . . . . . . . . . . . . . . . . . . . . . . . 5
6.1
DEFAULT TEMPERATURE PROGRAM . . . . . . . . . . . . . . . . . . . . . . . . . 5
6.2
EDITING HEAT OR COOL PROGRAMS . . . . . . . . . . . . . . . . . . . . . . . . . 5
WARNING: Use Energizer
Energizer
DURACELL
PurePro
®
, Amherst, NH 03031
An F.W. Webb Company
pureproproducts.com
PurePro
®
6.2.1 WEEKDAY PROGRAMMING . . . . . . . . . . . . . . . . . . . . . . . . . . . . . . . . . . . . 5
6.2.2 WEEKEND PROGRAMMING . . . . . . . . . . . . . . . . . . . . . . . . . . . . . . . . . . . . 6
6.3
6.4
7
7.1
7.2
7.2.1 FILTER USAGE . . . . . . . . . . . . . . . . . . . . . . . . . . . . . . . . . . . . . . . . . . . . . . 7
7.2.2 FILTER LIMIT . . . . . . . . . . . . . . . . . . . . . . . . . . . . . . . . . . . . . . . . . . . . . . . 7
7.3
7.4
7.5
7.5.1 HARDWARE RESET . . . . . . . . . . . . . . . . . . . . . . . . . . . . . . . . . . . . . . . . . . 8
7.5.2 SOFTWARE RESET . . . . . . . . . . . . . . . . . . . . . . . . . . . . . . . . . . . . . . . . . . . 8
7.6
7.6.1 SWING 1 . . . . . . . . . . . . . . . . . . . . . . . . . . . . . . . . . . . . . . . . . . . . . . . . . . 8
7.7
8
8.1
8.2
8.3
8.4
8.5
8.6
9
9.1
10
11
12
13
14
®
or DURACELL
®
is a registered trademark of Eveready Battery Company, Inc.
®
is a registered trademark of The Procter & Gamble Company
DP7
DP711
FAN PROGRAMMING . . . . . . . . . . . . . . . . . . . . . . . . . . . . . . . . . . . . . . . 6
COPY . . . . . . . . . . . . . . . . . . . . . . . . . . . . . . . . . . . . . . . . . . . . . . . . . . . . 6
ADVANCED FEATURES . . . . . . . . . . . . . . . . . . . . . . . . . . . . . . . . . 7
KEYBOARD LOCK . . . . . . . . . . . . . . . . . . . . . . . . . . . . . . . . . . . . . . . . . . 7
FILTER MONITOR . . . . . . . . . . . . . . . . . . . . . . . . . . . . . . . . . . . . . . . . . . 7
ENERGY USAGE . . . . . . . . . . . . . . . . . . . . . . . . . . . . . . . . . . . . . . . . . . . 7
CALIBRATION OFFSET . . . . . . . . . . . . . . . . . . . . . . . . . . . . . . . . . . . . . 7
RESET . . . . . . . . . . . . . . . . . . . . . . . . . . . . . . . . . . . . . . . . . . . . . . . . . . . 7
TEMPERATURE VARIATION / SWING . . . . . . . . . . . . . . . . . . . . . . . . . 8
DEAD BAND . . . . . . . . . . . . . . . . . . . . . . . . . . . . . . . . . . . . . . . . . . . . . . 8
SETUP OPTIONS . . . . . . . . . . . . . . . . . . . . . . . . . . . . . . . . . . . . . . . . 8
MINIMUM RUN TIME J3 . . . . . . . . . . . . . . . . . . . . . . . . . . . . . . . . . 8
CLOCK FORMAT J4 . . . . . . . . . . . . . . . . . . . . . . . . . . . . . . . . . . . . . 9
TEMPERATURE DISPLAY FORMAT (F/C DISPLAY) J5 . . . . . . . . 9
SMART RECOVERY J6 . . . . . . . . . . . . . . . . . . . . . . . . . . . . . . . . . . . 9
GAS/ELECTRIC MODE J7 . . . . . . . . . . . . . . . . . . . . . . . . . . . . . . . . . 9
REPOSITIONING JUMPERS . . . . . . . . . . . . . . . . . . . . . . . . . . . . . . . . . 9
BATTERIES / MAINTENANCE . . . . . . . . . . . . . . . . . . . . . . . . . . . 9
BATTERY INSTALLATION . . . . . . . . . . . . . . . . . . . . . . . . . . . . . . . . . . . 9
TECHNICAL ASSISTANCE . . . . . . . . . . . . . . . . . . . . . . . . . . . . . . 9
WARRANTY . . . . . . . . . . . . . . . . . . . . . . . . . . . . . . . . . . . . . . . . . . . . 9
WIRING DIAGRAMS . . . . . . . . . . . . . . . . . . . . . . . . . . . . . . . . 10-11
USER PROGRAM TABLE . . . . . . . . . . . . . . . . . . . . . . . . . . . . . . . 12
JUMPER TABLE . . . . . . . . . . . . . . . . . . . . . . . . . . . . . . . . . . . . . . . 12
®
Alkaline Batteries Only.
52178
Advertisement
Table of Contents

Related Manuals for PurePro DP711

Summary of Contents for PurePro DP711
-
Page 1: Table Of Contents
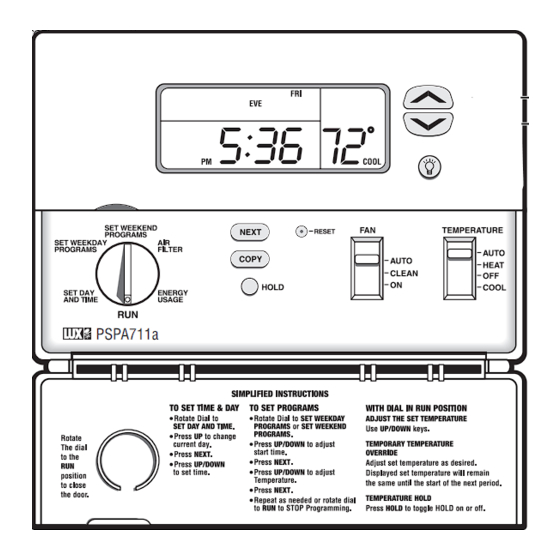
PurePro ® DP711 INSTALLATION AND OPERATING INSTRUCTIONS COMPATIBILITY ........2 6.2.1 WEEKDAY PROGRAMMING . -
Page 2: Compatibility
1 COMPATIBILITY • Adjustable Temperature Differential / Cycle Rate • Programmable Auto-Changeover Dead-Band Your DP711 is compatible with most 24 volt: 1-Heat / 1-Cool Gas, Oil, or Electric Heating and/or Cooling systems, including single-stage heat pumps. It cannot be used with: 3 ELECTRICAL RATINGS 120 volt heating systems or 3 wire zone valves. -
Page 3: Removal Of Old Unit
• Do not install it where there are unusual heating N O T E : If you are mounting the base to a soft material like plasterboard or if you are using the old mounting holes, the conditions, such as: in direct sunlight; near a lamp, screws may not hold. -
Page 4: Operating Basics
19. Verify that the system and its fan are operating 5.3.2 COOL properly. When set to a high temperature, the heating system • Use COOL mode to control your air conditioner, cooling should provide warm air after a short time. Likewise a cooling your home. -
Page 5: Override
5.6 OVERRIDE 5.8 DISPLAY ILLUMINATION During RUN, set temperatures may be temporarily altered For visibility in the dark, your thermostat incorporates an from their programmed values. Immediately after a set attractive electro-luminescent display backlight. temperature has been altered, the 2-hour default duration •... -
Page 6: Weekend Programming
• One period ends at the start time of the next period. The Default Periods Time end of one period may not be any closer to the beginning MORN 6:00 AM (6:00) of the next period than one 15 minute increment. Moving a 8:00 AM (8:00) start time too close to the next start time results in the 6:00 PM (18:00) -
Page 7: Advanced Features
7 ADVANCED FEATURES recommended setting in hours of filter usage. • Use UP/DOWN keys to adjust the filter limit in 10 hour 7.1 KEYBOARD LOCK increments to the recommended value. • To prevent tampering Press: NEXT, NEXT, NEXT, HOLD. • Rotate the dial to RUN finish this setting. This sequence of keys will lock and unlock all settings and programs. -
Page 8: Hardware Reset
7.5.1 HARDWARE RESET 7.7 DEAD BAND Use this small white button labeled after changing When using Auto-Changeover, dead band provides a H_RST Setup Option Jumper positions to effect the changes. The disallowed temperature range between the maximum heat Hardware RESET turns Heat, Air and Fan off, resets the units' set temperature and minimum cool set temperature. -
Page 9: Temperature Display Format (F/C Display) J5
8.4 SMART RECOVERY 9.1 BATTERY INSTALLATION 1. Remove fresh batteries from their carton. Smart Recovery allows your HVAC system to attempt to 2. Remove body of thermostat from the wall as described in recover from a setback period and reach your desired comfort installation. -
Page 10: Wiring Diagrams
12 WIRING DIAGRAMS TYPICAL 2 OR 3 WIRE HEAT ONLY HOOKUP 24V AC AND MILIVOLT SYSTEMS Y W RC RH C WIRING DIAGRAM NOTES JUMPER 1. Dashed lines are optional. SYSTEM PROVIDED COMMON 2. Optional common wire allows system to power Omit fan connections thermostat. - Page 11 TYPICAL 24V AC 5 WIRE HOOKUP SINGLE STAGE HEAT AND COOL 2 TRANSFORMER Y W RC RH C WIRING DIAGRAM NOTES JUMPER REMOVED COOL 1. Dashed lines are optional. COMMON 2. Optional common wire allows system to power HEAT thermostat. COMMON 3.
-
Page 12: User Program Table
13 USER PROGRAM TABLE To ease reprogramming later, record your thermostat’s programs and settings in the table provided below. HEAT COOL PERIOD TIME TEMP. TIME TEMP. MORN THURS HEAT COOL PERIOD NIGHT TIME TEMP. TIME TEMP. MORN MORN NIGHT NIGHT MORN MORN TUES...
Need help?
Do you have a question about the DP711 and is the answer not in the manual?
Questions and answers