Table of Contents
Advertisement
Quick Links
MOSQUITO 3D PRO - INSTRUCTION MANUAL
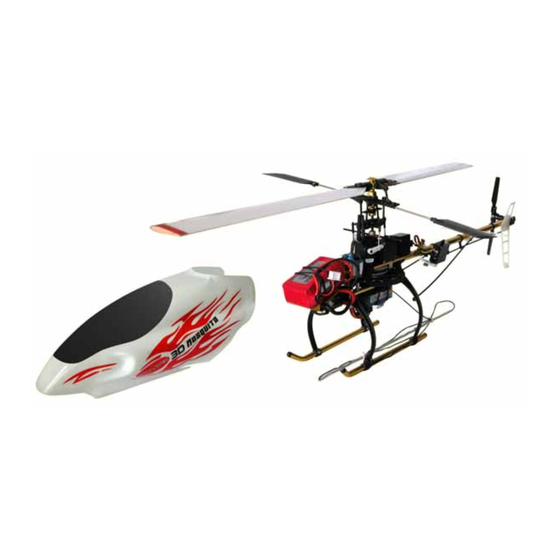
MOSQUITO 3D PRO
This micro R/C helicopter has the most advanced capabilities. 120 degree CCPM control, collective main
and tail rotors, belt tail drive and brushless motor ensure top performance.
MAX MAIN ROTOR RPM:
MOTOR:
MAIN ROTOR DIAMETER:
LENGTH:
WEIGHT:
SKYARTEC
Instruction & assembly
manual
Specifications:
SKYARTEC USA, INC.
copyright September 2006. All rights reserved.
SKYARTEC USA, INC.
18107 Valley Blvd.
City of Industry, CA 97144
www.skyartec.com
3000
SKYARTEC 4100KV
520mm
485mm
360-380g RTF
page -1-
Advertisement
Table of Contents

Subscribe to Our Youtube Channel
Related Manuals for SkyArtec MOSQUITO 3D PRO


Summary of Contents for SkyArtec MOSQUITO 3D PRO
-
Page 1: Specifications
MOSQUITO 3D PRO - INSTRUCTION MANUAL SKYARTEC MOSQUITO 3D PRO Instruction & assembly manual Specifications: This micro R/C helicopter has the most advanced capabilities. 120 degree CCPM control, collective main and tail rotors, belt tail drive and brushless motor ensure top performance. -
Page 2: Table Of Contents
MOSQUITO 3D PRO - INSTRUCTION MANUAL TABLE OF CONTENTS Introduction Gerneral information Required items Assembly instruction Connection and diagnostics for the electronic components Complete mechanical overview Spareparts I Spareparts II Spareparts III & detail description 10. Spareparts as in mecanical overview 11. -
Page 3: Introduction
MOSQUITO 3D PRO - INSTRUCTION MANUAL 1. Introduction Congratulations on the purchase of SKYARTEC´s Helicopter MOSQUITO 3D PRO. The MOSQUITO 3D PRO is ideal for beginners, intermediate and expert pilots looking for a small size full 3D capable helicopter. The MOSQUITO requires a 6 channel computer radio that supports 120 degree CCPM operation. -
Page 4: Assembly Instruction
MOSQUITO 3D PRO - INSTRUCTION MANUAL 4. Assembly instruction The set contains various labeled bags in order to simplify assembling steps. Please open the bags step by step in order to ease the assembly. Bags are marked S-1 to S- 18 according to the assembly steps. - Page 5 MOSQUITO 3D PRO - INSTRUCTION MANUAL STEP 3 - Steering blades - open BAG 3 Mount the balance bar (14) centerd into the preassembled rotor head from step 2 and secure it with the screw on both sides of the rotor head.
- Page 6 MOSQUITO 3D PRO - INSTRUCTION MANUAL STEP 6 - Lower body Mount the preassembled landing gear from step 4 onto the preassembled lower main frame from step 5. Mount the four holding screws as shown in the picture. Center the landing bars (16) between the two landing gears (18).
- Page 7 MOSQUITO 3D PRO - INSTRUCTION MANUAL STEP 9 - Tail rotor competion - open BAG 8 Mount the bolt (39) into the pitch shifter (38). Mount the pitch shifter (38) to the preassembled tail rotor from step 7 by using the bolts (43). Shove the preas-...
- Page 8 MOSQUITO 3D PRO - INSTRUCTION MANUAL STEP 11 - Upper main frame - open BAG 10 Mount the motor support (52) to the up- per main frame (55) with two screws. Then mount the swashplate support (51) and the upper bearing (54A) to the servo support (50).
- Page 9 MOSQUITO 3D PRO - INSTRUCTION MANUAL STEP 14 - Main frame mount - open BAG 12 Mount the preassembled upper main frame from step 11 and the tail boom with two screws to the lower body from step 12. Mount the motor pinion (66) to the motor (64).
- Page 10 MOSQUITO 3D PRO - INSTRUCTION MANUAL STEP 17 - Collective pitch connector mount Connect the pitch connectors (72) as shown to the swashplate and the in- ner ball links of the translation levers (11). (Picture doesn´t show the rota- ting frame in order to easy the view)
- Page 11 MOSQUITO 3D PRO - INSTRUCTION MANUAL STEP 19 - Pushrod mounting Premount the pushrods (74+73) by screwing the metal rod (74) into the to the ball link connectors (73). You may need to widen the ball link connectors (73) tip a little in order to ease the metal rod (74) mounting by using a cutting knive.
- Page 12 MOSQUITO 3D PRO - INSTRUCTION MANUAL STEP 21 - Tail servo mount - open BAG 16 Mount the tail servo with the servo ho- ling screws (not included in this kit) as shown to the servo holders (46). Use mount the ball link (78) to the servo arm as shown.
-
Page 13: Connection And Diagnostics For The Electronic Components
MOSQUITO 3D PRO - INSTRUCTION MANUAL 5. Connection and diagnostics for the electronic components This diagram represents the overall connections for wiring the MOSQUITO correctly (if using Futaba or Hitec). This dia- gram includes the separate connections pictured in the follwing page. -
Page 14: Complete Mechanical Overview
MOSQUITO 3D PRO - INSTRUCTION MANUAL 6. Complete mechanic overview page -14-... -
Page 15: Spareparts I
MOSQUITO 3D PRO - INSTRUCTION MANUAL 7. Spareparts - I page -15-... -
Page 16: Spareparts
MOSQUITO 3D PRO - INSTRUCTION MANUAL 8. Spareparts - II page -16-... -
Page 17: Spareparts Iii & Detail Description
MOSQUITO 3D PRO - INSTRUCTION MANUAL 9. Spareparts III and detail description set - no set description parts included M-01 mosquito canopy 1x part 79 M-02 mosquito decal set 1x part 80 2x part 75, 2x screw 2x10mm M-03 main rotor blades... -
Page 18: Spareparts As In Mecanical Overview
60 main gear 11. Canopy decals Your MOSQUITO 3D pro comes along with a PVC canopy and a decal set. There are two stickers to be placed onto the tail boom wings, the other stickers serve for the Canopy. The stickers should be mounted as shown in the following picture... -
Page 19: Additional Information About Helicopter Mechanics
12. Additional information about helicopter mechanics. Your MOSQUITO 3D PRO is a full F3C cabaple helicopter. But it depends on the user and its adju- stment abilities to gain a maximum performance and long spareparts lifetime. In the following we provide some useful informations about above mentionend. - Page 20 MOSQUITO 3D PRO - INSTRUCTION MANUAL Mounted helicopter views (electrical parts not included in set) Brushless motor mount CCPM swashplate Tail servo mount Tail rotor Main axis view page -20-...
Need help?
Do you have a question about the MOSQUITO 3D PRO and is the answer not in the manual?
Questions and answers