Advertisement
Quick Links
Advertisement

Related Manuals for Garmin gdr 45


Summary of Contents for Garmin gdr 45
- Page 1 GDR 45 D ri vi ng Reco rder Qui c k Sta r t M a nua l...
-
Page 2: Package Contains
Package contains 1. GDR 45 Driving Recorder 2. GDR Mount (adhesive mount and replacement adhesive pad included) 3. GDR exclusive car charger... -
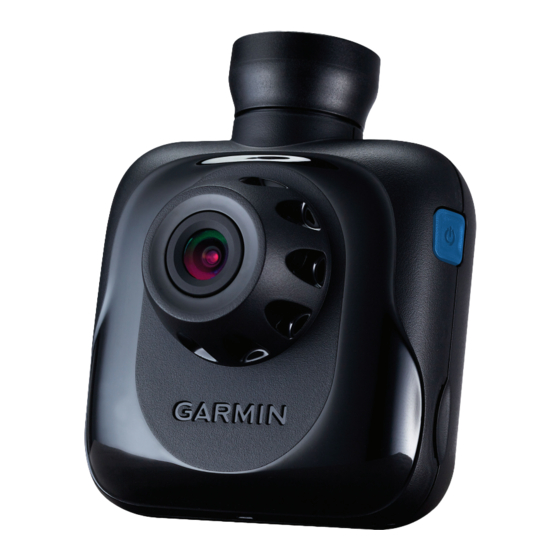
Page 3: Overview Of Functions
In addition to its built- in GPS positioning capability, the unit also provides complete tracks and information. The GDR 45 is also integrated with FCWS image recognition technology to detect distances with other vehicles when in motion. - Page 4 2. Description of Product Appearance and Indicator Lights GDR 45 Appearance ➒ ➊ ➋ ➌ ➍ ➐ ➎ ➑ ➏ ➓ 1. Manual File Protection Used for manually protecting files. See Collision Warning section for protection rules.
- Page 5 2. Function Key See Function Settings for details. 3. Image Calibration Key This function can be used to detect and calibrate the image cap- tured based on what the camera is pointing at, and is compatible with the front collision warning system (FCWS). 4.
- Page 6 11. LED Status Indicator LED color Action indicated Flashing Green Booting up or updating software Recording Flashing Red Rapid Flashing: Collision sensor activated Slow Flashing: Parking mode activated Green Idle (unable to record due to absence of memory card, formatting issue, or other reason)
-
Page 7: Product Specifications
3. Product Specifications GDR 45 Specs Dimensions (Length) 8.19 cm × (Width) 6.57 cm × (Depth) 4.16 cm Weight 122g Screen 2.3-inch TFT LCD Lens F=2.0 Recording area Visible diagonal viewing angle of 132 degrees (horizontal viewing angle: 120 degrees) - Page 8 Memory card slot microSDHC (8GB Class6 memory card or above is recommended) Recording mode Continuous recording; when the card is full, old files are overwritten (except for protected files). ■ 1080p (1920 × 1080 pixels) at 30fps; re- cord about 1.5 hours of footage (256MB for each video file) ■...
-
Page 9: Installation Instructions
Position the mount in the desired location on the inside of the windshield and press the adhesive side of the mount firmly against the glass. Then mount the GDR 45 onto the mount's ball-shaped con- nector. Step 2: Affix the adhesive pad to the top side of the GBC 30's mount. - Page 10 NOTE: In order to prevent reduced adhesive strength, do NOT affix the adhesive pad onto the defogger grid. If installing on a five-door hatchback or a vehicle with a very steep rear window, remove the bracket labeled "Garmin" and the ball-shaped connector and reassemble in the reverse in order to fit different angles. If the user wishes to secure the unit with screws, simply attach it to the vehicle's roof by applying screws through the holes located on the top of the bracket.
- Page 11 ➊ bered "1" is the USB cable that connects to GBC 30 (labeled ➋ "GARMIN DUAL CAM"), while the one numbered "2" is the USB cable that connects to the vehicle's charger. Step 7: Turn on the unit to begin record- ing with the front and rear cam- eras.
- Page 12 ➌ ➍ As the main camera of GDR 45 has a horizontal viewing angle of 120 degrees, it is recommended that the unit be installed at the windshield's centerline. In order to be able to capture camera images with a more...
- Page 13 Image Calibration Once the GDR 45 has been installed and turned on, the user will be prompted to complete an initial image calibration, and the camera will automatically determine the vehicle's center position. During calibration, the unit will automatically recognize the lane that the vehicle is traveling on (indicated by the solid green lines) and extend the two reference lines until they intersect.
- Page 14 After Calibration Is Complete Upon completion of calibration, a green crosshair will be shown on the top left of the driving recorder's screen to indicate that the image recogni- tion function has been enabled. Intersection of the two extended lines will be marked on-screen with a green cross.
- Page 15 proaching too close. 1. When a vehicle enters the detected area, the screen will prompt the user by displaying a white cross and frame. 2. If the system detects that the driver is not maintaining an adequate safe distance with the car in front given the current speed, a red cross and frame will be displayed along with a warning sound to alert the driver.
- Page 16 5. Settings The settings page provides two options: Driving Recorder Settings and General Settings. NOTE: Press and hold the up/down buttons to quickly scroll through the options Driving Recorder Settings 1. Recording Modes Four modes are available: 1080p, 720p, WVGA, and 720p Dual (when connecting secondary camera).
- Page 17 Enable the mirroring function if it is necessary to change the orientation. It is recom- mended that this calibration be redone if GDR 45 is reinstalled at a later time. 4. Collision Sensor Calibration Once the unit has been mounted to the fixed position, select "Collision Sensor Calibration".
- Page 18 Note that when sensitivity is set to Low, it is possible that a col- lision might fail to be recorded. 6. FCWS Sensitivity There are four options regarding the sensitivity of FCWS: High Sensitivity, Normal Sensitivity, Low Sensitivity, and Off. Sensitivity can be adjusted according to preference.
- Page 19 10. Exposure Compensation The camera's exposure value features 7 adjustable settings (Normal, ±1/3, ±2/3, and ±1). II. Parking Recording Mode The GDR 45 is able to record images after the engine is switched off. Two recording options are offered:...
- Page 20 Car Charger 1. Continue recording using built-in battery User may configure whether the driving recorder should record images using the built-in battery after the external power source is disconnected. Connecting GDR Dedicated Power Supply Cable (Optional Subscription) Once connected to an external power supply cable,, the GDR will turn on its motion detection mode and begin recording whenever it detects movement in front of the camera or senses collisions.
- Page 21 when the engine is turned off. 2. Stop Voltage The unit is able to detect the voltage level of the external battery. Ordinary sedans provide five voltage levels between 11.7V and 12.5V that the user can set, and vans provide four selectable voltage levels between 23.4V and 24.6V. The unit will stop movement detection and shutdown automatically once the external battery falls below the defined voltage level.
- Page 22 according to preference. NOTE: The unit will automatically reduce back light level after remaining idle for 1 minute. 2. Volume There are 10 volume levels to choose from. The unit comes with a default setting of 70% and is adjustable according to preference.
- Page 23 Displays current GPS reception. 9. Flicker Suppression Suppresses flickering caused by certain frequencies. 10. File Playback 11. Delete File Individually deletes specified video and still image files. 12. Format Disk Use this function to format blank memory cards. Formatting memory cards on a computer is not recommended. 13. Restore Default Factory Settings User may restore original factory settings using this function.
- Page 24 Connect to PC Please download the software “Driving Recorder PC Tool” from www. garmin.com.sg/products/application/ for installation WARNING Software only supports Windows OS (Windows XP/Vista/7). ➊ ➋ ➌...
- Page 25 1. The Playback Window The imported files can be displayed by switching between All, By Date, and Protected pages. Recorded videos will show recording date and time as well as protection status. You may view the gravity detection graph concurrently during video playback to view image status exactly at the moment of collision.
- Page 26 For videos recorded with dual cameras (optional), a sub-window will be added in the playback window showing what is recorded by the second camera (optional). You may click the image switch icon on top of the video to switch images by both cameras. The screenshot function may capture current playing frame into pic- ture file in JPG format. You may select Setup > Storage Path from the tool bar to change location where screenshot files will be saved.
- Page 27 2. The Map Location Window The blue path shown in the Map window is the driving path of recording videos being played. Locations marked with red icon are places where the video is displaying. You may use the playback bar to view relative position in the Playback window or click any segment shown in the Map window to review driving log in that seg- ment of road in fast pace.
- Page 28 3. The File Information Window You may preview recording files here. The PC Tool software re- trieve and display recorded coordinates and speed data in the lower right window. The instantaneous speed, location in coordinates, and date are all available for your review.
- Page 29 ON. Otherwise, the recording files may be damaged. 3. Certain functions are available only when a secondary GBC 30 (optional) is connected. 4. Though there are many video players available, not all support the decoder required by files generated by the products. Garmin PC Tool video player plays files recorded properly. 5. Please format the memory card before using it for the first time. Do not format it with your PC. 6. Please get memory card with 8GB capacity and Class 6 above from suggestion list.
- Page 30 iv. Memory card formatting v. Reset to factory default vi. Software update setup vii. Video playing 8. Files recorded when out of power or without GPS signal shall bear recording date of 1/1/1980. 9. DO NOT remove the memory card during recording. This may lead to file damage.
- Page 31 © 2014 Garmin Ltd. or its subsidiaries Garmin International, Inc. 1200 East 151st Street, Olathe, Kansas 66062, USA Garmin (Europe) Ltd. Liberty House, Hounsdown Business Park, Southampton, Hampshire, SO40 9LR UK Garmin Corporation No. 68, Zhangshu 2nd Road, Xizhi Dist.
Need help?
Do you have a question about the gdr 45 and is the answer not in the manual?
Questions and answers