
Related Manuals for MicrohDJ Monsoon FX PRO

Summary of Contents for MicrohDJ Monsoon FX PRO
-
Page 1: User Manual
USER MANUAL Please read this user manual before using this product... - Page 3 Introduction Thank you for purchasing the MICROH DJ MONSOON FX PRO. For your own safety and knowledge, please read this manual before installing or operating this device. This manual covers the important information on installation and applications. Please install and operate the fixture according to instructions.
-
Page 4: Safety Instructions
Safety Instructions CAUTION! ELECTRIC SHOCK WARNING! USE EXTREME CAUTION WHEN HANDLING WIRES. This device has been delivered in safe working condition. In order to maintain this condition and to ensure safe operation, it is absolutely necessary for the user to follow the safety instructions and warning notes written in this user manual. - Page 5 Display Item Number Display Function Menu Enter/ Check the menu function Down Check the next menu Button Check the previous menu Enter Enter the selected menu/ Enter...
-
Page 6: Main Function
Main Function When choosing a function, press MENU button, select menu options you want. Press ENTER button to the selected function, the display will be strobe, then press UP/DOWN button to select the required function, press ENTER button, or wait for 10 seconds or press MENU button for long time, then enter the menu mode. -
Page 7: Display Program Instruction
Display Program Instruction DMX512 Address Setting Choose , press ENTER button to confirm. Press UP/DOWN button to find initial address, then press ENTER button to save it. After 10 seconds or press MENU for long time to return to main menu. Channel Mode Choose , press ENTER button to confirm. - Page 8 Display Nixie Tube The Normal And Inversion Show Choose (Normal), press ENTER button to confirm, then enter (Inversion), after selection, press MENU button to enter the mode that has been selected. After 10 seconds or press MENU for long time to return to main menu. Test Press MENU button to , press ENTER button, the led display will strobe, the...
-
Page 9: Mounting And Installing
Improper installation can result in bodily injury or damage. Clamp Mounting: The MICROH MONSOON FX PRO provides a unique mounting bracket assembly that integrates 2 brackets to be used to mount on a truss or the floor. - Page 10 Regardless of the rigging option you choose for your MICROH LEDBARQX185 fixture, always be sure to secure your fixture with a safety cable. The fixture provides a built-in rigging point for a safety cable hanging bracket. Be sure to only use the designated rigging point for the safety cable and never secure a safety cable to a carrying handle.
- Page 11 DMX512 Control Data Connection: This fixture complies with international USITT DMX standards and can be used with a 3 pin DMX connector. Plug in the provided 3 pin XLR cable to the female 3-pin XLR output of your controller and the other side to the male 3-pin XLR input of the LED battery par light.
-
Page 12: Operation
Operation Master/Slave Build-In Function Connect the lights in series, the first light control the other light to auto show, sound control show and so on. It’s very good for the instant show mod. Must set the first light to be master light same time to choose (Random show), (show 1) or... - Page 13 31CH Channel Value Function 000-255 Full dimmer 1, 0 - 100% 000-255 Strobe 1, slow to fast 000-255 R dimmer, 0 - 100% 000-255 G dimmer, 0 - 100% 000-255 B dimmer, 0 - 100% 000-255 W dimmer, 0 - 100% 000-255 A dimmer, 0 - 100% 000-255...
-
Page 14: Specifications
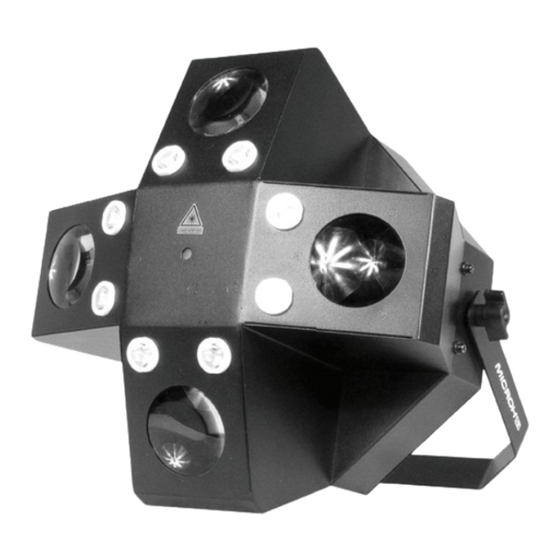
Features • LED display, easy to control • Red and Green rotating lasers • Four control modes: Sound active, LED auto run, DMX and master/slave Specifications Power AC100-240V, 50/60Hz Power consumption Power Connection AC In & Out Data Connection 3 Pin XLR 8 x 1W White LEDs + 28 x 3W 5 in 1 RGBWA LEDs Red Diode 150MW... -
Page 15: Maintenance And Cleaning
Maintenance and Cleaning The following points have to be considered during the inspection: All screws for installing the device, or parts of the device must be tightly connected, and must not be corroded. There must not be any deformations on the housing, colour lenses, fixations or installation spots (ceiling, suspension, trussing). - Page 16 For more information please contact: www.microhdj.com info@microhdj.com 905.428.9062...
Need help?
Do you have a question about the Monsoon FX PRO and is the answer not in the manual?
Questions and answers