Table of Contents
Advertisement
Quick Links
Advertisement
Table of Contents

Related Manuals for thomann Dr. Chord Pro


Summary of Contents for thomann Dr. Chord Pro
- Page 1 Dr. Chord Pro chord finder user manual...
- Page 2 Musikhaus Thomann Thomann GmbH Hans-Thomann-Straße 1 96138 Burgebrach Germany Telephone: +49 (0) 9546 9223-0 E-mail: info@thomann.de Internet: www.thomann.de 02.02.2017, ID: 238048...
-
Page 3: Table Of Contents
1.2 Notational conventions........................6 1.3 Symbols and signal words....................... 6 Safety instructions............................. 8 Instructions for use..........................10 Features............................... 11 Connections and operating elements................... 12 Operating..............................18 6.1 Starting the device........................... 18 Technical specifications........................33 Protecting the environment......................34 Dr. Chord Pro... -
Page 4: General Information
General information General information This manual contains important instructions for the safe operation of the unit. Read and follow the safety instructions and all other instructions. Keep the manual for future reference. Make sure that it is available to all those using the device. If you sell the unit please make sure that the buyer also receives this manual. -
Page 5: Further Information
General information 1.1 Further information On our website (www.thomann.de) you will find lots of further information and details on the following points: Download This manual is also available as PDF file for you to download. Use the search function in the electronic version to find the topics of Keyword search interest for you quickly. -
Page 6: Notational Conventions
General information 1.2 Notational conventions This manual uses the following notational conventions: Letterings The letterings for connectors and controls are marked by square brackets and italics. Examples: [VOLUME] control, [Mono] button. 1.3 Symbols and signal words In this section you will find an overview of the meaning of symbols and signal words that are used in this manual. - Page 7 NOTICE! This combination of symbol and signal word indicates a pos‐ sible dangerous situation that can result in material and environmental damage if it is not avoided. Warning signs Type of danger Warning – danger zone. Dr. Chord Pro...
-
Page 8: Safety Instructions
Safety instructions Safety instructions Intended use This device is intended to be used to tune musical instruments. Use the device only as described in this user manual. Any other use or use under other operating conditions is consid‐ ered to be improper and may result in personal injury or property damage. No liability will be assumed for damages resulting from improper use. - Page 9 Ensure that proper polarity is observed when inserting batteries. NOTICE! Possible damage by leaking batteries Leaking batteries can cause permanent damage to the device. Take batteries out of the device if it is not going to be used for a longer period. Dr. Chord Pro...
-
Page 10: Instructions For Use
Instructions for use Instructions for use Unpack and carefully check that there is no transportation damage before using the unit. Keep the equipment packaging. To fully protect the device against vibration, dust and moisture during transportation or storage use the original packaging or your own packaging material suitable for transport or storage, respectively. -
Page 11: Features
Tuning range: A0 (27.5 Hz) - C8 (4186.01 Hz) Calibration: 430 - 450 Hz adjustable metronome: 30 - 250 bpm Tone generator: C4 (32.7 Hz) - B4 (493.883 Hz) Headphones output (3.5 mm TRS phone socket) big display built-in microphone Automatic shutdown built-in speaker Dr. Chord Pro... -
Page 12: Connections And Operating Elements
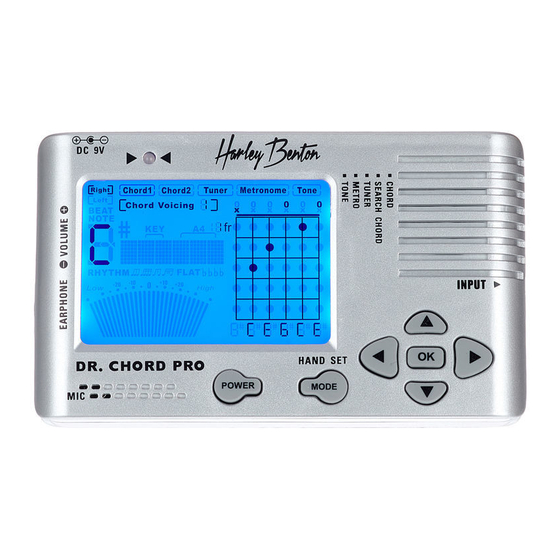
Connections and operating elements Connections and operating elements chord finder... - Page 13 Connections and operating elements 1 DC 9V Connection for power adapter. 2 LED display. 3 Display. 4 Speaker. 5 INPUT 1/4" standard instrument cable input. Arrow button ‘up’. Arrow button ‘right’. Arrow button ‘down’. Dr. Chord Pro...
- Page 14 Connections and operating elements 9 OK OK button. Arrow button ‘left’. 11 MODE / HAND SET Mode selector | right / left-handedness switch. 12 POWER On / off switch. 13 MIC Microphone. 14 EARPHONE Headphones socket. 15 VOLUME Volume control. chord finder...
- Page 15 Connections and operating elements Display 16 Mode display. Find chord position. Find chord name. Dr. Chord Pro...
- Page 16 Connections and operating elements Tuner. Metronome. Tone generator. 17 Chord voicing display. Shows the selected chord voicing. 18 Fret number display. Shows the fret where you should put your fingers. 19 Guitar fretboard display. The six vertical lines represent the six strings of the guitar, from low E to high E (if set for right-handed) or from high E to low E (if set for left-handed).
- Page 17 Connections and operating elements 23 Right / left-handedness indicator. right-handed (default) left-handed. Dr. Chord Pro...
-
Page 18: Operating
Operating Operating 6.1 Starting the device Press [POWER] to turn the device on. After 5 minutes without any operation, the unit will auto‐ matically switch off. Press [POWER] again to turn the device off. Operating mode selection If you press [MODE] the mode selection menu appears in the display. The flashing outline frame indicates the selected mode. - Page 19 Select #9 as the last chord type. For the chord name selecting process you do not need to know the chord’s construction. You only need to know the symbols used for the chord name. The following table present the chord types of the device: Dr. Chord Pro...
- Page 20 Operating Root note Chord type 1 Chord type 2 Chord type 3 Name Other description From C to B 6/9, 6add9 dom7 7-5, dom7b5 7b5(#9) 7-5(+9),dom7 b5(#9) 7-9,dom7b9 7+9,dom7#9 7#11 7+11,dom7# sus4 7sus4 7sus chord finder...
- Page 21 Operating Root note Chord type 1 Chord type 2 Chord type 3 Name Other description 9-5,dom9b5 sus4 9sus4 9sus dom13 sus4 13sus4 13sus min,- min6,-6 m6.9 m6/9 -(b6),minb6 -7(b5),min7-5 m7b5 -9,min9 Dr. Chord Pro...
- Page 22 Operating Root note Chord type 1 Chord type 2 Chord type 3 Name Other description -9,min9 m9b5 m9-5,min9b5 maj7 m9(maj7) m9+7,-9+7 -11,min11 -13,min13 add9 m(add9) maj7 m(maj7) m(+7) maj7 maj7#11 M7#11 maj9 maj13 sus2 5add2 chord finder...
- Page 23 Operating Root note Chord type 1 Chord type 2 Chord type 3 Name Other description sus4 aug.#5 +7b9 7+5(b9) +7#9 7+5(#9) 9#5,9+5 dim5 ° dim7 °7 add9 add9 Dr. Chord Pro...
- Page 24 Operating Different chord voicings under the same chord name: One chord can have many different voic‐ ings. A voicing refers to how the chord notes are arranged. It depends on where the chord is played on the guitar and on the fingering. The device provides 5 different voicings for each chord.
- Page 25 If you have pressed [OK] after completing the input for the last string, the cursor will still move to the next string, so that you can make further entries here. The unit will not start searching for names until you have made entries for the last string and have then pressed [OK]. Dr. Chord Pro...
- Page 26 Operating Transforming standard chords: When you have finished entering the chord position, press [OK]. The device now performs a standard transformation of your inputs. This follows 2 rules: (1) If the fret number can go back to 1, the unit will perform the transformation for fret 1, as shown on the left (A-A).
- Page 27 Chord2 mode, press [MODE / HAND SET] for approximately 2 seconds to indicate ‘Right’ or ‘Left’ in the display. The selection flashes. With you select the desired mode. Then press [OK] to confirm your choice and exit this setting. Dr. Chord Pro...
- Page 28 Operating Operating mode ‘Tuner’ After you have called up this mode, you can start tuning with the device as soon as it detects a signal input. The signal can be detected via the built-in microphone or the signal input. The microphone is only active when there is no plug in the INPUT socket.
- Page 29 If the tone is too high or too low, the LED will light red. If the tone is exactly tuned, the LED indicator lights green and the measuring pointer is in the middle position. Dr. Chord Pro...
- Page 30 Operating Operating mode ‘Metronome’ In this mode, the display appears as shown in the illustration on the left. Setting the ‘Beats’: Press to move the cursor to ‘BEATS’ position. Then press to set Beat values between 0 and 9. You can then move the cursor with to the desired position to adjust other parameters.
- Page 31 To finish these settings, press [OK] to confirm. Whenever you have changed settings, press [OK] to save. Otherwise, the cursor continues to flash. Operating mode ‘Tone gener‐ ator’ In this mode, the display appears as shown in the illustration on the left. Dr. Chord Pro...
- Page 32 Operating Tone selection: Press to select the desired tone from the 12 available notes between C and B. The selected note name is displayed in the ‘NOTE’ area. Calibration: Press to move the cursor to ‘A4’ position. Then press to set the A4 frequency to a value between 410 and 480 Hz.
-
Page 33: Technical Specifications
Calibration 430 - 450 Hz Tone generator C4 (32.7 Hz) - B4 (493.883 Hz) Metronome 30 - 250 bpm Dimensions (B × H × T) 120 × 70 × 28 mm Weight approx. 150 g (incl. battery) Dr. Chord Pro... -
Page 34: Protecting The Environment
Protecting the environment Protecting the environment Disposal of the packaging mate‐ rial For the transport and protective packaging, environmentally friendly materials have been chosen that can be supplied to normal recycling. Ensure that plastic bags, packaging, etc. are properly disposed of. Do not just dispose these materials with your normal household waste, but make sure that they are fed to a recovery. - Page 35 Dispose this device through an approved waste disposal firm or through your local waste facility. When discarding the device, comply with the rules and regulations that apply in your country. If in doubt, consult your local waste disposal facility. Dr. Chord Pro...
- Page 36 Notes chord finder...
- Page 37 Notes Dr. Chord Pro...
- Page 38 Notes chord finder...
- Page 40 Musikhaus Thomann · Hans-Thomann-Straße 1 · 96138 Burgebrach · Germany · www.thomann.de...
Need help?
Do you have a question about the Dr. Chord Pro and is the answer not in the manual?
Questions and answers