
Related Manuals for Motomaster 009-5097-2


Summary of Contents for Motomaster 009-5097-2
-
Page 1: Air Compressor
009-5097-2 DUAL POWER AIR COMPRESSOR IMPORTANT: INSTRUCTION Please read this manual carefully before using this tool and keep it for future reference. MANUAL... - Page 2 This MotoMaster® product carries a three-year warranty against defects in workmanship and materials. At its discretion, MotoMaster Canada agrees to have any defective part(s) repaired or replaced free of charge, within the stated warranty period, when returned by the original purchaser with proof of purchase.
-
Page 3: Table Of Contents
TABLE OF CONTENTS Specifications Safety Introduction Safety Danger Warning Caution Know Your Air Compressor Preparation Key Parts Diagram Parts List Operation Operation - 12 V DC Mode Operation - 120 V AC Mode Maintenance Cleaning and Storage Troubleshooting SAVE THESE INSTRUCTIONS This manual contains important safety and operating instructions. -
Page 4: Specifications
009-5097-2 / contact us 1-888-942-6686 SPECIFICATIONS MODEL 5097 VOLTAGE/HERTZ/PHASE/CURRENT 120/60/1/1.5 A MAXIMUM WORKING PRESSURE 120 PSI VOLTAGE DC 12 V 12 V (For use with 12 V DC POWER REQUIREMENT DC power outlet only) NOTE: This unit is equipped with fuse protection. -
Page 5: Safety
INTRODUCTION This manual contains information that relates to PROTECTING PERSONAL This air compressor is designed to SAFETY and PREVENTING EQUIPMENT inflate the tires of cars, bikes, ATVs, PROBLEMS. It is very important to sports equipment and other small read this manual carefully and inflatable items. -
Page 6: Safety
009-5097-2 / contact us 1-888-942-6686 SAFETY DANGER • The warnings, cautions and Keep children away from the • instructions discussed in this work area. Do not allow instruction manual may not bystanders and visitors to cover all possible conditions and handle the product. -
Page 7: Warning
WARNING • Risk of eye injury: Wear safety glasses with side shields when • DO NOT allow unskilled or operating the tool and verify that untrained individuals to operate others in the work area are also the power tool. wearing safety glasses. Safety •... -
Page 8: Caution
009-5097-2 / contact us 1-888-942-6686 CAUTION • DO NOT carry the air compressor by the air hose or • Do not wear watches, rings, power cord, as doing so may bracelets or loose clothing lead to damage. when using the tool. These can get caught in the moving parts, •... -
Page 9: Know Your Air Compressor
PREPARATION • Use only a two-wire extension cord that has a two-blade plug and a • The vehicle’s 12 V battery two-slot receptacle that will accept should be fully charged to get the plug on the product. Make the best performance from your sure your extension cord is in air compressor. - Page 10 009-5097-2 / contact us 1-888-942-6686 A double-insulated product is marked with the words “Double insulation” or “Double insulated.” The double-insulation symbol may also be marked on the product. • Store unused equipment. When not in use, tools must be stored in a dry location to prevent rust.
-
Page 12: Parts List
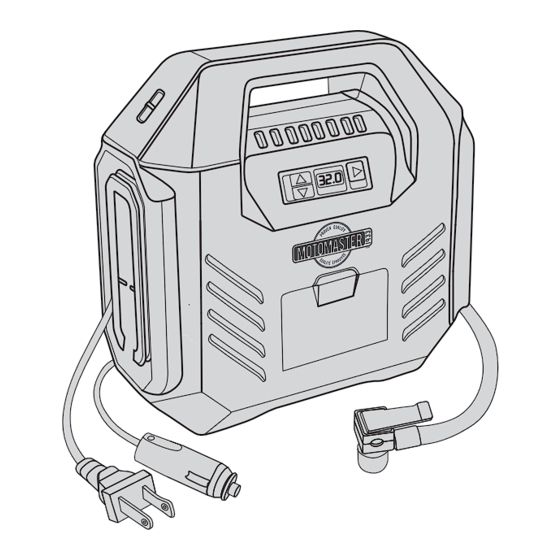
009-5097-2 / contact us 1-888-942-6686 PARTS LIST No. Description No. Description Quick-connect valve Power selector switch adaptor Increase/decrease Presta valve adaptor preset PSI level button Digital pressure gauge Sports needle Run/pause power Mattress nozzle switch Carrying handle 120 V AC power cord... -
Page 13: Operation
Inside Spread Display OPERATION - 12 V DC MODE • Place the air compressor on a flat and stable surface. fig. A • Insert the 12 V DC power cord (1) into 12 V DC power outlet (2) for automatic continuous supply of 12 V current to the air (fig. - Page 14 009-5097-2 / contact us 1-888-942-6686 • The digital pressure gauge displays the current pressure of fig. D the item you are inflating. The LCD reading (1) will be static when the LCD readout screen is displaying the current PSI (fig.
- Page 15 • Press the run/pause button (1) to turn on the air compressor. fig. F The preset PSI level can be changed during inflation, by pressing the buttons to the new desired PSI level. The air compressor will shut off automatically at the desired MOM-95097-06 preset PSI level that you have programmed into the digital...
-
Page 16: Operation - 120 V Ac Mode
009-5097-2 / contact us 1-888-942-6686 OPERATION - 120 V AC MODE fig. H • Place the air compressor on a flat and stable surface. • Insert the 120 V AC power cord (1) into a grounded 120 V AC... - Page 17 • The digital pressure gauge will display the current pressure of fig. K the item you are inflating. The LCD reading (1) will be static when the LCD readout screen is (fig. K) displaying the current PSI MOM-95097-10 • Press the button (1) on the digital pressure gauge to set the fig.
- Page 18 009-5097-2 / contact us 1-888-942-6686 • To turn the air compressor on, push the run/pause button (1). fig. M The preset PSI level can be changed during inflation by pressing the buttons to the new desired PSI level. The air...
-
Page 19: Maintenance
CLEANING AND STORAGE • Turn the power selector switch to “Off” position and unplug the cord. • Wipe the plastic parts clean using mild soap and warm water. DO NOT allow moisture or water to get into the interior moving parts. •... -
Page 20: Troubleshooting
009-5097-2 / contact us 1-888-942-6686 The following chart lists common operating issues and solutions. Please read it carefully and follow all instructions closely. Problem Possible Causes Solutions 1. Preset pressure 1. Adjust the preset pressure setting is below the setting to higher pressure.
Need help?
Do you have a question about the 009-5097-2 and is the answer not in the manual?
Questions and answers