
Related Manuals for Hark HK0526

Summary of Contents for Hark HK0526
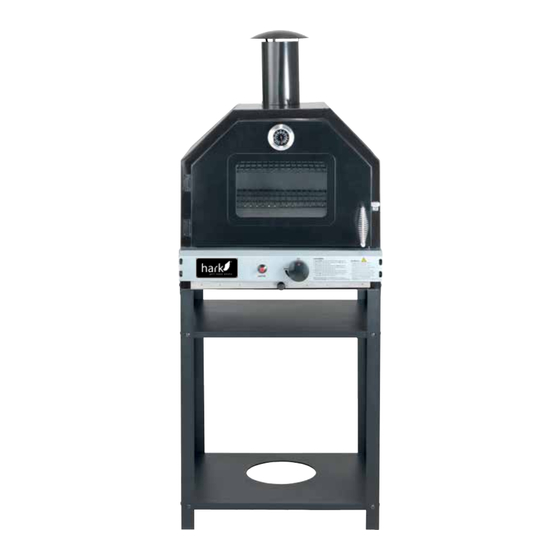
- Page 1 g r i l l r o a s t s m o k e GAS PIZZA OVEN ASSEMBLY AND OPERATION INSTRUCTIONS...
-
Page 3: Warranty Details
Gas Pizza oven Warranty Details Hark Enterprises Pty Ltd warrants that this genuine HARK® brand product is free from defects in workmanship and materials for 12 months from the date of purchase. If as a result of normal use in compliance with the manufacturer’s instructions the product fails to operate within the warranty period, we will repair or replace the product. - Page 5 Model No.: HK0526 Product Name: GAS PIZZA OVEN - For Universal (LPG) use only HAZARDOUS FIRE OR EXPLOSION MAY RESULT IF INSTRUCTIONS ARE IGNORED. It is the consumer's responsibility to see that the pizza oven is properly assembled, installed, and taken care of. Failure to follow instructions in this manual could result in injury and/or property damage.
-
Page 6: Expanded View
EXPANDED VIEW Line drawings are not to scale. Specifications are subject to change without notice. stone Wire support grid... -
Page 7: Hardware Pack
HARDWARE PACK Spacer INSTRUCTIONS FOR YOUR NEW GAS PIZZA OVEN Tools needed for assembly Phillips Head Screwdriver (not included) Before assembly Please read all instructions thoroughly before proceeding. Find a large, clean area in which to assemble your pizza oven. Please refer to the parts list and assembly diagram as necessary. - Page 8 A. ASSEMBLY OF THE GAS PIZZA OVEN STEP 1 ATTACH MOULDED BLACK FEET — Attach the (4) molded, black feet to the bottom of the Oven using (4) M4x20 screws as shown in Fig. 1 Fig. 1 STEP 2 ATTACH SMOKE STACK —...
- Page 9 STEP 3 ATTACH CONTROL KNOB — With the Dot on the Control Knob in the top position, push the Knob firmly onto the Valve Stem as shown in Fig. 3 Fig. 3 STEP 4 ATTACH HEAT REFLECTOR PLATE — Attach the Back Heat Reflector plate to the back of the Oven. Place (4) M5x30 screws through the (4) holes in the Plate, slide a Spacer onto each screw and then an M6 Washer onto each screw.
- Page 10 STEP 5 ASSEMBLING THE STAND — The stand is made up of the top storage shelf (part 15), the bottom gas bottle shelf (part 16) and the front and back legs. Please note the bottom shelf has an opening to hold the gas bottle.
- Page 11 STEP 7 ATTACHING THE PIZZA OVEN TO THE STAND — Place the Stand upright. With a Helper, put the Oven in position on top of the Legs, and make certain that the holes in the Legs match the attaching threaded holes in the sides of the Oven. Fasten the Oven to the stand with (4) M6x10 screws as shown in Fig.
-
Page 12: The Gas System
B. THE GAS SYSTEM GAS AND REGULATOR INFORMATION This pizza oven is designed for Propane (LPG) gas use only. Gas bottles with a "POL" connection are to be used with this pizza oven. Suitable regulators must have an outlet pressure of 2.75 kPa. You must have the proper regulator and bottle in order for the pizza oven to operate safely and efficiently. -
Page 13: Installation
LEAK TESTING Open the gas control valve on the cylinder. Check for leaks by brushing a solution 1/2 water and 1/2 soap over all gas system joints, including all valve connections, hose connections and regulator connections. DO NOT USE AN OPEN FLAME to test for leaks at anytime. If bubbles form over any of the joints, there is a leak. -
Page 14: Operation
D. OPERATION WARNINGS — This pizza oven should not be used indoors. — Read the instructions carefully before using the appliance. — Caution: Accessible parts may be very hot. Keep young children away. — This appliance is not intended to be installed or used on a recreational vehicle or marine environment. -
Page 15: Manual Ignition
times until burner has lit. If the burner has not lit, repeat this process. 4. If the burner has not lit after 3 attempts, turn off the gas tap, wait 5 minutes and then repeat step 3. If the pizza oven still fails to light, please refer to the manual ignition instructions below. -
Page 16: Care And Maintenance
F. CARE AND MAINTENANCE Regularly clean your pizza oven between uses and especially after extended periods of storage. Never douse the pizza oven with water when its surfaces are hot. In order to extend the life and maintain the condition of your pizza oven, we strongly recommend that the unit be cooled, cleaned, dried and then covered when left outside for any length of time, especially during the winter months. - Page 17 Diagrammatical Representation of "OUTDOOR AREAS" THIS APPLIANCE SHALL ONLY BE USED IN AN ABOVE GROUND OPEN-AIR SITUATION WITH NATURAL VENTILATION, WITHOUT STAGNANT AREAS, WHERE GAS LEAKAGE AND PRODUCTS OF COMBUSTION ARE RAPIDLY DISPERSED BY WIND AND NATURAL CONVECTION. THIS PIZZA OVEN IS NOT DESIGNED FOR MARINE USE. ANY ENCLOSURE IN WHICH THE APPLIANCE IS USED SHALL COMPLY WITH ONE OF THE FOLLOWING: —...
- Page 18 — Within a partial enclosure that includes an overhead cover and more than two walls, the following shall apply: a) at least 25% of the total wall area is completely open, and b) at least 30% of the remaining wall area is open and unrestricted (Refer to examples 3, 4 and 5).
-
Page 19: Replacement Parts
Made in China Guangdong Canbo Electrical Co., Ltd. Made in China This grill is manufactured by: Imported by: Hark Enterprises Pty Ltd Guangdong Canbo Electrical Co., Ltd. Unit 11, 41-49 Norcal Rd No.268 Qixin Road, Xingtan Town, Nunawading, VIC, 3131... - Page 20 Hark Enterprises Pty Ltd Unit 11, 41-49 Norcal Rd, Nunawading, VIC 3131 T: 1300 799 787 E: service @ hark.com.au W: www.hark.com.au...
Need help?
Do you have a question about the HK0526 and is the answer not in the manual?
Questions and answers