Fisher & Paykel RB60V18 Installation And User Manual
Integrated
Hide thumbs
Also See for RB60V18:
- Installation instructions and user manual (48 pages) ,
- Operating instructions manual (8 pages) ,
- Installation manual (52 pages)

Related Manuals for Fisher & Paykel RB60V18


Summary of Contents for Fisher & Paykel RB60V18
-
Page 1: Installation Instructions
INSTALLATION INSTRUCTIONS USER GUIDE Integrated Fridge-Freezer RB60V18 model NZ AU GB IE EU HK IN SG CN... -
Page 3: Table Of Contents
CONTENTS Introduction Safety and warnings Installation instructions — General Installation instructions — Refrigerator Installation instructions — Trim kit Moving or storing your refrigerator Operating instructions Interior features Maintenance Cleaning care — Interior/exterior Storing food in your refrigerator Storing food in your refrigerator compartment and variable-temperature drawer Storing food in your freezer Troubleshooting Wiring diagram Manufacturer’s Warranty — NZ AU GB IE EU HK IN SG... -
Page 5: Introduction
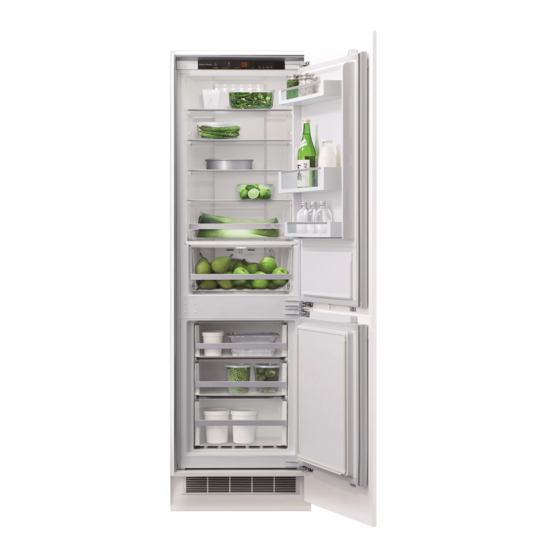
As your life changes, so can your refrigerator. This book explains the features and functions, and will help you get the most out of your refrigerator. We hope you enjoy your new refrigerator. RB60V18 refrigerator (Shown with door panels) -
Page 6: Safety And Warnings
SAFETY AND WARNINGS WARNING! Electric Shock Hazard Read and follow the safety and warnings outlined in this user guide before operating this appliance. Failure to do so can result in death, electric shock, fire or injury to persons. This refrigerator contains flammable refrigerant isobutane (R600a). - Page 7 SAFETY AND WARNINGS • To avoid hazard due to instability of the appliance, it must be fixed in accordance with installation instructions. • Keep ventilation openings, in the appliance enclosure or in the built-in structure, clear of obstruction. • Do not use mechanical devices or other means to accelerate the defrosting process.
- Page 8 SAFETY AND WARNINGS • Repair or replace immediately all electric service cords that have become frayed or otherwise damaged. Do not use a cord that shows cracks or abrasion along its length or at either the plug or appliance end. •...
- Page 9 SAFETY AND WARNINGS Disposal • Extreme care must be taken when disposing of your old appliance to avoid hazards: – The flammable refrigerant gas must be safely removed. – The thermal insulation foam in this appliance contains flammable insulation blowing gases, any exposed foam may be highly flammable and must be carefully treated during disposal.
- Page 10 SAFETY AND WARNINGS Power failure — food safety • Do not refreeze frozen foods that have thawed completely. The food may be dangerous to eat. Follow the recommendations below if you discover food in your freezer has thawed: – Ice crystals still visible — food may be refrozen but should be stored for a shorter period than recommended.
-
Page 11: Installation Instructions - General
INSTALLATION INSTRUCTIONS — GENERAL Please follow the steps for installation to ensure your appliance operates correctly. Location Your refrigerator should not be located in direct sunlight or next to any heat generating appliance such as a cooktop, oven or dishwasher. Power To ensure that the appliance is not accidentally switched off, connect your refrigerator ●... -
Page 12: Installation Instructions - Refrigerator
INSTALLATION INSTRUCTIONS — REFRIGERATOR Components list — Refrigerator installation Clearance adjustment plate Bottom attachment bracket Top attachment bracket cover H0060212285 H0060106782 H0060222453 (2 installed) Hinge cover Bottom attachment Upper fastenings H060210290 bracket cover H0060113353 (4 installed) H0060210289 Cabinet attachment bracket Position adjustment plate Cabinet attachment bracket cover H0060113352 H0060222989... - Page 13 INSTALLATION INSTRUCTIONS — REFRIGERATOR Exploded view...
- Page 14 INSTALLATION INSTRUCTIONS — REFRIGERATOR Product and minimum clearance dimensions PRODUCT DIMENSIONS Overall height 1773 Overall width Overall depth Top door height 1066 Hinge gap height Bottom door height CABINETRY DIMENSIONS (including minimum clearances) Inside height 1782 – 1786 Inside width 564 – 570 Overall depth min.
- Page 15 INSTALLATION INSTRUCTIONS — REFRIGERATOR 1. Preparations before installation Door hinge This model is right-hand hinged, with a left-hand door opening. If required, you can change this model to left-hand hinged and right-hand door opening. To do this, use a flat-head screwdriver to remove the covers to the left and right of ●...
- Page 16 INSTALLATION INSTRUCTIONS — REFRIGERATOR Clearance adjustment plate/sheet If 18mm cabinet is used, clearance adjusting plate is not needed. ● ● If 15mm cabinet is used, clearance adjusting plate is needed. ● ● Hinge exchange and enlarged view of clearance adjustment plate Cabinet attachment bracket and clearance adjustment plate Fix the cabinet attachment bracket to the refrigerator with the screws provided.
- Page 17 INSTALLATION INSTRUCTIONS — REFRIGERATOR Air flow stops The air flow stops are located on the back cover of the compressor. Adjust these air flow stops to ensure they make contact with the cabinet. Air flow stops Adjusting the air flow stops Door gasket baffle Remove the door gasket baffle from the door and then store for future transportation.
- Page 18 INSTALLATION INSTRUCTIONS — REFRIGERATOR 2. Placing the refrigerator into the cabinet Pull the power cord through the hole at the back of the cabinet or if the power socket is inside the cabinet, plug in the refrigerator before installing it into the cabinet. Take care not to kink or bend the power cord as a damaged cord is a fire risk.
- Page 19 INSTALLATION INSTRUCTIONS — REFRIGERATOR Top of kitchen cabinet 3. Dismantling the top attachment brackets and removing the door magnet Open the refrigerator door and remove the top attachment bracket cover by drawing it upwards. Do the same for the freezer. Move the rulers vertically so the top of the rulers latch onto the cabinet above.
- Page 20 INSTALLATION INSTRUCTIONS — REFRIGERATOR 4. Attaching the top attachment bracket to the upper cabinet door Lay the upper cabinet door (face down) onto a clean floor. Attach the top attachment bracket to the top of the cabinet door. Adjust to ensure the centre line of the top attachment bracket aligns with the centre of the cabinet door.
- Page 21 INSTALLATION INSTRUCTIONS — REFRIGERATOR 5. Attaching the upper cabinet door Open the refrigerator door, hang the upper cabinet door onto the height adjustment screws (at the upper sides of the refrigerator) and fix with hex screws. Do not fasten the screws too tightly as to allow for some horizontal movement of the ●...
- Page 22 INSTALLATION INSTRUCTIONS — REFRIGERATOR 6. Attaching the top attachment bracket to the lower cabinet door Lay the lower cabinet door (face down) onto a clean floor. Attach the top attachment bracket to the top of the cabinet door. Adjust to ensure the centre line of the top attachment bracket aligns with the centre of the cabinet door.
- Page 23 INSTALLATION INSTRUCTIONS — REFRIGERATOR 7. Attaching the lower cabinet door Open the freezer door, hang the cabinet door onto the height adjustment screws and fix with a hex screw. Do not fasten the screws too tightly, allow for some horizontal movement of the ●...
- Page 24 INSTALLATION INSTRUCTIONS — REFRIGERATOR 8. Top adjustment of the cabinet doors Fix the upper hook of the door to the cabinet door. Use a spanner to turn height adjustment nut (A) (approximately 5mm of adjustment is possible). If the height adjusting nut is difficult to adjust, check the left and right clearances of ●...
- Page 25 INSTALLATION INSTRUCTIONS — REFRIGERATOR 9. Bottom adjustment of the cabinet doors Loosen the screws slightly, adjust the depth (A) and then tighten the screws. Insert the wood screws into the remaining holes in the bottom adjustment bracket after adjusting the horizontal positioning of the cabinet door. Side view Depth adjustment Cabinet door...
- Page 26 INSTALLATION INSTRUCTIONS — REFRIGERATOR 10. Finishing work Positions of final adjustments...
- Page 27 INSTALLATION INSTRUCTIONS — REFRIGERATOR Insert the top adjustment bracket cover onto the top adjustment bracket (2 places, refer to A). Upper door Lower door When changing the hinge position, remember to insert hinge hole sheets (4 places, refer to B). For left-opening door, take off the hinge hole sheets and change the position of the ●...
-
Page 28: Installation Instructions -Trim Kit
INSTALLATION INSTRUCTIONS —TRIM KIT Components list — Trim kit installation Top trim clip Side trim clip Trim end LH Trim end RH Screw H0060114628 H0060114629 H0060224901 H0060224901A H0130100516 (20) Top corner Top corner Top corner Top corner hinged RH non hinged RH non hinged LH hinged LH H0060224899 H0060224899A... - Page 29 INSTALLATION INSTRUCTIONS —TRIM KIT Mounting the trim clips to the cabinetry Attach brackets at ‘Installation Instructions — Refrigerator’, ‘1. Preparations before installation’. 15mm Drill hole 15mm back from front edge of cabinet for side trim clips 130mm 130mm...
- Page 30 INSTALLATION INSTRUCTIONS — TRIM KIT Installation of trim kit Attach trims at ‘Installation Instructions — Refrigerator’, ‘10. Finishing work’. Note: top trim ( ) is correct length for cabinets with 16mm wall thickness. For 18mm wall thickness, 4mm will need to be cut off the top trim...
-
Page 31: Moving Or Storing Your Refrigerator
MOVING OR STORING YOUR REFRIGERATOR If your refrigerator is turned off for any reason, wait 10 minutes before turning it back on. This will allow the refrigeration system pressures to equalise before restarting. Moving your refrigerator Turn off the appliance by pressing the button for 3 seconds, turn it off at the wall ●... -
Page 32: Operating Instructions
OPERATING INSTRUCTIONS Control panel Control panel Note: control panel shows all icons and options available on the control panel where in fact icons and options will only be visible when they have been selected or interacted with. Power Off/On Press to turn the appliance off or on. - Page 33 OPERATING INSTRUCTIONS Setting/changing the temperature of a compartment Press the ‘Compartment’ select button to scroll through the compartments indicated on the compartment icon. Stop when the compartment you wish to set is illuminated eg the refrigerator compartment. Selecting the refrigerator compartment Press the ‘Temperature’...
- Page 34 OPERATING INSTRUCTIONS Setting a special function Fast Freeze This function helps you get the best possible results when freezing fresh food. ‘Fast Freeze’ boosts the freezing speed by dropping the freezer compartment to a colder temperature for a preset time to ensure freshness, texture and taste are retained during the freezing process.
- Page 35 OPERATING INSTRUCTIONS Holiday Mode This function allows your refrigerator to run at an efficient state to save you energy when you are away. Be sure to remove any perishable food items or items close to their expiry dates before activating the ‘Holiday Mode’. To activate and deactivate ‘Holiday Mode’: To activate ‘Holiday Mode’...
- Page 36 OPERATING INSTRUCTIONS IMPORTANT! The ‘POWER’ button is not equivalent to turning off the power at the wall. For cleaning and maintenance, the appliance must be disconnected from the power supply at the wall socket. Display screen The display screen will remain illuminated while the refrigerator door is open. Power failure memory function The fridge will keep its original settings when power is restored after a power failure.
-
Page 37: Interior Features
INTERIOR FEATURES Variable-temperature drawer This drawer is controlled by a separate system to the refrigerator and freezer compartments to provide you with greater flexibility of food storage. Different foods require different storage temperatures so we have designed this drawer to operate from -5°C to 3°C. This enables you to set the perfect temperature based on what you are storing in the drawer. - Page 38 INTERIOR FEATURES Shelves Your refrigerator is fitted with shelves specially designed to retain spills, making clean up easier. The shelves can be repositioned at different ● ● heights to accommodate different food storage container sizes and heights. To remove the shelf, use the front edge to pull ●...
-
Page 39: Maintenance
MAINTENANCE Replacement of the interior light The LED lighting in your refrigerator saves energy and has a long lifetime. However, if replacement of an LED is required, simply call your Fisher & Paykel trained and supported service technician and they will replace it for you. Interior light: 12V, max 2.5W. -
Page 40: Cleaning Care - Interior/Exterior
CLEANING CARE — INTERIOR/EXTERIOR Interior It is important to keep the interior of the refrigerator and freezer clean to help prevent ● ● food from becoming contaminated during storage. The amount and types of food stored determines how often cleaning should be carried ●... -
Page 41: Storing Food In Your Refrigerator
STORING FOOD IN YOUR REFRIGERATOR Storage areas There are recommended storage areas for various foods. As cold air circulates inside the refrigerator, there is a temperature difference within both the fresh food and freezer compartments. Different foods should be placed in different areas according to their properties. -
Page 42: Storing Food In Your Refrigerator Compartment And Variable-Temperature Drawer
STORING FOOD IN YOUR REFRIGERATOR COMPARTMENT AND VARIABLE-TEMPERATURE DRAWER Storing fresh, perishable foods in your refrigerator helps to extend storage times. The cold temperatures slow down the major causes of food spoilage — possible growth of bacteria, moulds and yeasts, and microbial chemical and physical reactions. Fresh food care IMPORTANT! The quality of food before it is placed in the refrigerator is critical to successful storage. - Page 43 STORING FOOD IN YOUR REFRIGERATOR COMPARTMENT AND VARIABLE-TEMPERATURE DRAWER Dairy foods and eggs Most pre-packed dairy foods have a recommended ‘use by/best before/best by’ date ● ● stamped on them. Store them in the refrigerator and use within the recommended time. Butter can become tainted by strong smelling foods so it is best stored in a sealed ●...
-
Page 44: Storing Food In Your Freezer
STORING FOOD IN YOUR FREEZER The use of temperatures of -18°C or colder to store food means that the food can be kept for longer periods than when refrigeration temperatures are used. This is because the growth of bacteria, moulds and yeasts are stopped, and microbial chemical and physical reactions are severely restricted at very low temperatures. - Page 45 STORING FOOD IN YOUR FREEZER Meat, poultry and game Do not try to freeze more than 1kg meat per 25L freezer capacity. Meat must be frozen ● ● quickly in order to maintain its texture. Do not stuff poultry before freezing. ●...
-
Page 46: Troubleshooting
TROUBLESHOOTING If there is a problem with your appliance, please check the following points before contacting your local Fisher & Paykel trained and supported service technician or the Customer Care Centre. Product parts and accessories can be purchased through Fisher & Paykel Customer Care Centre or online at www.fisherpaykel.com (this service is available to selected markets only). - Page 47 TROUBLESHOOTING PROBLEM POSSIBLE CAUSE WHAT TO DO Unfamiliar noises. Cabinet not stable or level. Ensure cabinet is on even flooring. Freezer is defrosting. This is normal. Water in the Condensation is formed A small amount of condensation is vegetable bins. by the water produced by beneficial for fruit and vegetable fruit and vegetables.
-
Page 48: Wiring Diagram
WIRING DIAGRAM Power cord plug FC Fan Cooling Fan PC Damper Display Panel PC Door switch SNR1 PC Temperature sensor SNR2 FC Temperature sensor SNR3 Ice Temperature sensor SNR4 Defrost sensor Main control board PC Light Variable temperature compartment light Compressor VCC board Fuse 1... -
Page 49: Manufacturer's Warranty - Nz Au Gb Ie Eu Hk In Sg
MANUFACTURER’S WARRANTY — NZ AU GB IE EU HK IN SG You automatically receive a 2 year Manufacturer’s Warranty with the purchase of this refrigerator covering parts and labour for servicing within the country of purchase. Fisher & Paykel undertakes to: Repair or, at its option, replace without cost to the owner either for material or labour any part of the product, the serial number of which appears on the product, which is found to be defective within TWO YEARS of the date of purchase. - Page 50 MANUFACTURER’S WARRANTY — NZ AU GB IE EU HK IN SG Service under this Manufacturer’s Warranty must be provided by a Fisher & Paykel trained and supported service technician (refer to the ‘Customer Care’ section at the back of this book). Such service shall be provided during normal business hours. This Manufacturer’s Warranty certificate should be shown when making any claim.
-
Page 51: Customer Care - Nz Au Gb Ie Eu Hk In Sg
CUSTOMER CARE — NZ AU GB IE EU HK IN SG Before you call for service or assistance... Check the things you can do yourself. Refer to the installation instructions and your user guide and check that: Your product is correctly installed. You are familiar with its normal operation. -
Page 52: Registration
CUSTOMER CARE — NZ AU GB IE EU HK IN SG In Ireland if you need assistance…* Call the Fisher & Paykel Customer Care Centre and talk to one of our Customer Care Consultants. Phone: 1800 625 174 or 01-8077960 Fax: 1800 635 012 Website: www.fisherpaykel.com Postal address: Fisher &... -
Page 53: Customer Care— Cn
CUSTOMER CARE —CN Before you call for service or assistance... Check the things you can do yourself. Refer to the installation instructions and your user guide and check that: Your product is correctly installed. You are familiar with its normal operation. You have read the ‘Troubleshooting’... - Page 54 EUROPEAN DIRECTIVE 2012/19/EU ON WASTE ELECTRICAL AND ELECTRONIC EQUIPMENT (WEEE) GB This appliance is marked according to the European directive 2012/19/EU on Waste Electrical and Electronic Equipment (WEEE). By ensuring this product is disposed of correctly, you will help prevent potential negative consequences for the environment and human health, which could otherwise be caused by inappropriate handling of this product.
-
Page 56: Www.fisherpaykel.com
www.fisherpaykel.com © Fisher & Paykel Appliances 2017. All rights reserved. The product specifications in this booklet apply to the specific products and models described at the date of issue. Under our policy of continuous product improvement, these specifications may change at any time. You should therefore check with your dealer to ensure this booklet correctly describes the product currently available.
Need help?
Do you have a question about the RB60V18 and is the answer not in the manual?
Questions and answers
how do you remove the temperature control drawer so I can clean it